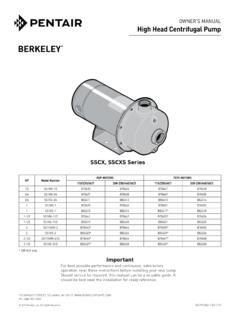
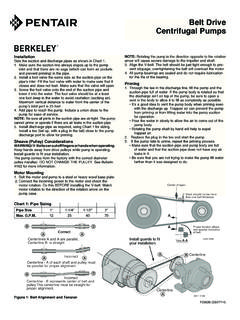
Transcription of InstallatIon, operatIon & parts Manual Model …
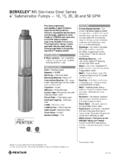
1 DescriptionDouble pipe deep well ejector package ( Model BK4800) includes a deep well ejector, check valve, strainer, plastic pipe adapter, and an assortment of nozzles and venturis to suit your well conditions. This ejector assembly is designed for all 4" and larger double pipe applications. For use with Berkeley Convertible Jet Pump Models 05SL, 07SL, 10SL, 15SL, 10PL, 15PL, 10VM and safety informationFollow safety instructions in your pump owner's sUre pump is turned off and all pressure is re leased before attempting to install the deep well proposition 65 Warning This product and related accessories contain chemicals known to the State of California to cause cancer, birth defects or other reproductive This kit contains seven venturis and five nozzles (See Figure 12, Page 5, Key Nos. 1 and 2).
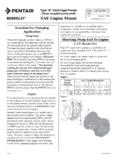
2 Use only one venturi and one nozzle with any installation . Select the correct nozzle and venturi from the Performance Charts on Pages 3 and 4. note: Be sure to find the right pump Model , well depth, and nozzle/venturi combination on chart or pump will not perform according to specifications (See Figures 2, 3, and 4, and Performance Charts on Pages 3, and 4). 2. Inspect ejector body, nozzle, and venturi carefully to BE SURE that they are clean and free of all foreign materials. Dirt, sand, or gravel will plug ejector! 3. Use 5/8" deep-well socket to install nozzle in top (double port end) of ejector body (See Figure 3). Nozzle threads into third set of threads visible inside ejector discharge port (larger port) in ejector body. figure 1 CheckValveAdapterNozzleVenturiEjectorStr ainerJET 3 NozzleEjectorDischargePortInstall Nozzle(Uses 5/8" deepwellsocket)SuctionPortDrivePort1276 1194figure 2 What the deep well ejector doesPump sends part of discharge down drive pipe and through ejector, where flow through nozzle and venturi picks up more water and delivers it to pump suction.
3 This allows pump to lift water more than 25' (the limit for a shallow well pump).293 WRIGHT STREET, DELAVAN, WI 53115 : 888-782-7483 installation , operatIon & parts Manual Model BK4800 Deep Well Double Pipe Ejector Package 2013 Pentair, Ltd. All Rights Reserved. BE317 (Rev. 03/21/13)4. Install venturi in ejector body. Venturi threads into second set of threads in ejector discharge port (over nozzle). End of venturi will extend out of port when it is installed (See Figure 4). 5. Install check valve and strainer on end of ejector body with one port (bottom of ejector - See Figure 5). 6. Wrap 1-1/2 turns of PTFE pipe thread sealant tape onto threaded end of pipe adapter. Thread long adapter (furnished) into ejector discharge port (slide it over venturi to install). Tape and install short adapter (not furnished - purchase locally) in drive port (See Figure 6).
4 Adapters must be tight - if assembly leaks, pump will not lift water from " cased (Drilled) Well 1. Determine length of flexible plastic pipe needed to locate ejector at proper depth (your well driller should supply this information). Measure carefully and cut suction (1-1/4") and drive (1") pipes to : As a guide, set ejector 10 to 20 feet below lowest water level reached with pump running, but always at least five feet above bottom of well (See Figure 7). 2. Connect plastic pipes to adapters with hose clamps (See Figure 8); use two clamps per joint. Put tightening screws on opposite sides of pipe as shown. note: Clamp pipe securely and only use clamps that are all stainless Install steel nipples in sanitary well seal. note: To allow correct alignment of pipes with pump ports, 1-1/4" (suction) pipe must run above 1" (drive) pipe.
5 Adjust height of nipples in well seal to allow for this. 4. Use pipe couplings and adapters to connect nipples to plastic pipe (See Figure 9). PTFE pipe thread sealant tape all threaded joints to prevent : CLAMP PIPE SECURELY; clamps must hold weight of pipes, ejector, and water in pipes. In a 110' well, this can be more than 100 lbs. 2 JET Venturi-same hole asnozzlefigure 4 JET ValveInstallStrainerfigure 5 JET PipeAdaptersfigure 6 Suction PipeDrive Pipe10 to 20 FeetAt least 5 Feetfigure 7 Clamp Suctionand Drive Pipesto Adapters - 2clamps per jointfigure 8figure 9 Steel NipplesCouplingsAdapters5. Install steel elbows on top end of nipples (See Figure 10). PTFE pipe thread sealant tape all threaded joints to prevent leaks!note: Installing elbows at this step may make it more difficult to fill pipe (Step 7); however, they provide a positive stop to prevent pipe from sliding through well seal and disappearing down the well.
6 6. Install ejector in well; install well seal in top of well casing. Tighten seal bolts to form seal with casing and to clamp nipples. 7. While holding pipes SECURELY, fill with water to make sure that connections and check valve do not leak (See Figure 11). Pipes should hold water. If they leak, remove and locate leak. Remake leaking joint with PTFE pipe thread sealant tape or retighten clamp. Repeat installation and fill check until pipes do not leak. 8. Install adapters in elbows and connect horizontal offset piping to pump. Connect horizontal pipe as needed. PTFE pipe thread sealant tape all threaded joints to prevent leaks!3figure 10figure 11performancetaBle ii models 05sl and 07sl Model 05sl Model 07sl 1/2 Hp 3/4 Hp feet to pressure in psi pressure in psi Water 20 30 40 50 20 30 40 50 Gpm with J32p-32 Venturi & #55 nozzle Gpm with J32p-33 Venturi & #51 nozzle 30 40 Gpm with J32p-24 Venturi & #51 nozzle Gpm with J32p-29 Venturi & #54 nozzle 50 60 Gpm with J32p-24 Venturi & #51 nozzle 70 80 90 taBle i models 10pl and 15pl Model 10pl Model 15pl 1 Hp 1-1/2 Hp feet to pressure in psi pressure in psi Water 20 30 40 50 60 20 30 40 50 60 Gpm with J32p-24 Venturi and
7 #51 nozzle Gpm with J32p-28 Venturi & #55 nozzle 30 40 50 60 70 Gpm with J32p-22 Venturi & #53 nozzle 80 90 100 110 4taBle iii models 10sl and 15sl Model 10sl Model 15sl 1 Hp 1-1/2 Hp feet to pressure in psi pressure in psi Water 20 30 40 50 20 30 40 50 Gpm with J32p-33 Venturi & #55 nozzle Gpm with J32p-33 Venturi & #55 nozzle 30 40 50 Gpm with J32p-29 Venturi & #51 nozzle Gpm with J32p-29 Venturi & #55 nozzle 60 10 70
8 80 Gpm with J32p-22 Venturi & #53 nozzle Gpm with J32p-22 Venturi & #54 nozzle 90 100 110 iV models 10Vm and 15Vm J32P-24 20 1 HP Venturi 30 11 4 1 40 10VM #52 50 Nozzle 60 J32P-18 20 1 HP Venturi 30 11 4 1 40 10VM #52 50 Nozzle 60 J32P-24 20 11 2 HP Venturi 30 11 4 1 40 15VM #52 50 Nozzle 60 J32P-18 20 11 2 HP Venturi 30 11 4 1 40 15VM #52 50 Nozzle 60
9 Pipe Disch cat. Jet sizes press Gallons per minute at Depth to Water (not pump setting) - in feet no. no. suct. Drive psi 30 40 50 60 70 80 90 100 110 120 130 140 180 200 220 260 3005replacement parts list Key no.
10 Description Qty. BK4800 1 Venturi 1 each J32P-18 J32P-24 J32P-32 J32P-28 J32P-22 J32P-29 J32P-33 2 Nozzle (#52) 1 each J34P-42 (#51) J34P-41 (#55) J34P-45 (#53) J34P-43 (#54) J34P-44 3 Ejector Body 1 N40-92 4 Check Valve 1 N212-12P 5 Strainer 1 L8-1P 6 Plastic Pipe Adapter 1 U11-104 PMODELBK480041 JET 12 replacement parts illustration293 WRIGHT STREET, DELAVAN, WI 53115 : 888-782-7483notICe D installation , De FonCtIonneMent et Des pI CesMod le BK4800 jecteur pour puits profonds deux tuyaux 2013 Pentair, Ltd. All Rights Reserved. BE317 (R v. 21/03/13)DescriptionL jecteur (Mod le n BK4800) pour puits profonds deux tuyaux comprend un jecteur pour puits profonds, un clapet anti-retour, une cr pine, un adaptateur de tuyau en plastique et un assortiment de buses et d ajutages pour r pondre aux conditions du puits.