Transcription of Installing Your Bat House - Bat Conservation International
1 Installing your Bat House - Wooden Post or steel Pole Installation- Choose a sunny location to install your bat House pole. Bat houses work best with at least 6-8 hours of direct sunlight (if only partial day sun is available- morning sun is preferable). Bat houses should not be lit by bright lights. This is one reason Installing them on existing light or utility poles is a bad idea. Bats may find bat houses more quickly if they are located along forest or water edges where bats tend to fly. However, they should be placed at least 20 to 25 feet from the nearest tree branches, wires or other potential perches for aerial predators Most nursery colonies of bats choose roosts within 1/4 mile of water, preferably a stream, river or lake. Greatest bat- House success has been achieved in areas of diverse habitat, especially where there is a mixture of varied agricultural use and natural vegetation. Single-chambered bat houses do not work well installed on poles.
2 Since larger bat houses are more thermally stable, use only multi-chambered bat houses at least 14 inches wide and 20 inches tall on posts. All bat houses should be mounted at least 10 feet above ground, and 12 to 20 feet is better. Metal predator guards may be helpful, especially on wooden posts. Bat houses can be installed at any time of the year, but they are more likely to be used during their first summer if installed before the bats return in spring. If you are excluding bats from a nearby building, install the bat houses at least two to six weeks before the evicting the bats. It is best to test for local needs before putting up more than three to six houses. Compare houses of different colors or shades and sun exposure. Be sure to use a schedule-40 galvanized steel pole with the inside diameter 2 or greater OR a 4 x6 treated wooden post. A local fencing supply company is the best place to purchase poles and posts.
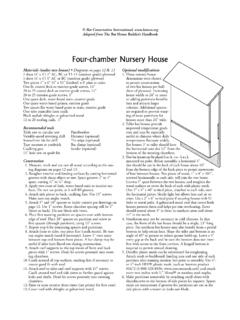
3 Copyright Bat Conservation International , Inc. All rights reserved. SINGLE BAT House ON A WOODEN POST (Single Post Mount) You Will Need: 4x6 pressure treated wooden post (at least 16 ) Pea gravel 2 x4 boards 2 cut to width of bat House 1 cut to at least 6 longer than bat House 1 5/8 exterior grade screws 3 exterior grade screws 3/32 bit (to pre-drill screw holes) 6 lag bolts, hex bolts, or carriage bolts Drill bit sized for bolts Wrenches to fit bolts Exterior grade adhesive caulk (optional) Wood clamps or spring clamps Tape measure, Pencil, Electric Drill Post hole digger Tamp stick Instructions: * Multi-chambered houses only * Make sure there are no underground wires, pipes or cables you ll be digging about 3 feet down. * Wooden posts tend to rot when set directly in concrete or cement. Use pea gravel instead. 1) Cut each 2 x4 board to the width of your bat House .
4 2) Measure and drill pilot holes to ensure screws will attach securely to the bat House frame and do not protrude inside the bat House roosting crevices. The bat House frame typically extends down the sides and along the top 1 . 3) Apply adhesive caulk (optional) between the boards and the bat House and attach the boards to the bat House using 1 5/8 screws. You may want to clamp the boards prior to drilling to ensure they stay in place. 4) Cut the vertical mounting board six inches longer than the bat House . Center the board on top of the horizontal mounting boards so the ends of the board extend at least 3 inches above and below the bat House . Secure the vertical board to the horizontal boards with 3 screws. Make sure the screws do not protrude into the roosting chambers. 5) Pre-drill holes at the top and bottom of the vertical mounting board, and secure the bat House to post with lag screws, hex bolts, or carriage bolts.
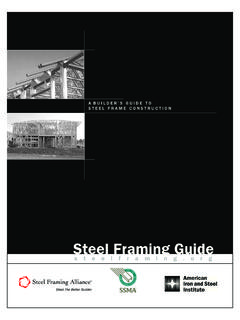
5 6) For poles up to 16 feet, use a post-hole digger (or auger) to dig a hole about 34 and about twice the width of the post. Add an additional 2 of depth for each additional foot of post beyond 16 feet. Tamp the bottom of the hole to make sure it is level. 7) Set the post in the ground and orient it to face the bat House in proper direction (generally south or southeast). Brace the post if needed with scrap wood to ensure it remains straight. Fill the hole with pea gravel, tamping firmly after each three-inch layer of gravel. copyright Bat Conservation International , Inc. All rights reserved. TWO BAT HOUSES ON A WOODEN POST (Single Post Mount) You Will Need: 4 x6 pressure treated wooden post (at least 16 ) Pea gravel 2 x4 boards 4 boards cut to width of bat House (s) 2 boards cut to at least 6 longer than bat House (s) 1 5/8 exterior grade screws 3 exterior grade screws 3/32 bit (to pre-drill screw holes) 8 lag bolts, hex bolts, or carriage bolts Drill bit sized for bolts Wrenches to fit bolts Exterior grade adhesive caulk (optional) Wood clamps or spring clamps Tape measure, Pencil, Electric Drill Post hole digger Tamp stick Instructions: * Multi-chambered houses only * Make sure there are no underground wires, pipes or cables you ll be digging about 3 feet down.
6 * Wooden posts tend to rot when set directly in concrete or cement. Use pea gravel instead. * Mounting two bat houses back-to-back on poles (with one facing north and the other south) is ideal. Cover both with a galvanized metal roof to protect bat houses and allow bats the option of roosting between them out of the rain. 1) Cut four 2 x4 boards to the width of your bat houses (2 for each House ). 2) Measure and drill pilot holes to ensure screws will attach securely to the bat House frame and do not protrude inside the bat House roosting crevices. The bat House frame typically extends down the sides and along the top 1 . 3) Apply adhesive caulk (optional) between the boards and the bat House and attach the boards to the bat House using 1 5/8 screws. You may want to clamp the boards prior to drilling to ensure they stay in place. 4) Cut the vertical mounting boards (one for each House ) six inches longer than the bat House .
7 Center the board on top of the horizontal mounting boards so the ends of the board extend at least 3 inches above and below the bat House . Secure the vertical board to the horizontal boards with 3 screws. Make sure the screws do not protrude into the roosting chambers. 5) Pre-drill holes at the top and bottom of the vertical mounting boards, and secure the bat houses to the post with lag screws, hex bolts, or carriage bolts. 6) For poles up to 16 feet, use a post-hole digger (or auger) to dig two holes about 34 and about twice the width of the posts. Add an additional 2 of depth for each additional foot of post beyond 16 feet. Tamp the bottom of the holes to make sure each one is level. Measure carefully to ensure they are the same depth. 7) Set the posts in the ground and orient them to face the bat House in proper direction (generally south or southeast). Brace the posts if needed with scrap wood to ensure it remains straight.
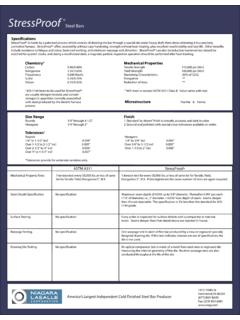
8 Fill the holes with pea gravel, tamping firmly after each three-inch layer of gravel. copyright Bat Conservation International , Inc. All rights reserved. TWO BAT HOUSES ON A WOODEN POST (Double Post Mount) You Will Need: 2 4 x6 pressure treated wooden posts (at least 16 ) Pea gravel 2 x4 or 2 x6 boards 4 boards cut to depth of both bat houses + 2 boards cut to at least 6 longer than bat houses 1 5/8 exterior grade screws 3 exterior grade screws 3/32 bit (to pre-drill screw holes) 8 lag bolts, hex bolts, or carriage bolts Drill bit sized for bolts Wrenches to fit bolts Exterior grade adhesive caulk (optional) Wood clamps or spring clamps Tape measure, Pencil, Electric Drill Post hole digger Tamp stick Instructions: * Multi-chambered houses only * Make sure there are no underground wires, pipes or cables you ll be digging about 3 feet down. * Wooden posts tend to rot when set directly in concrete or cement.
9 Use pea gravel instead. *Mounting two bat houses back-to-back on poles (with one facing north and the other south) is ideal. Place houses inch apart and cover both with a galvanized metal roof to protect the center roosting space from rain. 1) Cut four 2 x4 boards a length that equals the depth of both bat houses plus . These will attach the bat houses to each other with a gap between. 2) Measure and drill pilot holes to ensure screws will attach securely to the bat House frame and do not protrude inside the bat House roosting crevices. The bat House frame typically extends down the sides and along the top 1 . 3) Apply adhesive caulk (optional) between the boards and the bat House and attach the boards to the bat House using 1 5/8 screws. You may want to clamp the boards prior to drilling to ensure they stay in place. 4) Cut the vertical mounting boards (one on each side) six inches longer than the bat House .
10 Center the board on top of the horizontal mounting boards so the ends of the board extend at least 3 inches above and below the bat House . Secure the vertical board to the horizontal boards with 3 screws. Make sure the screws do not protrude into the roosting chambers. 5) Pre-drill holes at the top and bottom of the vertical mounting boards, and secure the bat houses to the post with lag screws, hex bolts, or carriage bolts. 6) For poles up to 16 feet, use a post-hole digger (or auger) to dig a hole about 34 and about twice the width of the post. Add an additional 2 of depth for each additional foot of post beyond 16 feet. Tamp the bottom of the hole to make sure it is level. 7) Set the post in the ground and orient it to face the bat House in proper direction (generally south or southeast). Brace the post if needed with scrap wood to ensure it remains straight. Fill the hole with pea gravel, tamping firmly after each three-inch layer of gravel.