Transcription of Instruction Manual - Minelab
1 Instruction ManualSuccess StoriesTreasure Talk BlogThe latest product Instruction manuals and detector software updates are available at:We also encourage you to visit our other online resources regularly. They are frequently updated and are a continually evolving source for product information."EQUINOX is the most exciting detector I have used in a long time! It just keeps surprising me with what I'm finding in heavily detected parks." Mark Williams, Australia"At heavily hunted beaches when you need to cover ground quickly after a busy beach day, the EQUINOX s amazing recovery speed helps you to stay one step ahead of the beach hunting competition.
2 " Gary Drayton, USAAn asterisk appears throughout the Manual , indicating features only included with the EQUINOX 800 detecting is a fascinating and rewarding activity enjoyed by people all over the world. By getting to know your EQUINOX detector you can become one of the many who find gold nuggets, coins and treasure on a regular EQUINOX is a high -performance detector incorporating Minelab s new Multi-IQ technology. With the assistance of this Instruction Manual , and the accompanying Getting Started Guide, you will quickly learn how to set up your detector for the best wishes you every success on your detecting Detecting Code of Ethics Respect the rights and property of others.
3 Observe all laws, whether national, state or local. Always obtain permission before searching sites. Never destroy historical or archaeological treasures. Leave the land and vegetation as it was. Always fill in your holes after on purchasing your EQUINOX metal @MinelabMetalDetectors/MinelabDetectingC ontentsAssembly & Getting StartedCarton Contents 5 Assembly 6 Assembled Detector 7 Detector Battery 8 Charging the Battery 8 Battery Status Indicator 8 Battery Maintenance 8 Operating With a Power Bank 8 Control Panel 9 LCD Icons 10 Quick Start 11 Global and Local Settings 12 Reset a Search Profile 12 Factory Reset the Detector 12 Detecting BasicsHow Detectors Work 14 Key Detecting Concepts 15 Detecting Technique 16 Holding the Detector 16 Adjusting the Length of the Shafts 16
4 Adjusting the Angle of the Coil 16 Sweeping the Coil 16 Targets 16 Detector Sounds 17 Simple Detecting Exercise 18 Pinpointing Technique 19 Coil Configuration and Pinpointing 19 Pinpointing a Target Manually 19 Target Recovery 20 Digging Tools 20 Recovering a Target 20 Detect ModesDetect Modes 22 Detect Mode Navigation 22 Adjusting Search Profiles 22 Choosing the Right Detect Mode 22 Park 23 Field 24 Beach 25 Gold* 26 Detect Screen FunctionsFrequency 28 Changing the Frequency 28 Single Frequency Operation 28 Frequencies and Detect Modes 28 Multi-IQ Technology 29 Single Frequency Ranges 29 Target ID & Discrimination 30 Target ID 30 Discrimination Scale 30 Typical Target Examples 31 Target ID Accuracy 31 Backlight 32 Turning the Backlight On 32 Adjusting the Backlight Brightness 32 User Profile* 33 Save a User Profile 33 Activating the User Profile 33 Sensitivity
5 34 Sensitivity Indicator 34 Adjusting Sensitivity 34 Recommended Sensitivity Settings 34 Depth Gauge 35 Pinpoint 36 Pinpoint Visualisation 36 Pinpointing a Target 36 Settings MenuSettings Menu 38 Settings 38 Advanced Settings 38 Accessing Advanced Settings 38 Settings Menu Navigation 38 Noise Cancel 39 Auto Noise Cancel 39 Manual Noise Cancel* 39 Ground Balance 40 Manual Ground Balance 40 Auto Ground Balance 40 Tracking Ground Balance 41 Volume Adjust 42 Adjusting the Volume 42 Tone Volume (Advanced Setting) 43 Adjusting Tone Volume 43 Threshold Level 44 Adjusting the Threshold Level 44 Gold Threshold 44 Threshold Blanking 44 Park, Field, and Beach Threshold 44 Threshold Pitch* (Advanced Setting) 45 Adjusting the Threshold Pitch 45 Target Tone 46 Selecting the Number of Target Tones 46 Tone Pitch (Advanced Setting) 47 Adjusting Tone Pitch: 1, 2, or 5 Tones 47 Adjusting Tone Pitch.
6 50 Tones 48 Accept/Reject 49 Creating a Discrimination Pattern 49 All Metal 49 Accepting/Rejecting Detected Targets 49 Tone Break (Advanced Setting) 50 Adjusting Tone Break 50 Recovery Speed 51 Swing Rate 51 Adjusting Recovery Speed 51 Iron Bias (Advanced Setting) 52 Adjusting Iron Bias 52 Detector AudioAudio Options 54 Wireless Audio Latency 54WM 08 Wireless Audio Module 55 Pairing the WM 08 55 Pairing Additional WM 08 Modules 55 Charging the WM 08 55ML 80 Wireless Headphones 56 Pairing Wireless Headphones 56 Adjusting ML 80 Volume 56ML 80 Factory Reset 57 Charging ML 80 Headphones 57ML 80 Auxiliary Cable 57 Smart Phone Call Functions 57 Smart Phone Music Functions 57 Wired Headphones 58 Connecting Wired Headphones 58 Adaptor Cable 58 Connecting Waterproof Headphones 58 Headphone Socket Submersion 58 Care & SafetyEQUINOX Accessories 60 Maintenance & Safety 61 Factory Presets 62 Troubleshooting
7 63 Error Codes 64 Technical Specifications 65 Software Updates 66 Assembly & Getting StartedThis section will show you how to assemble your EQUINOX Series detector, charge the battery, and will introduce you to the control ContentsEQUINOX Series detectors come with everything you need to get started detecting. The EQUINOX 800 comes with additional accessories for even greater a list of the main accessories that are compatible with your detector, read 'EQUINOX Accessories' on page 60. Go online to see the full range at and specifications may vary slightly from those shown and may be subject to 08 wireless audio mm (1/8-inch) wired headphonesGetting Started Guide ( 2) (English and Russian)Carton contents reference (English and Russian)Multi-language screen protector packUSB charging cable with magnetic connectorUSB charging cable with magnetic connectorIncluded with EQUINOX 800 Included with EQUINOX 600ML 80 wireless headphonesUSB charging cableAuxiliary cable mm (1/8-inch) Hard shell caseML 80 Instruction sheetUpper shaft with handleMiddle shaftLower shaftCoil yoke washers ( 2, attached)
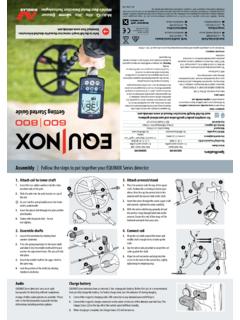
8 Yoke nut and bolt (attached)EQX 11 Double-D smart coilSkidplate (attached)Velcro tabs ( 2)Armrest boltArmrestStandArmrest strap Carton Contents | 5 ContentsAssemblyFollow these easy steps to assemble your EQUINOX Series coil to lower shaft1. Insert the two yoke washers into the holes on either side of the Slide the yoke into the yoke bracket on top of the that the spring loaded pin in the lower shaft is Insert the yoke bolt through the yoke and the yoke bracket. 4. Fasten with the yoke nut - Do not shafts1. Loosen the twistlocks by rotating them Press the spring loaded pin in the lower shaft and slide it into the middle shaft until the pin reaches the adjustment holes.
9 The pin will click into place. 3. Attach the middle shaft to the upper shaft in the same Lock the position of the shafts by rotating twistlocks armrest1. Place the armrest onto the top of the upper shaft. Position the armrest just below your elbow, then align the central hole in the armrest with the nearest hole in the shaft. 2. Insert the screw through the stand, upper shaft and armrest. Tighten the screw With the velcro side facing upwards, thread the armrest strap through both slots in the armrest. Ensure the end of the strap will be fastened outwards from your coil1. Wrap the coil cable around the lower and middle shaft enough times to take up the slack, but so the coil can still tilt without Use the velcro tabs provided to secure the coil cable against the shaft.
10 3. Align the coil connector and plug into the socket in the back of the control unit, tightening the retaining ring. 2 2 3 3 4 4 1 1 2 3 1 2 3 1 2 Assembly | 6 ContentsArmrestArmrest strapAttachment pointsUpper shaftHandle(With internal Lithium-ion rechargeable battery)StandMiddle shaftLower shaftCoil yoke assemblyUpper shaft twistlockMiddle shaft twistlockControl unit (rear view)Charging interfaceCoil cable connector socketSpeakerHeadphone mm (1/8-inch) with waterproof dust-capCoil cableEQX 11 smart coilSkidplateYoke Washers ( 2)Yoke nutYoke bracket Yok eYoke boltAssembled DetectorSide buttons Assembled Detector | 7 ContentsDetector BatteryThe EQUINOX detector is powered by an internal Lithium-ion instructions on how to charge the WM 08 Wireless Audio Module read page 55.