Transcription of INSTRUCTIONS-PARTS LIST 307–713 - Graco Inc.
1 307 713 Rev. DSupercedes Rev. CINSTRUCTIONS-PARTS LISTINSTRUCTIONSThis manual contains importantwarnings and AND KEEP FOR Roller Equipment300 psi (21 bar) MAXIMUM WORKING PRESSUREO perate your pump at the lowest pressure needed for sufficient paint supply to your rollerAdjustable Extension Roller Kit 218 625 Includes Roller Frame, 18 36 in. ExtensionTube, 3/8 in. nap Roller Cover and 45 GunAdapterAdjustable Extension Tubes218 775 18 36 in. ( m)218 776 3 6 ft ( m)218 777 6 12 ft ( m)*45 Gun Adapter 218 9321/4 npt(m) x 7/8 UNF(F)*Flush Kit 218 944 Uses standard garden hose to flush water base paints from the Extension Tube and Roll-er Frame*360 Straight Swivel 218 9311/4 npt(m) x 1/4 npsm(f) swivel*Gun Adapter Kits for non Graco guns218 945 For guns with 3/4 20 nozzle threads (Binks)218 946 For guns with 1 1/16 16 nozzle threads (Wagner)Tip Gaskets 218 600 Package of 5 tip gaskets*See packaging for specific installation instruc-tionsNOTE.
2 For a leak free connection, use pipesealant on all male INC. BOX 1441 MINNEAPOLIS, MN55440 1441 COPYRIGHT 1995, Graco Inc. is registered to EN ISO 900105881 Roller Cover & Roller Frame(See Manual307 755 forparts)AdjustableExtenstionTube360 StraightSwivel45 GunAdapterTip GasketGun Adapter KitFlushKitGraco GunGraco InlineDispensingValve WARNINGINSTRUCTIONSEQUIPMENT MISUSE HAZARDE quipment misuse can cause the equipment to rupture or malfunction and result in serious not modify the tube or roller frame or use parts not designed for this the adjustable extension tube starts to extend during use, stop rolling immediately and engagethe gun safety latch.
3 Check that the locknut on the tube is tight. If the locknut is tight, the tube orthe roller is clogged; follow the Pressure Relief Procedure on page 3 and flush the adjustable extenstion tube only with the roller frame described in this manual. This is notan airless gun extension (pole gun).FIRE AND EXPLOSION HAZARDI mproper grounding, poor ventilation, open flames or sparks can cause a hazardous condition and re-sult in a fire or explosion and serious fresh air ventilation to avoid the buildup of flammable fumes from solvents or the fluidbeing the application area free of debris, including solvent, rags, and HAZARDA void contact with power lines.
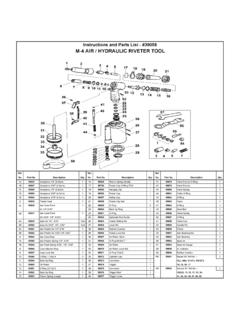
4 Contact with power lines could cause serious injury, including burns all grounding instructions in your separate pump and paint gun instruction with all local, state, and national fire, electrical, and safety Extension Tubes218 775 18 36 in. ( m)218 776 3 6 ft ( m)218 777 6 12 ft ( m)Fig. 105882 TubeRingWasherSealLips of seal must face into tube; greasebefore assembly; do not damage lipsHandleScrewApply LoctiteIncludes replaceable item 108 163, shaft : Always flush the extension tube asinstructed in Flushing on page parts: Stainless Steel, Polyurethane,Plated Steel3 7 7 3 3 ADJUSTABLE EXTENSION ROLLER KIT 218 625 Installation1.
5 Assemble the roller kit as shown in Fig sure the gasket is in place between thegun and the tube to the desired length andtighten the locknut : Always allow cold equipment to warm to roomtemperature before sure the fluid drain valve is closed andthe gun safety latch is engaged. Then startthe pump and set it to the lowest possibleoperating the gun safety latch and triggerthe gun briefly until paint comes to with triggering and rolling thepaint until you determine just how oftenyou need to trigger the gun to keep aneven flow of paint to the the pump pressure only if youcannot get a sufficient supply of paint tothe To adjust the extension tube while paint-ing, engage the gun safety latch.
6 Loosenthe locknut and extend or retract the retracting, some paint in the tube will bepushed out to the roller. Either roll thisexcess paint onto the wall, or completelyretract the tube, drain the excess paint intoa pail, then adjust the tube length. Tightenthe locknut you stop painting, follow thePRESSURE RELIEF PROCEDURE onpage 3. Then elevate the roller end of thetube to prevent paint from the pump, gun and extension tubeimmediately after each use to preventpaint from drying in the equipment anddamaging it. See Flushing, : A Flush Kit, part No.
7 218 944, can be used toflush water base paint from the Extension Tube andRoller Frame. instructions are on the kit Relief ProcedureWARNINGPRESSURIZED EQUIPMENT HAZARDThe system pressure must be manually relieved toprevent the system from starting or spraying acci-dentally. To reduce the risk of an injury from acci-dental spray from the gun, splashing fluid, ormoving parts, follow the Pressure Relief Proce-dure whenever you:Dare instructed to relieve the pressure,Dstop spraying,Dcheck or service any of the system equipment,Dor install or clean the spray the gun safety off the power to the the fluid drain valve (required in yoursystem to relieve pressure).
8 The gun safety latch and triggerthe the gun safety flush the pump, gun, extension tube and rollerframe without disconnecting parts, use the the PRESSURE RELIEF PROCE-DURE on page the roller cover. Refer to the extend the extension tube and tight-en the locknut securely. This is veryimportant to thoroughly flush the the pump for flushing asinstructed in your separate pump instruc-tion manual. Use a solvent that is compat-ible with the paint you are 3 3 WARNINGINJECTION HAZARDKeep your hands and body away formthe roller frame when flushing.
9 Highpressure fluid emitted from the holes inthe frame could cause an injection the extension tube and roller frameaway from yourself or any other turn on the pump and flush the sys-tem thoroughly as described in your sepa-rate pump instruction manual, using thelowest pressure possible. While flushing,loosen the extension tube locknut andpump the tube in and out several off the pump and follow the PRES-SURE RELIEF PROCEDURE WARNINGon page leave water in the pump, gun orextension tube: doing so will cause corro-sion. After flushing with water, flush againwith solvent or mineral spirits in the sys-tem.
10 Retract the extension tube beforestoring the roller cover thoroughly beforestoring 218 625 Includes items 1 935 FRAME, roller See manual 307 755 for parts12218 775 EXTENSION TUBE, 18 36 (460 920 mm)13239 533 ADAPTER 45 , 1/4 npt(m) x 7/8 UNF(F)14166 969 GASKET15107 590 COVER, 1/2 nap1 Fig. 20588315234 Sales Offices: Atlanta, Chicago, Detroit, Los AngelesForeign Offices: Belgium, Canada, England, Korea, Switzerland, France, Germany, Hong Kong, INC. BOX 1441 MINNEAPOLIS, MN55440 1441 PRINTED IN 307 713 February 1985, Revised January 1998