Transcription of IOM :: 40-200-lbf - All Things Backflow
1 BFMM40006-10 MAINTENANCE MANUALC overing Models:40-200 Series (1/4 - 10 )40-200S Series (1/4 - 1 )40-700 Series (3 - 10 ) reduced pressure PRINCIPLE (RPZ) Backflow PREVENTERS 1/4" - 10" ANDREDUCED pressure DETECTOR ASSEMBLY (RPDA) 3" - 10"Conbraco Industries, Inc. Box 247 Matthews, NC 28106 Phone: (704) 841-6000 Fax the lead free version of the 40-200 Series, refer OF CONTENTSR educed pressure Principle Backflow Preventer 1/4" - 10" & reduced pressure Detector Assembly 3" - 10" Section Page I Description and Operation ..2 II Installation ..3 III Trouble Shooting Guide.
2 4 IV Maintenance Instructions 1/4" - 2" ..5 V Maintenance Instructions 2-1/2" - 10" ..6 VI Testing Procedure 1/4" - 10" ..7 - 10 VII Part List 1/4" - 2" (Bronze Body) ..11, 12 VIII Parts List 1/4" - 1" (Stainless Steel Body) ..13, 14 IX Parts List 2-1/2" - 10" (Ductile Iron Body) ..15 - 20 X Parts List 3" - 10" RPDA ..21 - 24 XI Backflow Preventer Test Kits ..262 The RPZ device consists of two independently acting,spring loaded, poppet type check valves, togetherwith a hydraulically dependent, mechanicallyindependent pressure differential relief valve, locatedin the zone between the check valves. Two resilientseated shut-off valves and four test cocks completethe normal operation, the pressure drop across thefirst check valve into the zone area is approximately7 PSI.
3 The second check valve is lightly spring loadedto provide a minimum pressure drop of 1 PSI acrossit. (See Fig. 1)The relief valve operates on a differential pressure on the upstream side of the firstcheck valve acts against the diaphragm to close therelief valve during normal operation. In the event ofback- pressure , the relief valve will open to maintainthe pressure in the zone at least 2 PSI less than theinlet pressure Principle Backflow PreventerI DESCRIPTION AND OPERATIONThe RPDA device consists of a mainline RPZ and aby-pass assembly consisting of an approved RPZassembly and water meter. Each device is equippedwith test cocks for periodic field testing and isnormally supplied with inlet and outlet shut-off information on operation, installation, troubleshooting & testing refer to Installation InstructionBooklet I503600 furnished with each RPDA unit.
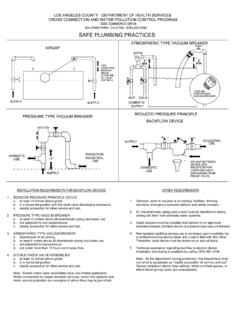
4 Formaintenance instructions see pages 5 & 6. For partslist see pages 21 - pressure DETECTOR ASSEMBLY (RPDA)(No Flow Condition)FIGURE 1 Flow3(a) The RPZ device must be installed in an accessiblelocation to facilitate periodic field testing andmaintenance.(b) The location selected should have adequatedrainage for relief valve discharge. Drainage maybe piped away, providing an approved air gapdevice is used (see Fig. 2). The device shouldnever be placed where it may become submergedin standing water.(c) Flush all upstream piping thoroughly to removeforeign matter prior to installing the device.(d) Install the device in a horizontal position withadequate clearance from walls and/orobstructions, for testing and maintenance. A 12" to30" clearance between the lower most portion ofthe device and flood grade or floor should beprovided.
5 (e) When shut-off valves are supplied separately, theyshould be installed with a test cock on theupstream side of the inlet shut-off valve.(f) A Y strainer can be installed just upstream of theRPZ assembly to eliminate any debris fromentering the device and fouling the check and/orrelief valve.(g) When installing the assembly, use pipe sealant onexternal threads only (if applicable).(h) Use wrench grips provided when installing (ifapplicable).(i) After installing the assembly, and with downstreamor #2 shut-off valve closed, pressurize the RPZdevice and bleed air through test cock #4. Thenopen #2 shut-off :If water continues to drain from the relief valve,check the Trouble Shooting section for probablecauses and INSTALLATIONFIGURE 24 III TROUBLE SHOOTING GUIDESYMPTOM1.
6 Relief valve continuouslydischarges during Relief valve dischargescontinuously during flowand no-flow Relief valve dischargesintermittently in a spitting action duringno-flow Relief valve does not openduring field test No. #2 check valve fails tohold pressure differentialacross #1 check valve islow during field test No. 3(must be a minimum of 3 PSI more than theopening diferentialpressure of the relief valveas recorded in Test No. 1).CAUSEa. #1 check valve fouled #2 check valve fouled withdebris coupled with a backpressure #1 check poppet stem notmoving freely in guide (or#2 check poppet during abackpressure condition.)a. Relief valve fouled Damaged diaphragm(allows water to passthrough from inlet to zone).c.
7 Sensing passage to inletside of diaphragm #1 check poppet stem notmoving freely in pressure fluctuations (waterhammer) from #2 shut-off valve notclosed Test equipment #2 shut-off valve notclosed #2 check valve fouled #2 check poppet stem notmoving freely in #1 check valve fouled Upstream pressurefluctuations causinginaccurate gauge #1 check poppet stem notmoving freely in ACTIONa. Inspect and clean seatdisc and Inspect and clean seatdisc and Inspect for debris ordeposit on poppet stem Inspect and clean reliefvalve seat disc and Replace Inspect and clean passagein cover and Inspect for debris ordeposits on poppet stemor Eliminate or reducepressure Close #2 shut-off valve orinspect for possiblethrough Recheck test Close #2 shut-off valve orinspect for possiblethrough Inspect and clean seatdisc and Inspect for debris ordeposits on poppet stemor Inspect and clean seatdisc and Eliminate Inspect for debris ordeposits on poppet stemor Disassembly Check Valves1.
8 Close #2 shut off valve, then close #1 Bleed pressure from the assembly by opening #2,#3, and #4 test :Caps are spring loaded and should be removedcarefully to avoid personal Unscrew cap using hex head Remove spring and poppet assembly from Disassembly Check Valve PoppetCAUTION:Do not use pliers or other tools which maydamage or scratch the plastic Holding the poppet assembly in one hand,remove screw and retaining washer. 2. Remove the seat All parts should be carefully inspected for anydamage or excessive wear and thoroughly rinsedin clean water prior to reassembly. Replace wornparts as Assembly Check Valve Poppet1. Install new disc in poppet, secure disc withretaining washer and :Due to symmetry of the disc, the old disc may beturned over to obtain an effective Assembly Check Valve1.
9 Install the poppet assembly into the Install the spring (heavy spring, larger diameterwire, goes into #1 check valve) onto the Apply a thin coat of synthetic based lubricant oncap Guide cap over spring and poppet stem andtighten Relief Valve Disassembly1. Remove cover bolts, cover and Grasp the diaphragm plate and pull the assembly straight out of the Holding the relief valve assembly in one hand,remove the screw and retaining Remove the seat Tu r n t h e a s s e m b l y o v e r, k e e p i n g t h e s p r i n gcompressed by holding down on the diaphragmplate, remove the Remove the diaphragm plate, spring and bushingfrom the Remove the O-Ring from the All parts should be carefully inspected for anydamage or excessive wear and thoroughly rinsedin clean water prior to reassembly.
10 Replace wornparts as Assembly Relief Valve1. Apply a thin coat of synthetic base lubricant on O-Rings before Install O-Ring onto Slide bushing over stem and position springonto Position diaphragm plate and compress spring,install screw into Tu r n t h e a s s e m b l y o v e r a n d i n s t a l l s e a t d i s c ,retaining washer and Install O-Ring onto Slide complete assembly into the Position diaphragm over flange, install cover andtighten bolts Open #1 shut-off valve & bleed air out of the unitthrough #2, #3 and #4 test cocks; then open #2shut-off s t c o m p l e t e a s s e m b l y t o e n s u r e p r o p e r o p e r a t i o n .IV 1/4" - 2" MAINTENANCE INSTRUCTIONS6A. Disassembly Check Valves1.