Transcription of Lab 1.5.2: Basic Router Configuration
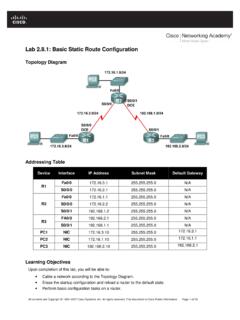
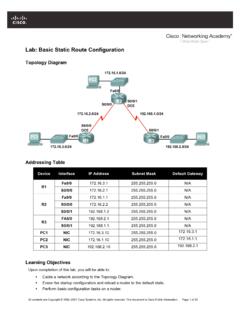
1 All contents are Copyright 1992 2007 Cisco Systems, Inc. All rights reserved. This document is Cisco Public Information. Page 1 of 9 Lab : Basic Router Configuration Topology Diagram Addressing Table Device Interface IP Address Subnet Mask Def.
2 Gateway Fa0/0 N/A R1 S0/0/0 N/A Fa0/0 N/A R2 S0/0/0 N/A PC1 N/A PC2 N/A Learning Objectives Upon completion of this lab, you will be able to: Cable a network according to the Topology Diagram. Erase the startup Configuration and reload a Router to the default state. Perform Basic Configuration tasks on a Router . Configure and activate Ethernet interfaces. Test and verify configurations. Reflect upon and document the network implementation. Scenario In this lab activity, you will create a network that is similar to the one shown in the Topology Diagram.
3 Begin by cabling the network as shown in the Topology Diagram. You will then perform the initial Router configurations required for connectivity. Use the IP addresses that are provided in the Topology Diagram to apply an addressing scheme to the network devices. When the network Configuration is complete, examine the routing tables to verify that the network is operating properly. This lab is a shorter version of Lab : Cabling a Network and Basic Router Configuration and assumes you are proficient in Basic cabling and Configuration file management. CCNA Exploration Routing Protocols and Concepts: Introduction to Routing and Packet Forwarding Lab : Basic Router Configuration All contents are Copyright 1992 2007 Cisco Systems, Inc.
4 All rights reserved. This document is Cisco Public Information. Page 2 of 9 Task 1: Cable the Network. Cable a network that is similar to the one in the Topology Diagram. The output used in this lab is from 1841 routers. You can use any current Router in your lab as long as it has the required interfaces as shown in the topology. Be sure to use the appropriate type of Ethernet cable to connect from host to switch, switch to Router , and host to Router . Refer to Lab : Cabling a Network and Basic Router Configuration if you have any trouble connecting the devices. Be sure to connect the serial DCE cable to Router R1 and the serial DTE cable to Router R2.
5 Answer the following questions: What type of cable is used to connect the Ethernet interface on a host PC to the Ethernet interface on a switch? _____ What type of cable is used to connect the Ethernet interface on a switch to the Ethernet interface on a Router ? _____ What type of cable is used to connect the Ethernet interface on a Router to the Ethernet interface on a host PC? _____ Task 2: Erase and Reload the Routers. Step 1: Establish a terminal session to Router R1. Refer to Lab , Cabling a Network and Basic Router Configuration , for review of terminal emulation and connecting to a Router . Step 2: Enter privileged EXEC mode.
6 Router >enable Router # Step 3: Clear the Configuration . To clear the Configuration , issue the erase startup-config command. Press Enter when prompted to [confirm] that you really do want to erase the Configuration currently stored in NVRAM. Router #erase startup-config Erasing the nvram filesystem will remove all files! Continue? [confirm] [OK] Erase of nvram: complete Router # Step 4: Reload Configuration . When the prompt returns, issue the reload command. Answer no if asked to save changes. What would happen if you answered yes to the question , System Configuration has been modified. Save? _____ _____ The result should look something like this: Router #reload System Configuration has been modified.
7 Save? [yes/no]: no Proceed with reload? [confirm] CCNA Exploration Routing Protocols and Concepts: Introduction to Routing and Packet Forwarding Lab : Basic Router Configuration All contents are Copyright 1992 2007 Cisco Systems, Inc. All rights reserved. This document is Cisco Public Information. Page 3 of 9 Press Enter when prompted to [confirm] that you really do want to reload the Router . After the Router finishes the boot process, choose not to use the AutoInstall facility, as shown: Would you like to enter the initial Configuration dialog? [yes/no]: no Would you like to terminate autoinstall?
8 [yes]: [Press Return] Press Enter to accept default. Press RETURN to get started! Step 5: Repeat Steps 1 through 4 on Router R2 to remove any startup Configuration file that may be present. Task 3: Perform Basic Configuration of Router R1. Step 1: Establish a HyperTerminal session to Router R1. Step 2: Enter privileged EXEC mode. Router >enable Router # Step 3: Enter global Configuration mode. Router #configure terminal Enter Configuration commands, one per line. End with CNTL/Z. Router (config)# Step 4: Configure the Router name as R1. Enter the command hostname R1 at the prompt. Router (config)#hostname R1 R1(config)# Step 5: Disable DNS lookup.
9 Disable DNS lookup with the no ip domain-lookup command. R1(config)#no ip domain-lookup R1(config)# Why would you want to disable DNS lookup in a lab environment? _____ _____ What would happen if you disabled DNS lookup in a production environment? _____ _____ CCNA Exploration Routing Protocols and Concepts: Introduction to Routing and Packet Forwarding Lab : Basic Router Configuration All contents are Copyright 1992 2007 Cisco Systems, Inc. All rights reserved. This document is Cisco Public Information. Page 4 of 9 Step 6: Configure the EXEC mode password. Configure the EXEC mode password using the enable secret password command.
10 Use class for the password. R1(config)#enable secret class R1(config)# Why is it not necessary to use the enable password password command? _____ _____ Step 7: Configure a message-of-the-day banner. Configure a message-of-the-day banner using the banner motd command. R1(config)#banner motd & Enter TEXT message. End with the character '&'. ** !!!AUTHORIZED ACCESS ONLY!!! ** & R1(config)# When does this banner display? _____ Why should every Router have a message-of-the-day banner? _____ Step 8: Configure the console password on the Router . Use cisco as the password. When you are finished, exit from line Configuration mode.