Transcription of Lab Exercise 2 - Bluegrass Community and Technical College
1 Lab Exercise 2 Microscopy Cell Structure Textbook Reference: See Chapter 3 for Cell Structure What you need to be able to do on the exam after completing this lab Exercise : Be able to name the parts of the microscope and give the function of each part. Be able to explain the proper usage and care of the microscope . Be able to demonstrate the proper usage of the microscope by locating, focusing, and identifying a specimen on a microscope slide. Be able to explain how working distance, field size, brightness, and resolution change with increasing magnification. Be able to explain the lens effect and depth of field as it relates to microscope usage. Be able to calculate the total magnification of your microscope . Be able to explain how to prepare a wet mount slide. Be able to identify cell parts on the cell model. Be able to identify various cells and cell structures under the microscope .
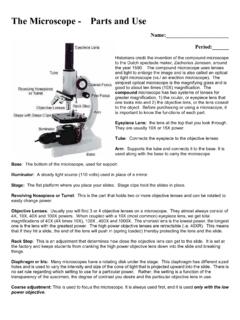
2 2-1 The microscope We will be using a compound light microscope in this lab to view various cells and tissues. It is very important that you learn to use the microscope correctly, and can efficiently get images into the proper focus for study. Know the following parts of the microscope and the function of each part. 2-2 Know the following functions of the microscope parts. PART FUNCTION Arm Used to carry the microscope ; located between the body tube and the base Base Supports the microscope ; used to carry the microscope Body tube (Head) Supports the objective lens system and the ocular lens; directs light toward the ocular lens Coarse focus (adjustment) Brings the specimen into focus by raising or lowering the stage; never use the coarse focus on high power! Condenser Substage lens that concentrates light on the specimen; the condenser control knob will raise and lower the condenser to vary the light; the best position for the condenser is just below the opening in the stage Fine focus (adjustment) Used for final focusing (fine-tuning the image) Iris diaphragm Regulates the amount of light that passes through the stage; located at the base of the condenser Objective lenses Magnify the specimen for viewing; scanning lens (red ring) magnifies 4X, low power lens (yellow ring) magnifies 10X, high power lens (blue ring) magnifies 40X, oil immersion lens (white ring) magnifies 100X Ocular lens (eyepiece) The lens (or lenses) you look through; magnifies the specimen 10X; monocular microscopes have one ocular lens, binocular microscopes have two ocular lens Revolving nosepiece Contains the objective lenses.
3 Use nosepiece to rotate the correct objective lens into place over the opening in the stage Stage Flat platform where the slide is placed for viewing Stage clips Hold the slide in place; two knobs below the stage control the precise movement of the specimen on a mechanical stage Substage light Light source; a light dimmer dial on the base varies the intensity of the light source 2-3 Use and Care of a compound microscope 1. Always use both hands when transporting the microscope . Place one hand on the arm and the other hand under the base. Make sure the cord is not hanging down so you don t trip over it. 2. Carefully place the microscope on your work table. 3. Carefully remove the dust cover and set it aside. 4. Place the cord behind the microscope then plug it into the outlet. Be very careful not to trip over the cord or pull on it. 5. Once you have the microscope plugged in, sit down and find the light switch.
4 The light switch on your microscope is located on the side of the base (see microscope picture above). Turn on the light switch and adjust the intensity of the light with the light dimmer dial (see microscope picture above). 6. Turn and lock the scanning lens (4X objective) in place above the opening in the stage. If the lens is in the correct place, you should see a bright circle of light when you look through the eyepiece. This circle of light is your field of view. 7. Without looking through the eyepiece, lower the stage completely and carefully place the microscope slide on the microscope stage with the specimen on the slide directly over the opening in the stage. If your microscope has stage clips, secure the slide under the stage clips. If your microscope has a mechanical stage, turn the control knobs (below one side of the stage) to position the specimen directly over the opening in the stage.
5 8. While looking through the eyepiece, carefully turn the coarse adjustment knob to raise the stage until the specimen comes into view. 9. Use the fine adjustment knob for final focusing of the image. 10. Since the scanning lens allows you to see a larger portion of your slide in less detail, you may need to increase your magnification. To switch to the next magnification, carefully turn the revolving nosepiece until the low power lens (10X objective) is locked in place. 11. Your compound light microscope is parfocal. If your image was in proper focus before you changed the objective lens, you should only have to do minimal focusing to get the image in focus with the new objective. You should only have to use the fine focus knob on low power to get the image in proper focus. 12. If you need to increase your magnification to the high power lens (40X objective), simply turn the revolving nosepiece until the 40X objective is locked in place.
6 Make sure your image is in proper focus on low power before switching to the high power objective. 2-4 13. Use ONLY the fine adjustment knob to focus on high power. NEVER USE THE COARSE FOCUS KNOB ON HIGH POWER! The high power lens should be very close to your slide when in proper focus. If you turn the coarse adjustment knob while on high power, the objective could easily break your slide. NOTE: If you lose the image on high power, go back to low power and find/focus it before going up to high power again. 14. When you are finished with the microscope , return the scanning lens (4X) to place. Lower the stage completely, remove the slide, and carefully place into the correct box. 15. Carefully clean all the lenses with lens paper. Never use paper towels or any other kind of paper/cloth on your microscope lenses as it may scratch the glass. 16. Carefully unplug the microscope and wrap the cord snugly around the base.
7 17. Place the dust cover over the microscope and carefully carry it with both hands back to where you got it. NOTE: Most likely your microscope will already be set up on your lab bench before you get to the lab. If so, do not worry about Steps 1 - 3 and 17 when working in the BIO 137 lab. 2-5 Viewing Objects Through the microscope Procedure: 1. Place a paramecium slide on the microscope . 2. Bring the slide into focus using the scanning (4X) lens. 3. Observe how much of the paramecium you can see. Make a drawing of your paramecium below. Scanning Lens Observation: 4. Now, switch to low power (10X) and use the fine adjustment knob to focus the image. Note: Before switching to the low power lens, make sure your paramecium is in the center of your field of view. 5. Observe how much of the paramecium you can see. Make a drawing below.
8 Low Power Observation: 6. Lastly, switch to high power (40X). Make sure your paramecium is in the center of your low power field of view before you switch to the high power lens. If you lose the image, go back to the low power lens, focus it, put it in the center, switch to the high power lens, and use fine focus only. 7. Observe how much of the paramecium you can see now. Make a drawing below. High Power Observation: 2-6 Answer the parts of Question #8 with either Increased or Decreased 8. As you increased the magnification, what happened to the: (A) working distance (distance between the lens and specimen)? (B) field size (how much of the slide in your field of view)? (C) image brightness and resolution (clearness of the image)? Estimating the Size of the Field 1. Switch to the scanning lens on your microscope , lower the stage, and remove the slide.
9 2. Obtain a metric ruler and place it under the stage clips with the millimeters (smallest marks) over the opening in the stage. 3. Switch to the low power lens and raise the stage until the millimeters are in focus. 4. Count the number of millimeters that will fit in your low power field of view. The millimeters are counted as the spaces between the dark lines. Record the number below. Diameter of Low Power Field of View = _____mm 5. To calculate the diameter of your low power field of view in micrometers, multiply your answer in #4 by 1,000. Diameter of Low Power Field of View = _____mm x 1,000 = _____ m 6. Lower the stage completely and remove the ruler. 7. Place the paramecium slide on the microscope and bring into focus using the low power lens. 8. Choose one paramecium cell and estimate its length and width in m (based on the diameter of the entire field of view).
10 Example: if the low power field of view was 1000 m and the paramecium cell occupied one-half of the field of view, you could estimate the length to be 500 m. If it occupied one-fourth of the field of view, you could estimate the length to be 250 m. Length = _____ m Width = _____ m 2-7 Choose one paramecium cell and estimate its length and width in m (based on the diameter of the entire field of view). Example: if the low power field of view was 1000 m and the paramecium cell occupied one-half of the field of view, you could estimate the length to be 500 m. If it occupied one-fourth of the field of view, you could estimate the length to be 250 m. Length = _____ m Width = _____ mThe Lens Effect 1. Place the Letter e slide in the stage clips (slide label right side up). 2. Get the letter e in focus using the low power lens. 3. Observe the position of the letter.