Transcription of LabelWriter Print Server
1 LabelWriter Print ServerUser Guide Print ServerCopyright 2011 Sanford, All rights reserved. 04/11No part of this document or the software may be reproduced or transmitted in any form or by any means or translated into another language without the prior written consent of Sanford, and LabelWriter are registered trademarks of Sanford, All other trademarks are the property of their respective holders. iiiContentsAbout the LabelWriter Print Server .. 1 Print Server Features .. 1 System Requirements.. 2 Using this Guide.. 2 Installing the LabelWriter Print Server .. 3 Getting Started .. 3 Connecting the Cables .. 4 Installing the Software.
2 4 Installing the Software in Windows .. 4 Installing the Software in Mac OS .. 5 Configuring the Print Server .. 5 Adding a Printer .. 7 Adding a Printer in Windows XP .. 7 Adding a Printer in Windows Vista .. 11 Adding a Printer in Mac OS.. 15 Adding a Printer in Linux .. 16 Printing a Test Label .. 18 Managing the LabelWriter Print Server .. 19 About the Control Center .. 19 Viewing the Print Server Information (Windows only) .. 19 Changing the Control Center Language .. 20 About the Print Server Web Pages.. 21 Viewing the Print Server Status .. 22 Configuring the Server .. 22 Changing the Server Name and Description .. 22 Changing the TCP/IP Configuration .. 23 Changing the Administrator Name and Password.
3 23 Upgrading the Firmware .. 24 Getting Help.. 25 Troubleshooting .. 25 Status Lights .. 25 Restoring the Print Server to the Factory Default Settings .. 25 Limited Warranty .. 26 Obtaining Technical Support .. 27 Returning Your Print Server for Repair .. 28iv Technical and Certification Information .. 29 Technical Specifications .. 29 Device Certification .. 29 Declaration of Conformity .. 29 Documentation Feedback .. 301 Chapter 1 About the LabelWriter Print ServerCongratulations on purchasing a dymo LabelWriter Print Server .
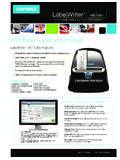
4 Your Print Server will give you years of reliable service. We encourage you to take a few minutes to review how to use and care for your Print the Print Server , you can connect your LabelWriter 400 or later series printer directly to your network, without dedicating a computer to printer sharing. Now everyone connected to your network can Print to a single LabelWriter printer. We have no doubt that the LabelWriter Print Server will make your job easier and more Server FeaturesYour LabelWriter Print Server can be used to share any LabelWriter 400 or later series printer, including the LabelWriter Twin Turbo and LabelWriter Print Server connects to your network using a standard Ethernet familiar with the major components of the Print status lights visually show the current state of the Print Server .
5 See "Status Lights" on page 25 for a description of the status LINK ACTIVE connector (to network)USB connector (to printer)Init/ResetbuttonPowerconnectorSt atus lightsAbout the LabelWriter Print Server2 System RequirementsThe Print Server requires a standard Ethernet connection and one of the following: Windows XP 32-bit Windows Vista 32 or 64-bit Windows 7 Mac OS X or later ( LabelWriter Duo requires Mac OS X or later) Linux (Linux is not officially supported. See "Adding a Printer in Linux" on page 16 for more information)Using this GuideThis User Guide provides instructions for the dymo LabelWriter Print Server on the Windows, Macintosh, and Linux platforms. For the most part, the software operates in the same way on all platforms.
6 Any differences in features, procedures, or commands are noted within the User Guide includes information for installing and using the Print Server with a dymo LabelWriter printer. Depending on the model of dymo printer you are using, some sections of this User Guide may not apply to you. The following table provides a summary of the Guide ChapterDescriptionAbout the LabelWriter Print ServerThis chapter gives an overview of the Print Server . Installing the LabelWriter Print ServerThis chapter describes how to install and configure the Print Server , install the Print Server Control Center software, and add a LabelWriter printer to your the LabelWriter Print ServerThis chapter includes information about the Print Server Control Center software.
7 This includes information on changing the Server configuration and upgrading the HelpThis chapter offers suggestions for resolving problems that can occur when using the Print Server . If you are unable to solve a problem, this chapter also describes how to contact dymo Technical and Certification InformationThis chapter contains technical and certification information for the Print 2 Installing the LabelWriter Print ServerThis chapter describes how to install and configure the Print install the Print server1 Make sure that you have everything you need to get the the LabelWriter Control Center the Print the printer to your Chapter 3, Adding a Printer for instructions on adding a printer on your specific operating StartedOnce you have unpacked your Print Server , make sure that you have all of the items shown addition to the items that come with the Print Server , you will need the following.
8 A LabelWriter 400 or later series printer, with power adapter and USB cable Installed LabelWriter printer drivers (included in the dymo Label Software installation) A standard Ethernet cable (available from your local office supply and other retailers) A working Ethernet connection to your Local Area NetworkPOWER LINK ACTIVE USBL abelWriter Print ServerCD-ROMP ower adapterInstalling the LabelWriter Print Server4 Connecting the CablesThe Print Server connects directly to your network using a standard Ethernet connect the cables1 Plug the Ethernet cable into the right side of the Print Server . 2 Plug the other end of the Ethernet cable into an available Ethernet connection on your the USB cable from your LabelWriter printer into the right side of the Print sure that the USB cable is connected to your printer and that your printer is plugged the Print Server power adapter into the left side of the Print the other end of the power adapter into a power the SoftwareThe Control Center software included with your Print Server gives you quick access to everything that you need to configure and manage your Print Server .
9 You can install the software on any computer that is connected to your the Software in WindowsYou can install the Control Center software in install the software in Windows1 Insert the LabelWriter Print Server CD into your CD-ROM drive. After a few seconds, the installation screen the installation screen does not appear:a. Click Start, then Run on the Windows taskbar. The Run dialog box Enter D:\ (where D is the letter assigned to the CD-ROM drive) and click Install Application and follow the instructions in the the final page of the installer, make sure that the Launch LabelWriter Print Server Control Center check box is selected, and then click LabelWriter Control Center LINK ACTIVE USBC onfiguring the Print Server5 Installing the Software in Mac OSTo install the software in Mac OS1 Insert the LabelWriter Print Server CD into your CD-ROM CD icon appears on your the CD icon.
10 And then double-click the Mac dymo LabelWriter Print Server Control dymo LabelWriter Print Server Control Center folder the dymo LabelWriter Print Server Control Center icon into the Applications folder on your dymo LabelWriter Print Server Control Center in the Applications folder to open the Print Server Control the Print ServerWhen you first install the Print Server , the Server is automatically assigned an IP address. Every time the software is launched, the IP address is displayed next to the Server name in the Control Center default, the Server is configured to automatically get an IP address. If you are using the Print Server on a small office or home network, we recommend that you configure the Server to use a static IP address.