Example: air traffic controller
Lave-vaiselle SHPM65Z***, SHP865Z***, SHXM65Z***,
This dishwasher is provided with Installation Instructions and this Use and Care Manual. Read and understand all instructions before using the dishwasher. This dishwasher is intended for use up to a maximum altitude of 13,000 ft (4,000 meters) above sea level. To reduce the risk of fire, electrical shock, or serious injury, observe the following:
Tags:
Information
Domain:
Source:
Link to this page:
Documents from same domain

en Installation Instructions
media3.bosch-home.comElbow connection with 3/4” female hose threads on one end and fits your water supply line (copper tubing, compression fitting, or braided hose) on the other. Hot Water Supply Line - Minimum 3/8″ O.D. copper tubing or metal braided dishwasher supply line. Only needed if house water supply line is not sufficient.

Installation Manual - media3.bosch-home.com
media3.bosch-home.comImportant - save these instructions for the local electrical inspector’s use. Before installing, turn power OFF at the service panel. Lock service panel to prevent power from being turned ON accidentally. Refer to rating label for more information. See “Rating Label” under “Service” for rating label location.

20% remboursés
media3.bosch-home.com25200, 2600G, 3530, 3540, 36440, 36400, 36445, 36470, 4020 entre le 31/08/2021 et le 31/12/2021 inclus chez un de nos revendeurs participants ; Complétez le bulletin de participation disponible en magasin / Imprimez le bulletin de participation disponible
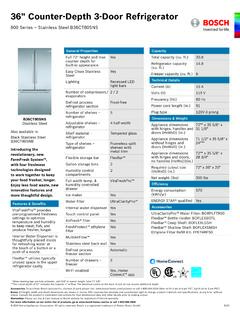
36 Counter-Depth 3-Door Refrigerator
media3.bosch-home.comfreezer section Automatic Number of drawers – freezer 3 Wi-Fi enabled Yes, Home Connect™ app Capacity Total capacity (cu. ft.) 20.8 Refrigerator capacity (cu. ft.) 14.8 Freezer capacity (cu. ft.) 6 Technical Details Current (A) 15 A Volts (V) 115 V Frequency (Hz) 60 Hz Power cord length (in.) 91 Plug type 120V-3 prong Dimensions & Weight ...
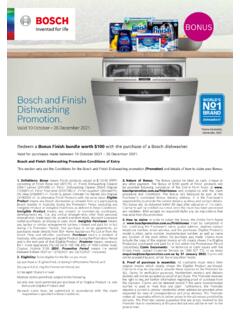
Bosch and Finish Dishwashing Promotion.
media3.bosch-home.comThe Promoter and Reckitt Benckiser (Hygiene Home) Pty Ltd may, for an indefinite period, unless otherwise advised, use the information for promotional, marketing, publicity, research and profiling purposes, including sending electronic messages or telephoning the claimant. Claimants should direct any

Robert Bosch Hausgeräte GmbH mit integrierter Waage ...
media3.bosch-home.comkann. Das Getriebe ist so konstruiert, dass die Geschwindigkeit genau an das jeweilige Zubehör angepasst wird. Einfach verstaut Durch das geringe Gewicht kann die MUM 5 Serie | 4 bequem auf die Arbeitsfläche gestellt und danach leicht zurück in den Küchenschrank geräumt werden. Dank Kabel - staufach oder -aufrollautomatik (je nach

SUBMIT ONLINE AND GET PAID IN LESS THAN 8 WEEKS!
media3.bosch-home.comPlease allow 8 - 10 weeks for us to process your mail-in rebate. Or, get your rebate 2 weeks faster by submitting online at BoschApplianceRebate.com Please ensure your claim is submitted by January 31, 2022 . Please submit your serial number or FD number no …

OptiMUM Serie 8 Backen in Perfektion.
media3.bosch-home.comwender von Bosch Hausgeräten haben auch auf Facebook und Instagram die Möglichkeit, mit dem Unternehmen und unter einander in Kontakt zu treten. Wir informieren Sie regelmäßig über spannende Neuigkeiten und liefern Ihnen nützliche Tipps und Tricks. Darüber hinaus haben

II FDBM NF 1.0 KFF96AV1 AV2 1 BO USA 9001601361
media3.bosch-home.comLEA Y CONSERVE ESTAS INSTRUCCIONES Al instalar el aparato debe prestarse atención a que el cable de conexión de red no quede atrapado ni se dañe. ¡ Un aislamiento dañado del cable de conexión de red es peligroso.Evite que el cable de conexión de red entre en contacto con fuentes de calor. Riesgo de explosión ADVERTENCIA

SUBMIT ONLINE AND GET PAID IN LESS THAN 8 WEEKS!
media3.bosch-home.comInduction Cooktops NIT5060UC NIT5068UC NIT5460UC NIT5469UC NIT5660UC NIT5668UC NIT8060SUC NIT8060UC NIT8069SUC NIT8069UC NIT8660SUC NIT8660UC NIT8669SUC NIT8669UC NITP060SUC NITP060UC NITP069SUC NITP069UC NITP660SUC NITP660UC NITP669SUC NITP669UC Warming & Storage Drawers HSD5051UC HWD5051UC …
Related documents
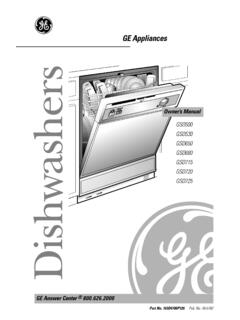
Owner’s Manual - GE Appliances
www.geappliances.comUse your dishwasher only for its intended purpose as described in this Owner’s Manual. This dishwasher must be properly installed and located in accordance with the Installation Instructions before it is used. If you did not receive an Installation Instructions sheet with your dishwasher, you can receive one by calling us toll-free

OPERATION MANUAL - Daikin
my.daikin.euInstallation manual: Instruction manual specified for a certain product or application, explaining how to install, configure and maintain it. ... dishwasher, clothes washer or other appliance. During this procedure there must be no smoking, open flame or any electrical appliance operating nearby. If hydrogen is

USER MANUAL - Lec Medical
lec-medical.co.ukUSER MANUAL . 2 Contents Before first use 3 Positioning of refrigerator 3 ... transport and installation. If the refrigeration circuit is damaged, avoid using a naked flame in ... DO NOT put then in a dishwasher. Detergents containing abrasives or acids are not suitable for the cleaning.
Dishwasher Instruction Manual - BEKO AU
www.beko.com.auDishwasher Instruction Manual. This product was manufactured using the latest technology in environmentally friendly conditions. ... Installation 7 Appropriate installation location 7 Connecting water supply 7 Connection to the drain 8 Adjusting the feet 9 Aquasafe+ 9
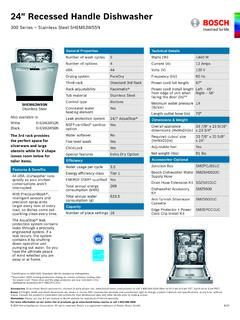
24 Recessed Handle Dishwasher
images.thdstatic.comInstallation Details 24" Recessed Handle Dishwasher 300 Series – Stainless Steel SHEM63W55N Ø 2 1/2" (63.5 mm) 7" (178 mm) Example of Hardwire Installation Note: Cutout required on left or right cabinet wall, depending on location of water inlet, drain and electrical connection 2 1/2" (63.5 mm) Image 3a: New Dish EU, ADA and 18 inch - Rev ...

GE Appliances Self-Cleaning Electric Ranges
www.geappliances.comManual. Be sure your appliance is properly installed and grounded by a qualified installer in accordance with the provided installation instructions. Have the installer show you the location of the circuit breaker or fuse. Mark it for easy reference. Do not attempt to repair or replace any part of your range unless it is specifically