Transcription of LEAKAGE TESTING MANUAL CLEANING
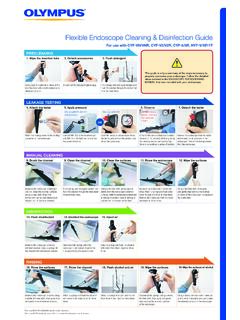
1 781611165109234 PRECLEANING - Immediately After UseMANUAL CLEANING RINSINGIMPORTANTLEAKAGE TESTING 151213141817 WARNING: This guide is only a summary of the steps necessary to properly clean your endoscope. Be sure to follow the detailed steps outlined in the ENDOSCOPE REPROCESSING MANUAL that was included with your endoscope when CLEANING GUIDEA spirate water, then air through the suction water, then air, into elevator-wire channel/auxiliary-water channel. (Alternatively, the auxiliary-water channel may be flushed using the OFP pump.)
2 The auxiliary water tube should remain attached during transport to reprocesing all detachable water-resistant cap. This step is omitted for 190 endoscopes. Transport to the reprocessing room in a covered container. NOTE: Ensure that the ETO cap is removed prior to leak TESTING 190 generation the ETO valve and the MB-155 are free of water drops. Detach auxiliary water tube and attach LEAKAGE tester. Turn on air source and confirm expansion of the bending section. Immerse entire endoscope in clean water. Perform LEAKAGE test. Angulate tip during test.
3 Remove from water. Turn off air source and detach LEAKAGE tester from air source. After the tip has deflated, detach LEAKAGE tester from endoscope. CAUTION: If a leak is detected, the endoscope must be repaired. Follow manufacturer s immersed: Immerse in freshly prepared detergent solution. Clean all external surfaces. Brush endoscope distal tip and, if applicable, brush and flush the insertion tube portion of the suction channel. Repeat until all debris is immersed: While immersed: Brush the universal cord portion of the suction channel.
4 Repeat until all debris is immersed: While immersed: While immersed: Brush the suction cylinder and instrument channel port. Repeat until all debris is detergent solutioninto suction injection tube andchannel plug. Flush detergent solution into the air and water channels. Flush the forceps- elevator, if detergent solution into auxiliary-water / elevator-wire all external surfaces of endoscope and CLEANING accessories, then soak in detergent solution for the time recommended by the detergent a soft, lint-free cloth toremove excess moisture fromendoscope and cleaningaccessories in preparation for the entire instrument in clean water and gently agitate to clean water through all channels (including auxiliary- water / elevator-wire, if applicable).
5 Remove from water, then flush air through all channels. Wear all appropriate personal protective equipment. Meticulous CLEANING is essential for effective disinfection/sterilization. Be sure to reprocess all removable parts ( , valves) according to the reprocessing MANUAL . Visually inspect the equipment after CLEANING . If debris remains, repeat the procedure. Inspect the MB-155 ( LEAKAGE Test Connector) for signs of damage prior to AW channel- CLEANING adapter. Flush water, then air, through air / water Channel- CLEANING Adapter Wipe down insertion tube with a water- soaked endoscopes with elevators or auxiliary-water feeding only: For endoscopes with elevators or auxiliary-water feeding only:EVIS (140/240), EXERA (160), EXERA II (180) & EXERA III (190) GI Endoscopes Refer to companion ENDOSCOPE DISINFECTION GUIDE for disinfection informationSuction CleaningAdapterInjection TubeChannel PlugInjection TubeChannel PlugAuxiliary-Water TubeDistal tip 2018 Olympus America Inc.
6 / Printed in USA - OAICDS0618 PWC26643