Transcription of Lionel TrainMaster Command Control Upgrade Kit Owner’s …
1 72-2960-2501/04 LionelTrainMaster CommandControl Upgrade KitOwner s ManualCongratulations!Congratulations on your purchase of the Lionel TrainMaster Command Control Upgrade Kit!This kit allows you Upgrade a Lionel locomotive that has been specifically designated as Command upgradeable. These locomotives were first offered in the 1998 Lionel Lionel TrainMaster Command Control Upgrade Kit is composed of electroniccircuit boards that are extremely sensitive to static electricity. Please avoid allphysical contact with the chips and handle the boards by their edges Upgrade the Platinum Ghost F-3 (6-38150), the Santa Fe FT (6-18157), the NewYork Central FT (6-18163), or the Baltimore & Ohio FT (6-18169), follow theupgrade instructions in the Owner s Manual for the particular Hudson locomotive with the Conventional RailSounds sound system (6-21988)must also have an Upgrade to the full RailSounds sound system ( Upgrade Kit 6-22963) for proper operation.
2 2 Note!Note!Caution!The following Lionel marks may be used throughout this instruction manual and are protected under rights , TrainMaster , Odyssey , RailSounds , CrewTalk , TowerCom , DynaChuff ,StationSounds , Pullmor , ElectroCoupler , Magne-Traction , CAB-1 Remote Controller ,PowerMaster , Lionel ZW , ZW , PowerHouse , TMCC , Lionelville , Lockon The name FasTrack is used with permission from Pitsco, of contentsSteam locomotive upgrades4-7 Early Hudson and Pacific locomotive modifications8-12 Diesel locomotive upgrades13-14 Reprogramming your locomotive15 The TrainMaster Command Control environment16 Running your locomotive in the TrainMaster Command Control environment17 CAB-1 Remote Controller Command for your locomotive17 Assigning your locomotive a new ID#18 Notes19 Limited Warranty/ Lionel Service203 Steam locomotive upgradesFollow these steps to Upgrade all steam locomotives, with the exception of the early versionsof the upgradeable Hudson and Pacific locomotives (6-18082, 6-18083, 6-18084, 6-18085,6-18086.)
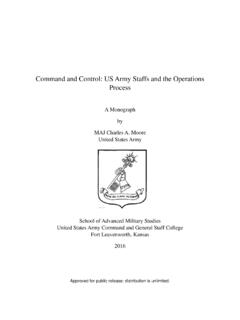
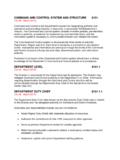
3 6-18087, 6-18088, and 6-28000). These exceptions are discussed in the next section. 1. Remove the body screws that secure the locomotive body to the frame and lift away the to your locomotive s manual for the location of these screws. 2. Locate and unplug the 104E circuit board from the motherboard. Refer to Figure 1. Replacing the 104E circuit board104E circuit boardR2LC circuit boardMake sure that the circuitboard is seated on bothrows of !Steam locomotive upgrades (continued)3. Install the R2LC circuit board from the TrainMaster Command Control Upgrade kit in theposition made available in Step As illustrated in Figure 2, move the jumper marked JP1 to the next position, leaving theopposite pin 2.
4 Changing the jumper locationJP1 Steam locomotive upgrades (continued)5. Install the locomotive s body back on the frame, making sure that no wires are Remove the tender body screws and lift away the body. Refer to the locomotive s manual forthe locations of the Follow the tether cable to the end of the black insulation and locate the green wire. 8. Determine if the green wire is connected to the four-pin connector. If the wire is connected,reinstall the tender body. The Upgrade is complete. Proceed to page 15 to reprogram your locomotive for use in the TrainMaster Command Control environment. If the green wire is notattached, continue with this procedure.
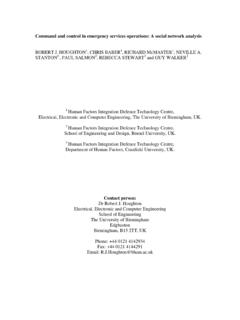
5 Refer Figure 3. Tether cableGreen wireTether cableSteam locomotive upgrades (continued)9. Pull the black insulating sleeve off the end of the loose green tether Grasp the white housing of the four-pin connector and pull it straight up and off the circuitboard. 11. As illustrated in Figure 4, insert the connector pin at the end of the green wire into theempty fourth position on the connector. If you are also adding a RailSounds sound system Upgrade , install the RailSoundssound system circuit boards as discussed in the RailSounds sound system Replace the body, making sure that the wires are not pinched between the body and theframe.
6 13. Reprogram the R2LC for your specific locomotive. Refer to page !Figure 4. Connecting the green wireGreen wireMetalprojectionsTa bGreenwireFourthpositionEarly Hudson and Pacific locomotive modificationsFollow these steps to Upgrade early versions of the upgradeable Hudson and Pacificlocomotives (6-18082, 6-18083, 6-18084, 6-18085, 6-18086, 6-18087, 6-18088, and 6-28000).1. Remove the body screws that secure the locomotive to the frame and lift away the body. Referto your locomotive s manual for the location of these Locate and remove the jumper marked JUMP FOR EUNIT on the motherboard. This positionis to remain open.
7 Refer to Figure As illustrated in Figure 5, move the jumper marked RADIO(FL)/EUNIT to the next position,leaving the opposite pin 5. JUMP FOR EUNIT jumper positionFrontRemove jumper atJump for EUNITMove jumper atRADIO (FL)/EUNITE arly Hudson and Pacific locomotive modifications (continued)4. Move the jumper marked EUNIT(RL)/R2LC to the next position, leaving the opposite pinopen. Refer to Figure 6. Jumper positionsFrontFrontMove jumper atR2LC (CAB)/EUNITMove jumper atEUNIT (RL)/R2 LCThis illustration shows the properplacement of the Hudson and Pacific locomotive modifications (continued)5. Move the jumper marked R2LC(CAB)/EUNIT to the next position, leaving the opposite pinopen.
8 Refer to Figure As illustrated in Figure 7, install the R2LC circuit board into the slot marked RADIO on 7. R2LC circuit board installationFrontR2LC circuit boardRearMake sure that the circuitboard is seated on bothrows of pins. Note!Early Hudson and Pacific locomotive modifications (continued)7. Install the locomotive s body back on the Remove the tender body screws and lift away the Follow the tether cable to the end of the black insulation and locate the green wire. Thegreen wire should not be connected to any terminal or Pull the black insulating sleeve off the end of the loose green tether Grasp the white housing of the four-pin connector and pull it straight up and off the circuitboard.
9 12. Insert the connector pin at the end of the green wire into the empty fourth position on theconnector and then plug in the connector. Refer to Figure 8. Connecting the green wireInstall the loosegreen wireFour-pinLeococonnectorInside the tenderFive-pin LeococonnectorMetalprojectionsTa bGreenwireFourthposition12 Early Hudson and Pacific locomotive modifications (continued) If you are not adding a RailSounds sound system Upgrade , reinstall the body. TheTrainMaster Command Control Upgrade is complete. If you are also adding a RailSounds sound system Upgrade , install the RailSounds soundsystem circuit boards as discussed in the RailSounds sound system Upgrade Replace the body, making sure that the wires are not pinched between the body and Reprogram the circuit board for use in the TrainMaster Command Control to page locomotive upgradesFollow these steps to Upgrade all diesel locomotives.
10 1. Remove the body screws that secure the locomotive body to the frame and lift away the to your locomotive s manual for the location of these As illustrated in Figure 9, locate and unplug the 104E circuit board from the Control BoardFront/Cab104 E UnitRearFigure 9. Replacing the 104E circuit boardBe sure that the circuitboard is seated on bothrows of !14 Diesel locomotive upgrades (continued)3. Install the R2LC circuit board from the TrainMaster Command Control Upgrade kit in theposition made available in Step 2. C-420 locomotives the two wires that connect the front lighting harnesscontact pads and the two wires that connect to the rear lighting harness pads so that the LEDmarker lights and headlights operate.