Transcription of Logitech® PTZ Pro Camera Setup Guide
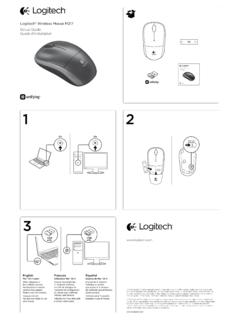
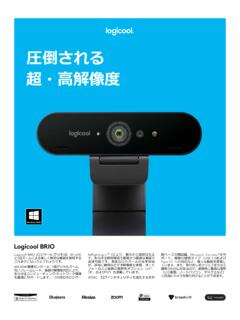
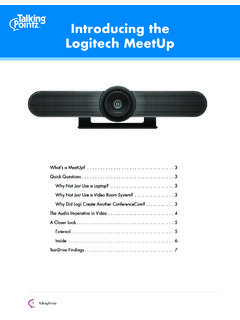
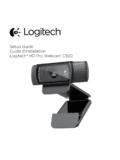
1 logitech PTZ Pro Camera Setup Guide logitech PTZ Pro Camera English .. 3 Dansk .. 43. Deutsch .. 8 Norsk .. 48. Fran ais ..13 Suomi .. 53. Italiano .. 18 ..58. Espa ol .. 23 По-русски ..63. Portugu s ..28 Magyar .. 68. Nederlands .. 33 esk verze .. 73. Svenska .. 38 Po polsku .. 78. 2. logitech PTZ Pro Camera Know your product 4 9. 5 10. 6. 1 7 11. 8. 13. 2. 14. 15. 12. 3. Camera Remote Accessories 1. 10X lossless zoom 4. Mirror 9. Video mute 13. Camera mount 2. Camera LED 5. Zoom in 10. Far end control 14. Cable lock 3. Kensington 6. Pan and tilt 11. Home 15. Cables Security Slot 7. Zoom out 12. Remote 8. Camera presets battery door 1, 2, and 3. English 3. logitech PTZ Pro Camera Set up your product b c a 1. Set up Camera on table, or using 6. The Camera LED will flash to show that mount on table or wall.
2 Connection is taking place, and when 2. Connect PTZ Pro Camera completed, the Camera head will rotate. (refer to diagram above). 7. If these activities do not take 3. Attach cable lock before plugging place, try again and then consult in cable to the Camera port. Troubleshooting or call technical support. 4. Connect to external power. 8. Start your video call from your application. The LED on the Camera 5. To start video from your PC or Mac will alight when streaming. application, connect the USB cable to your USB port. 4 English logitech PTZ Pro Camera Visit Product Central Discover your product's full potential. Get valuable information and usage tips by browsing easy-to-use FAQs. Find answers to product questions and get help setting up your product. See if there's software available for download that can enhance your product experience.
3 To enjoy all the benefits of your logitech product, visit and take advantage of logitech 's wide range of useful support services: Troubleshooting Software downloads Diagnostics In-box documentation Firmware upgrades Warranty information Support community Spare parts (if available). English 5. logitech PTZ Pro Camera Use your product Video Starting the video: The video is controlled Use Preset 1 as your own defined by the application and will start once home position. When the Camera the Camera is selected and the video is reconnected to the PC, it will return to is started in the application. An LED will the position set in Preset 1. If no position light when the video is streaming. is set for Preset 1, the Camera will return Pan and tilt the Camera using to the default home position.
4 The controls on the remote control. All three Presets are by default set to Press once for incremental or press the out-of-box home. and hold for continuous pan or tilt. Far end control: By selecting this key Caution: Do not manually rotate webcam and downloading the application head. Doing so may damage unit. from , Zoom the Camera up to 10X by pressing you may control the pan, tilt and the zoom button. zoom of any logitech ConferenceCam Home: Select the Home button to return product or C930e Webcam in supported the default, out-of-box home position. applications. Camera selection and pan, tilt and zoom tools are also Camera Presets: You can set up available from the downloadable to 3 Camera Preset positions. application for PC as well as ability to First, position the Camera using disable this feature locally.
5 Please visit the remote control, and then press and the download page listed for more hold one of the Camera Preset buttons for information. 3 seconds to save that position. You may return to your defined position at any time by pressing the Preset button once. 6 English logitech PTZ Pro Camera Mounting your Camera Changing the remote control battery The PTZ Pro remote control runs on a Li-ion CR2032 battery . battery life will vary based on usage. x2 Troubleshooting tips Please visit for troubleshooting tips, information on software tools and for a diagnostic tool to help troubleshoot issues you may have with your PTZ Pro. What do you think? Please take a minute to tell us. Thank you for purchasing our product. English 7. logitech PTZ Pro Camera Produkt auf einen Blick 4 9.
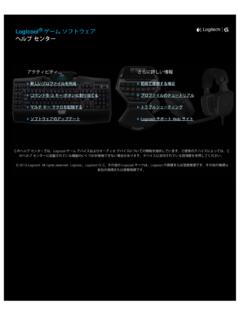
6 5 10. 6. 1 7 11. 8. 13. 2. 14. 15. 12. 3. Kamera Fernbedienung Zubeh r 1. 10-fach 4. Spiegeln 9. Video 13. Kamerahalterung verlustfreier Zoom 5. Vergr ern stummschalten 14. Kabelschloss 2. Kamera-LED 6. Schwenken 10. Steuerung 15. Kabel und Kippen der Kamera der 3. Kensington . Gegenseite Security Slot 7. Verkleinern 11. Home 8. Kamera- voreinstellungen 12. Batterie- 1, 2 und 3 fachdeckel der Fernbedienung 8 Deutsch logitech PTZ Pro Camera Einrichten des Ger ts b c a 1. Stellen Sie die Kamera auf einen Tisch 6. Die LED der Kamera blinkt, oder setzen Sie die Kamera in die w hrend die Verbindung aufgebaut wird. auf einem Tisch aufgestellte oder an Ist der Vorgang abgeschlossen, einer Wand montierte Halterung. dreht sich der Kamerakopf. 2. Schlie en Sie die PTZ Pro Camera an 7.
7 Wenn diese Signale ausbleiben, (siehe Darstellung oben). starten Sie einen neuen Versuch und 3. Bringen Sie das Kabelschloss an, suchen Sie ggf. anschlie end unter bevor Sie das Kabel mit dem Kamera- Fehlerbehebung nach weiteren anschluss verbinden. Informationen oder wenden Sie sich an den technischen Support. 4. Schlie en Sie die Stromversorgung an. 8. Starten Sie den Videoanruf 5. Verbinden Sie das USB-Kabel mit Ihrem aus der Anwendung heraus. Computer, um ber eine Anwendung auf W hrend des Streaming-Vorgangs dem PC bzw. Mac Videos zu starten. leuchtet die LED der Kamera. Deutsch 9. logitech PTZ Pro Camera Produktzentrale Entdecken Sie das volle Potential Ihres Ger ts. Holen Sie sich wertvolle Informationen und Anwendungstipps in den leicht verst ndlichen FAQs. Finden Sie Antworten auf Fragen zum Ger t und Hilfe beim Einrichten des Ger ts.
8 Suchen Sie nach herunterladbarer Software, mit der sich der Funktionsumfang des Ger ts erweitern l sst. Um alle Vorteile Ihres logitech Produkts nutzen zu k nnen, greifen Sie unter auf das umfassende Serviceangebot von logitech zu: Fehlerbehebung Software-Downloads Diagnose Mitgelieferte Dokumentation Firmware-Aktualisierungen Garantieinformationen Support-Community Ersatzteile (falls verf gbar). 10 Deutsch logitech PTZ Pro Camera Verwendung des Produkts Video Video starten: Das Video wird durch zu speichern. Sie k nnen die Kamera die Anwendung gesteuert. Es startet, jederzeit durch kurzes Dr cken sobald in der Anwendung die Kamera der Voreinstellungstaste in die definierte ausgew hlt und das Video gestartet wird. Position bringen. W hrend der laufenden bertragung Verwenden Sie Voreinstellung 1.
9 Des Videos leuchtet eine LED. als selbstdefinierte Ausgangsposition. Schwenken und kippen Sie die Kamera Wenn die Kamera wieder mit dem mit der Fernbedienung. Zur schrittweisen PC verbunden wird, kehrt sie in die in Anpassung dr cken Sie die entsprechende Voreinstellung 1 festgelegte Position Taste einmal, zur stufenlosen Anpassung zur ck. Wenn f r Voreinstellung 1 keine halten Sie die Taste gedr ckt. Position festgelegt ist, kehrt die Kamera in Vorsicht: Drehen Sie den Webcam-Kopf ihre Standard-Ausgangsposition zur ck. nicht manuell. Dadurch k nnte das Ger t Alle drei Voreinstellungen entsprechen besch digt werden. standardm ig der im Werk Zoom: Es ist eine bis zu 10-fache voreingestellten Ausgangsposition. Vergr erung des Bildausschnitts Steuerung der Kamera der Gegenseite: m glich.
10 Mit dieser Taste l sst sich nach Privat: Dr cken Sie die Home-Taste, Herunterladen der Software unter um in die standardm ige, im Werk aus voreingestellte Ausgangsposition unterst tzten Anwendungen heraus zur ckzukehren. die Schwenk-, Kipp- und Zoomfunktion Kameravoreinstellungen: Sie einer logitech ConferenceCam k nnen bis zu 3 Voreinstellungen oder einer C930e Webcam steuern. f r die Kameraposition festlegen. Neben Tools f r Kameraauswahl, Positionieren Sie zuerst die Kamera Schwenk-, Kipp- und Zoomfunktion bietet mithilfe der Fernbedienung. die herunterladbare PC-Anwendung Halten Sie anschlie end eine der auch die M glichkeit, diese Funktion lokal Voreinstellungstasten 3 Sekunden lang zu deaktivieren. Auf der Downloadseite gedr ckt, um die gew hlte Position finden Sie weitere Informationen.