Transcription of Logix 510si Digital Positioner
1 Manual F5 1 PMV Valve Control SystemManual F5alve Control System1 Logix 510si Digital PositionerThis product meets the requirements ofADK041400E - F5 1 PMV Valve Control SystemManual F5alve Control SystemManual F5 2 Manufacturers declaration Hersteller-Erkl rung D claration de fabricantGBManufacturers declarationWe her eby co nfirm th at th e appl iances describ ed in th is shee t has been manuf actured in compliancewit h th e appli cable standards and is inte nded for installati on in a machine /ap pli cati on, and thatco mmissionin g is stri ctly prohibit ed unti l ev idence has bee n prov ided that th e machine /ap pli cati on inquesti on is also in compliance withEC dir ec ti ve 2006 /4 2/EC, 2006/95/EC an d 20 04/1 08 /E manufacture rs dec larati on is appli cabl e to th e foll owing PMV seri rungHi ermit erkl re n wir , da die in diesem Blatt beschri ebene n Ger te en tspre chend den g lt igen Normengebaut und zum Einbau in ein e Maschin e oder Applikati on besti mmt sind, sowie da der enInbetri ebnahme so lang e unt ersagt ist, bis festg estell t wur de, da dieseMaschin e/ Appli kati on ebe nfal ls der EG-Richtlin ie2006 /42 /EC, 2006 /95 /EC un d 2004 /1 08 /EC.
2 Diese Hersteller erkl run g hat f r folgende PMV-Seri en G lt igkei claration de fabricantNous d clarons par la pr sent e que les apparei ls d cri ts sur cett e page sont co nstruits en co nformit avec les normes en vigueur et qu'il s sont destin s tr e mo nt s dans une machin e ou une ap pli cati on,nous d clarons galemen t que leur mise en service est inter dit e tant qu'il n'a pa s t co nstat que cet temacine /appli cati on satisfait galem en t la dire cti ve 2006 /4 2/EC, 2006/95/EC et 2004 /10 8/E e d clarati on de fourn isseur est valable pour les types d'apparei ls PMV suivants:F5 .Mr. Jan-Eric AnderssonPresident, Palmstiernas International ABManual F5 2 Manufacturers declaration Hersteller-Erkl rung D claration de fabricantGBManufacturers declarationWe her eby co nfirm th at th e appl iances describ ed in th is shee t has been manuf actured in compliancewit h th e appli cable standards and is inte nded for installati on in a machine /ap pli cati on, and thatco mmissionin g is stri ctly prohibit ed unti l ev idence has bee n prov ided that th e machine /ap pli cati on inquesti on is also in compliance withEC dir ec ti ve 2006 /4 2/EC, 2006/95/EC an d 20 04/1 08 /E manufacture rs dec larati on is appli cabl e to th e foll owing PMV seri rungHi ermit erkl re n wir.
3 Da die in diesem Blatt beschri ebene n Ger te en tspre chend den g lt igen Normengebaut und zum Einbau in ein e Maschin e oder Applikati on besti mmt sind, sowie da der enInbetri ebnahme so lang e unt ersagt ist, bis festg estell t wur de, da dieseMaschin e/ Appli kati on ebe nfal ls der EG-Richtlin ie2006 /42 /EC, 2006 /95 /EC un d 2004 /1 08 /EC .Diese Hersteller erkl run g hat f r folgende PMV-Seri en G lt igkei claration de fabricantNous d clarons par la pr sent e que les apparei ls d cri ts sur cett e page sont co nstruits en co nformit avec les normes en vigueur et qu'il s sont destin s tr e mo nt s dans une machin e ou une ap pli cati on,nous d clarons galemen t que leur mise en service est inter dit e tant qu'il n'a pa s t co nstat que cet temacine /appli cati on satisfait galem en t la dire cti ve 2006 /4 2/EC, 2006/95/EC et 2004 /10 8/E e d clarati on de fourn isseur est valable pour les types d'apparei ls PMV suivants:F5.
4 Mr. Jan-Eric AnderssonPresident, Palmstiernas International ABManual F5 3 PMV Feedback module storage and handling proceduresPMV feedback modules are precision instruments which should be storedand handled accordingly to avoid problems or modules contain electronic components which can be damaged byexposure to water. Appropriate precautions should be taken to protect unitswhile in storage-Stored in original PMV shipping containers, units should be stored in anenvironmentally controlled area, clean, cool (15-26 C, 60-80 F) and dry,out of direct sunlight or weather storage- If feedback units must be stored outdoors, make sure front covers aretightened, all conduits entries are sealed and that units not are exposed todirect sunlight, rain or damage mechanismWhen units are stored in hot, humid climates, the daily heating/cooling cyclewill cause air to expand/contract and be drawn in and out of the feedbackhousing through ports left open.
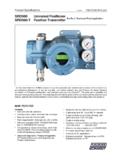
5 Dependent on the local temperaturevariations, humidity and dew points and time in storage, condensation couldoccur and accumulate inside causing erratic operation or failure due to waterand corrosion. The potential for condensation damage is especially high insouthern climates and aggravated if units are exposed to direct further assistance, please contact you nearest PMV SealF5 is supplied with conduit entry points seal is only a storage seal, not to be used as sealwhen F5 is in Storage Seal is removed or damaged, make sureconduit entry points are resealed before furthershipping or proper cable glands or vapour proof F5 on Positioner P5/EP5 or actuator/valvepackage. Remove Storage Seal for conduit entry E1& E2, make electrical connections, install propercable glands or plugs to ensure the units F5 4 DescriptionThe PMV F5 is a feedback unit uniquely designed to mount on top of the PMVP5, EP5 or P-2000 positioners with minimum parts required.
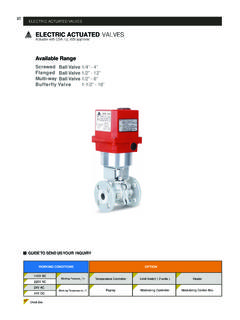
6 The F5 can alsobe mounted on actuators with an additional mounting kit. The F5 is availablein two different enclosures, standard or explosion standard enclosure for F5 offers a gasketed NEMA 4/ IP66 enclosure withoptional American and European intrinsically safe approvals. The explosionproof version is approved NEMA 7 / IP66 and carries North American andEuropean approvals. Both enclosures can be furnished with Namur sensors,mechanical or proximity switches, potentiometer or 4-20 mA position trans-mitter or a combination of these F5 4 DescriptionThe PMV F5 is a feedback unit uniquely designed to mount on top of the PMVP5, EP5 or P-2000 positioners with minimum parts required. The F5 can alsobe mounted on actuators with an additional mounting kit. The F5 is availablein two different enclosures, standard or explosion standard enclosure for F5 offers a gasketed NEMA 4/ IP66 enclosure withoptional American and European intrinsically safe approvals.
7 The explosionproof version is approved NEMA 7 / IP66 and carries North American andEuropean approvals. Both enclosures can be furnished with Namur sensors,mechanical or proximity switches, potentiometer or 4-20 mA position trans-mitter or a combination of these F5 5 Product labelF5 IS Intrinsically safeF5 EX Explosion proofManual F5 6 M odell codeManual F5 7 Mounting on P5 or EP5 Mounting F5 on actuator (On/Off control valves )Install the spindle adaptor 1into F5 shaft, make sure that a spring clip 2is fitted. A solid click should be heard when the spindle adaptor isproperly installed into the F5 F5 on the actuator using a mounting kit and the ISO F05 mountingholes on the bottom of the F5. Make sure that the F5 spindle is properlyalligned on top of the that the four fasteners 3 are installed into Remove the front cover and the indicator from the Positioner .
8 Loosen and remove the Allen head screw (3) (5mm hex-wrench) Install drive coupling (4) on the Positioner shaft, secure it with screw (3) Check that F5is fitted with 4 nos of screws 5and O-ring 9, install the F5 ontop of the Positioner unit, make sure that the coupling is properly engagedbefore tightening the four screws 5. Make connections and calibrate. Reinstall indicator 2 and front cover 1 on the F5O-ring seal9524351 See for video clip.,Manual F5 6 M odell codetighten 1,5-2 NmManual F5 Mounting on P-2000/P-2020653217 Remove front cover, indicator and cam nut from the Positioner Replace the cam nut with coupling 1, calibrate the Positioner . Check that the gasket is fitted to the bottom of plate 2, install screws 5 (3xlong, 1x short) plastic washer 6 and O-rings 7. Secure the F5 to the plate 2 with screws 3.
9 Install assembly onto the Positioner , make sure that coupling 1 is properlyengaged. Make electrical connections and Manual F5 Mounting on P-2000/P-2020653217 Remove front cover, indicator and cam nut from the Positioner Replace the cam nut with coupling 1, calibrate the Positioner . Check that the gasket is fitted to the bottom of plate 2, install screws 5 (3xlong, 1x short) plastic washer 6 and O-rings 7. Secure the F5 to the plate 2 with screws 3. Install assembly onto the Positioner , make sure that coupling 1 is properlyengaged. Make electrical connections and Manual F5 F5-EXFront cover screws shall be tightened 7 Nm (5,2 lbf x ft).Approvals:CSA, FMDiv. 1, Class 1,2 & 3 Group BCDEFG T4-T6 ATEX II 2 G EEx d IIB + H2 T4-T6 The F5-EX is approved explosion proof by CSA, FM and Manual F5 Installing F5-EX on P5/EP5 Installing on an actuator Remove front cover, indicator and Allen head screw from the Positioner .
10 Install drive coupling 4 and secure it with the Allen head screw. Remove front covers and indicator from the F5-EX unit. Remove screws 3. Install F5-EX on P5/EP5, , make sure drive coupling is properly engagedbefore tightening screws 5. Reinstall and tight screws 3. Connect and calibrate. Reinstall front covers and indicator. Front cover screws 2 shall be tightened to 7 Nm (5,2 lbf x ft) Remove front covers and indicator from the F5-EX unit. Remove screws 3 and (5). Reinstall and tight screws 3. Install drive shaft into F5-EX, a solid click should be heard when spindleadapter is properly installed. Mount F5-EX on the actuator using the F05 holes and a mounting kit. Connect and calibrate, reinstall front covers and indicator. Front cover screws 2 shall be tightened to 7 Nm (5,2 lbf x ft).453232 See for video 0 Manual F5 ConnectionsWARNING!