Transcription of M4-CG Series General Purpose Application Controller ...
1 M4-CG Series General Purpose ApplicationController Installation GuideApplicationThe CG Series General Purpose Application controllersare well-suited for controlling a wide variety of facilityand HVAC equipment, including fan coils, air handlingunits, packaged HVAC equipment, and central plantequipment. CG Series controllers run pre-engineered anduser-programmed Series controllers include an integral real-time clock,which enables the controllers to monitor and controlschedules, calendars, and trends, and operate forextended periods of time as standalone controllers whenoffline from the Metasys system ProtocolsCG Series controllers can communicate using multiplecommunication protocols depending on model andconfiguration.
2 CGE controllers communicate using theBACnet /IP communication protocol. CGM controllerscommunicate using the BACnet MS/TP, N2 or wirelessZigbee communications protocols, with the addition ofZFR183x Pro Wireless Field Bus controllers in BACnet/IP or BACnet MS/TPcommunication mode are BACnet network-compliantdevices. The BACnet protocol is a standard for ANSI,ASHRAE, and the International Standards Organization(ISO) for building running in N2 mode can be used to maintainor modernize sites with installed legacy Johnson Controls controllers. For installation and commissioning support,and tips for efficient and safe replacement, referto the Modernization Guide for Legacy N2 Controllers(LIT-12012005) and the Controller -specific information about mapping N2 Objects in controllerswith switchable communications protocols, refer to theN2 Compatibility Options chapter of the Controller Tool Help(LIT-12011147).
3 To configure CGM Series controllers tocommunicate using the N2 communications protocol, seeConfiguring N2 communications (CGM models only).To configure CGM controllers to communicate usingthe wireless communications protocol, see Configuringwireless communications (CGM models only).North American Emissions ComplianceUnited StatesThis equipment has been tested and found to complywith the limits for a Class A digital device pursuant toPart 15 of the FCC Rules. These limits are designedto provide reasonable protection against harmfulinterference when this equipment is operated in acommercial environment. This equipment generates,uses, and can radiate radio frequency energy and, if notinstalled and used in accordance with the instructionmanual, may cause harmful interference to radiocommunications.
4 Operation of this equipment in aresidential area may cause harmful interference, in whichcase the users will be required to correct the interferenceat their own Class (A) digital apparatus meets all therequirements of the Canadian Interference-CausingEquipment appareil num rique de la Classe (A) respecte toutesles exigences du R glement sur le mat riel brouilleur the following guidelines when installing thecontroller: To minimize vibration and shock damage to thecontroller, transport the Controller in the originalcontainer. Verify that all parts shipped with the Controller . Do not drop the Controller or subject it to included One CGM/CGE Controller with removable terminalblocks (Input/Output, Power, FC, and SA Bus terminalblocks are removable) One installation instructions sheetNote: The FC terminal block is only available with theCGM and special tools needed Three fasteners appropriate for the mounting surface(M4 screws or #8 screws) One 20 cm (8 in.)
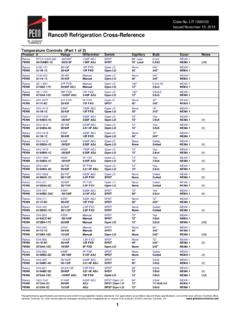
5 Or longer piece of 35 mm DIN rail andappropriate hardware for DIN rail mount (only) Small straight-blade (1/8 in. or mm) or Philips #2screwdriver for securing wires in the terminal blocks*241014301698D*Part No. 24-10143-01698 Rev. (For factory use only)M4-CGM09090-0x, M4-CGM04060-0, M4-CGE09090-0x, M4-CGE04060-0 Physical featuresThe following figures display the physical features of theCGM and CGE controllers, and the accompanying tableprovides a description of the physical features and areference to further information where 1: CGM Physical FeaturesFigure 2: CGE Physical FeaturesTable 1: Physical features of CGx Series controllersPhysical Feature: Description and References1 Binary Outputs (BO) Terminal Block: Black terminals.
6 See Table Outputs (CO) Terminal Block: Black terminals. See Table Output (AO) Terminal Block: Black terminals. Only present on CGM09090 and CGE09090 models. See Table Switch Block:CGM: Decimal Addressing. See Setting the device address on CGM : Controller Number. See Setting the Controller number for CGE models5 Supply Power Terminal Block: Gray terminals; 24 VAC, Class 2. See Supply power terminal Lift Tab. See Removing the Controller Actuator (SA) Bus Terminal Block: Orange terminal. See SA Bus terminal Controller (FC) Bus Terminal Block: Blue terminal. See FC Bus terminal block (or N2 protocol as required) on (EOL) Switch. See Setting the End-of-Line (EOL) switch (CGM models only).
7 10 Universal Serial Bus (USB) host type A PortNote: The USB feature is not currently Input (BI) Terminal Block: White terminals. See Table Inputs (UI) Terminal Block: White terminals. See Table (SA Bus) Port: RJ-12 6-Pin Modular Jack. See Sensor (SA Bus) Status Indicators. See .15FC Bus Port RJ-12 6-pin Modular Jack. See FC Bus port on CGM Ports: ETH-1 and ETH-2. See BACnet/IP Ethernet Network Topology for CGE controllersMountingObserve the following guidelines when mounting acontroller: Ensure the mounting surface can support thecontroller, DIN rail, and any user-supplied enclosure. Mount the Controller horizontally on 35 mm DIN railwhenever possible. Mount the Controller in the proper mounting position.
8 Mount the Controller on a hard, even surface wheneverpossible in wall-mount applications. Use shims or washers to mount the Controller securelyand evenly on the mounting surface. Mount the Controller in an area free of corrosive vaporsand observe the Ambient Conditions requirements inTable Series General Purpose Application Controller Installation Guide2 Provide for sufficient space around the Controller forcable and wire connections for easy cover removaland good ventilation through the Controller (50 mm[2 in.] minimum on the top, bottom, and front of thecontroller). Do not mount the Controller on surfaces prone tovibration, such as ductwork. Do not mount the Controller in areas whereelectromagnetic emissions from other devices or wiringcan interfere with Controller panel or enclosure mount applications, observe thefollowing additional guidelines: Mount the Controller so that the enclosure walls donot obstruct cover removal or ventilation through thecontroller.
9 Mount the Controller so that the power transformerand other devices do not radiate excessive heat to thecontroller. Do not install the Controller in an airtight 3: Controller mounting positionMounting features and dimensionsFigure 4: Back of CGE09090 and CGM09090 controllerFigure 5: Back of CGE04060 and CGM04060 controllerNote: Mounting dimensions are listed in millimeters inthe above figures. The DIN rail channel and the mounting clips areshown in an extended rail mount applicationsAbout this task: To mount a Controller horizontally on a 35 mm DIN rail(recommended method), complete the following steps:1. Securely mount a 20 cm (8 in.) or longer sectionof 35 mm DIN rail horizontal and centered in thedesired space so that the Controller mounts in thehorizontal Pull the two bottom mounting clips outward fromthe Controller to the extended position (Figure 4 orFigure 5).
10 3. Hang the Controller on the DIN rail by the hooks atthe top of the (DIN rail) channel on the back of thecontroller (Figure 4 or Figure 5), and position thecontroller snugly against the DIN Push the bottom mounting clips inward (up) tosecure the Controller on the DIN rail. To removethe Controller from the DIN rail, pull the bottommounting clips out to the extended position andcarefully lift the Controller off the DIN mount applicationsAbout this task: To mount a Controller directly on a wall or other flatvertical surface, complete the following steps:1. Pull the two bottom mounting clips outward andensure they are locked in the extended position asshown in Figure 4 or Figure Determine the proper mounting position thecontroller will be installed.