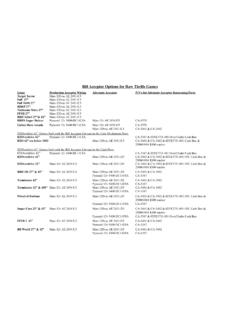
Transcription of MEI Cashflow SC83 Installation & Operation Manual
1 MEI Cashflow sc83 Part # 252055088 G2 MEI Cashflow sc83 Installation & Operation Manual Mars Inc. 2004 MEI Cashflow sc83 Part # 252055088 G2 MEI Cashflow sc83 Part # 252055088 G2 National and InternationalStandards ConformanceCashFlow sc83 Series products operate at Safety Extra Low Voltage Level (SELV) as defined in EN60950 Safety ofInformation Technology Equipment . They may be designed into equipment complying with IEC950/EN60950 Safety ofInformation Technology Equipment . Cashflow sc83 Series products are of Class 2 EnvironmentsThe Cashflow sc83 Series must not be operated in the presence of flammable gasses, fumes DisposalDo not dispose of any part of a Cashflow sc83 Series by by:Mars Electronics InternationalEskdale RoadWinnersh TriangleWokinghamBerkshireRG41 5 AQUnited KingdomInternet: Mars Inc.
2 2004 Except as permitted under the relevant local legislation, no part of this publication may be copied,transmitted, transcribed, or distributed in any form or by any means, or stored in a database retrievalsystem, or translated into any language (natural or computer), without the prior permission of Marsgistered trademarks. Copyright Mars Inc 2004. Mars Inc. 2004 MEI is a trademark of Mars, Inc. MEI reserves the right to change the product, product specificationsat any time. MEI has made every effort to ensure that the information in this document is disclaims any liability for any direct or indirect losses (how so ever caused) arising out of use orreliance on this installing the SC83XX into a host machine, turn off all installing or removing the PROM observe all ESD precautions toprevent damage.
3 MEI Cashflow sc83 Part # 252055088 G2 TABLE OF CONTENTSOVERVIEWM odel 5 Serial 6,7 Main Components of the sc83 Note Acceptor .. 8 Power Requirement .. 8 Installation AND REMOVAL OF COMPONENTSI nstalling the Chassis .. 9 Inserting and Removing the Acceptor Module .. 10 Installing an Entry Guide .. 11 Installing the Cashbox .. 12 Removing the Cashbox .. 12 Installing Locks on the Cashbox .. 13 UPDATING SOFTWAREC ashflow Programing Module (CPM) ..14,15 Replacing the PROM ..16-18 HARNESSING AND CONNECTORSEBDS Interface Pin Out .. 19RS232 Interface Pin Out .. 19 MAINTENANCEC leaning the Acceptor Module .. 20 TROUBLESHOOTINGD iagnostic 21 Frequently Asked Questions.
4 22-26SC83 DIMENSION Mars Inc. 2004 MEI is a trademark of Mars, Inc. Information is subject to change without notice. MEI has made every effort to ensure that theinformation in this document is accurate. However, we cannot be held responsible for any errors or omissions. MEI Cashflow sc83 Part # 252055088 G2 OVERVIEWS erial NumberWW Y L CC #####Configuration CodeManufacturing LocationYear Manufactured (Last digit of year)Week Manufactured(0-52)Sequential Production NumberModel Number00- OEM Configurable (No Harness)02- OEM Proprietary04- Opto Isolated EBDS*07- RS232 EBDS* Flash Unit (blank) P PROM UnitSecure Cashbox 83mm note path.* EBDS is a MEI protocol. EBDS stands for Extended bi-directional : Other interfaces will also be supported.
5 MEI Cashflow sc83 Part # 252055088 G2 OVERVIEWCOMPONENTSA cceptor ModuleChassisCashbox MEI Cashflow sc83 Part # 252055088 G2 FeaturesLIGHT BARLENSED RECEIVERCUSTOM BAR-CODE READER100 MHZ DSP PROCESSOREARLY NOTE PICK-UPSMOOTH SEALED NOTE PATHDIRECT ROLLER DRIVERIDGES MATE WITH ACCEPTORINTERNAL DIRECT ROLLER DRIVE ELEVATORSHORT NOTE PATHDURABLE WELDED PLASTIC EXTERIORRECESSED PLASTIC GEARSDUAL LOCK CAPABILITYCOMMON ACCEPTOR MODULESPC STYLE EDGE CONNECTOR INTERFACE CARDSACCEPTOR RELEASE LATCHNOTE PATH RELEASEDISPUTE RESOLUTION WINDOWENTRY GUIDE & POWER MOUNTINGCONFIGURATION BUTTON - NOT USED ON sc83 SERIESDIAGNOSTIC LEDS - SEE PAG E 18 FOR DETAILSUSB SERVICE PORT - SEE PAGE 12 AND FIGURE 2 FOR USER INTERFACEFLEXIBLE HANDLEPASSIVE CASHBOX LATCHESOVERVIEW MEI Cashflow sc83 Part # 252055088 G2 Main Components of the MEI Cashflow sc83 Note AcceptorThe sc83 consists of three main components Cashbox/LRC Acceptor ModuleChassisOVERVIEWThe Acceptor Module and Cashbox are interchangeable with other identical sc83 guides for the sc83 Not all entry guides fit in every machine.
6 Your choice regarding entry guides will depend onmachine specifications. Below are three entry guides that MEI currently manufactures. Forcustomers who prefer to tool their own entry guide, please contact our technical department. UniversalEntry GuidePlatform Entry GuidePower SpecificationInput Voltage:+12-28 VDCS tandby:10 WattsAcceptance:Peak 30 WattsStacking: Peak: 70 WattsCoin Resistant Entry Guide MEI Cashflow sc83 Part # 252055088 G2 INSTALLATIONM ounting Holes(use M4 screws)Mounting Holes(use M4 screws)BottomBackSideNote: Always power down machine prior to cashbox does not lock to the chassis. When you remove the unit from the container or when the unit is not installed in the machine, you mustnever carry the note acceptor by the handle of the cashbox.
7 The cashbox may release causing the rest of the unit to fall and damage the Chassis Most models have a configuration-specific harness installedon the back of the chassis (see Interface Manual p/n252058039 for more details). Connect the harness from thechassis to the host machine. Always dress all wires to avoidinterference with any equipment : If you have a custom configuration, you may need to contact our technical support group for assistance. Once the connections are made, you will need to line up the locating holes on the bottom ofthe chassis with the machine s locating pins. Line up the mounting screw holes and insert M4screws through several of the 10 mounting holes. There are three on each side of the chassis andfour located on the back. Leave screws slightly loose until the entry guide is mounted and alignedwith the machine door closed.
8 Screws must not exceed a 6mm depth through the mounting plate,otherwise they may interfere with the removable Grounding Considerations:Use star washers when mounting the chassis via the back or side mounting options. If the sidemounting option is selected, use the lower mounting holes with an M4 screw to ensure a bondedconnection to the host Holes MEI Cashflow sc83 Part # 252055088 G2 Inserting and Removing the Acceptor Module Insert the Acceptor Module so that the release lever locks into place. The acceptor should befirmly seated to ensure proper engagement of thelocking feature. To remove the unit, pull upwards on the release leverlocated on the front of the Acceptor Module and pullaway from the ModuleINSTALLATION MEI Cashflow sc83 Part # 252055088 G2 Eight pin harness connectorInstalling an Entry Guide To install an entry guide, just slide it onto the acceptor module until it locks into screws are required.
9 If the entry guide has lights, you will have to first connect the harnessfrom the entry guide to the eight pin connector located on the left hand side of the face of theacceptor module. Make sure that the entry guide is aligned so the machine door closes Moduleentry guideINSTALLATION Once the entry guide is aligned properly, remember to go back and tighten the screws on thechassis (refer back to chassis Installation instructions). To remove an entry guide, slide a flat head screwdriverbetween the entry guide and the acceptor module.(as shown in the diagram on the right) MEI Cashflow sc83 Part # 252055088 G2 Installing the Cashbox With the chassis mounted securely to the machine, you may now insert the cashbox into thechassis.
10 The cashbox has slots on both sides that will guide it into the chassis. When you insertthe cashbox, you will feel some resistance from the two springs inside the chassis. Make sure toinsert the cashbox all the way in so that the rear of the cashbox is flush against the chassis the Cashbox When the note acceptor is installed in a machine, you just need to grab the yellow strap on thecashbox and pull firmly to release it. Thecashbox does not lock on to the chassis. To remove the cashbox when the unit is notinstalled, grab on to the yellow handle andplace your thumb on the chassis where indi-cated in this diagram. Placing your thumb atthis location will give you sufficient leverage toremove the THUMB HEREINSTALLATION MEI Cashflow sc83 Part # 252055088 G2 The cashbox may be fitted with either one or two security locks.