Transcription of Microsoft Azure - Tables
1 Microsoft Azure Tables Storing a table does not mean relational database here. Azure Storage can store just a table without any foreign keys or any other kind of relation. These Tables are highly scalable and ideal for handling large amount of data. Tables can be stored and queried for large amount of data. The relational database can be stored using SQL Data Services, which is a separate service. The three main parts of service are Tables Entities Properties For example, if Book is an entity, its properties will be Id, Title, Publisher, Author etc.
2 table will be created for a collection of entities. There can be 252 custom properties and 3 system properties. An entity will always have system properties which are PartitionKey, RowKey and Timestamp. Timestamp is system generated but you will have to specify the PartitionKey and RowKey while inserting data into the table . The example below will make it clearer. table name and Property name is case sensitive which should always be considered while creating a table . How to Manage Tables Using PowerShell Step 1 Download and install Windows PowerShell as discussed previously in the tutorial.
3 Step 2 Right click on Windows PowerShell , choose Pin to Taskbar to pin it on the taskbar of your computer. Step 3 Choose Run ISE as Administrator . Creating a table Step 1 Copy the following commands and paste into the screen. Replace the highlighted text with your account. Step 2 Login into your account. $StorageAccountName = "mystorageaccount" $StorageAccountKey = "mystoragekey" $Ctx = New-AzureStorageContext $StorageAccountName - StorageAccountKey $StorageAccountKey Step 3 Create a new table .
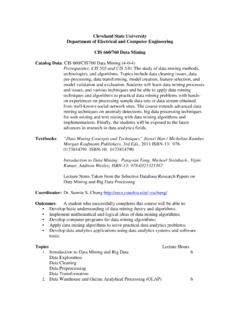
4 $tabName = "Mytablename" New-AzureStorageTable Name $tabName Context $Ctx The following image shows a table being created by the name of book . You can see that it has given the following end point as a result. Similarly, you can retrieve, delete and insert data into the table using preset commands in PowerShell. Retrieve table $tabName = "Book" Get-AzureStorageTable Name $tabName Context $Ctx Delete table $tabName = "Book" Remove-AzureStorageTable Name $tabName Context $Ctx Insert rows into table function Add-Entity() { [CmdletBinding()] param( $ table , [String]$partitionKey, [String]$rowKey, [String]$title, [Int]$id, [String]$publisher, [String]$author )}
5 $entity = New-Object -TypeName -ArgumentList $partitionKey, $rowKey $ ("Title", $title) $ ("ID", $id) $ ("Publisher", $publisher) $ ("Author", $author) $result = $ ( [ ] ::Insert($entity)) } $StorageAccountName = "tutorialspoint" $StorageAccountKey = Get-AzureStorageKey -StorageAccountName $StorageAccountName $Ctx = New-AzureStorageContext $StorageAccountName - StorageAccountKey $ $TableName = "Book" $ table = Get-AzureStorageTable Name $TableName -Context $Ctx -ErrorAction Ignore #Add multiple entities to a table .
6 Add-Entity - table $ table -PartitionKey Partition1 -RowKey Row1 -Title .Net -Id 1 -Publisher abc -Author abc Add-Entity - table $ table -PartitionKey Partition2 -RowKey Row2 -Title JAVA -Id 2 -Publisher abc -Author abc Add-Entity - table $ table -PartitionKey Partition3 -RowKey Row3 -Title PHP -Id 3 -Publisher xyz -Author xyz Add-Entity - table $ table -PartitionKey Partition4 -RowKey Row4 -Title SQL -Id 4 -Publisher xyz -Author xyz Retrieve table Data $StorageAccountName = "tutorialspoint" $StorageAccountKey = Get-AzureStorageKey - StorageAccountName
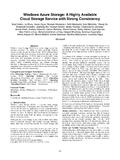
7 $StorageAccountName $Ctx = New-AzureStorageContext StorageAccountName $StorageAccountName - StorageAccountKey $ ; $TableName = "Book" #Get a reference to a table . $ table = Get-AzureStorageTable Name $TableName -Context $Ctx #Create a table query. $query = New-Object #Define columns to select. $list = New-Object [string] $ ("RowKey") $ ("ID") $ ("Title") $ ("Publisher") $ ("Author") #Set query details. $ = "ID gt 0" $ = $list $ = 20 #Execute the query. $entities = $ ($query) #Display entity properties with the table format.
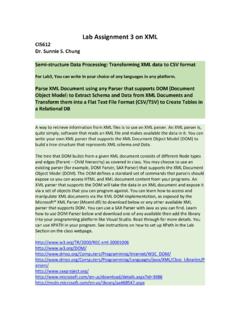
8 $entities | Format- table PartitionKey, RowKey, @{ Label = "Title"; Expression={$ ["Title"].StringValue}}, @{ Label = "ID"; Expression={$ [ ID ].Int32 Value}}, @{ Label = "Publisher"; Expression={$ [ Publisher ].StringValue}}, @{ Label = "Author"; Expression={$ [ Author ].StringValue}} -AutoSize The output will be as shown in the following image. The output will be as shown in the following image. Delete Rows from table $StorageAccountName = "tutorialspoint" $StorageAccountKey = Get-AzureStorageKey - StorageAccountName $StorageAccountName $Ctx = New-AzureStorageContext StorageAccountName $StorageAccountName - StorageAccountKey $ #Retrieve the table .
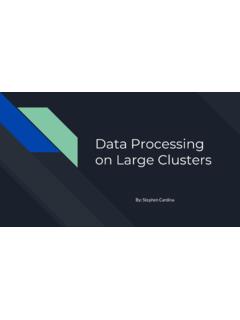
9 $TableName = "Book" $ table = Get-AzureStorageTable -Name $TableName -Context $Ctx -ErrorAction Ignore #If the table exists, start deleting its entities. if ($ table -ne $null) { #Together the PartitionKey and RowKey uniquely identify every #entity within a table . $tableResult = $ ( [ ] ::Retrieve( Partition1 , "Row1")) $entity = $ ; if ($entity -ne $null) { $ ( [ ] ::Delete($entity)) } } The above script will delete the first row from the table , as you can see that we have specified Partition1 and Row1 in the script.
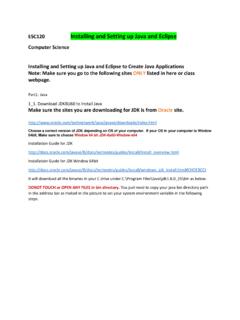
10 After you are done with deleting the row, you can check the result by running the script for retrieving rows. There you will see that the first row is deleted. While running these commands please ensure that you have replaced the accountname with your account name, accountkey with your account key. How to Manage table using Azure Storage Explorer Step 1 Login in to your Azure account and go to your storage account. Step 2 Click on the link Storage explorer as shown in purple circle in the following image.