Transcription of Microsoft Excel for Beginners - IT Training
1 Microsoft Excel for Beginners 1/16/2018 Microsoft Excel for Beginners hours This is a basic computer workshop. Microsoft Excel is a spreadsheet program. We use it to create reports that need calculations and charts. In this workshop we will learn how to move around and work inside the spreadsheet. Vocabulary .. 1 Status Bar Modes .. 1 Keyboard Navigation .. 2 Ribbon .. 2 Clipboard .. 2 Formatting Cells .. 3 Cells Structures .. 4 Inserting .. 4 Deleting .. 5 Cell size (Row Height/Column Width) .. 5 Fill Handle .. 6 Building an Equation .. 6 Type in the exact cell address .. 6 Use the mouse to point to the cell address .. 7 Mathematical Operations .. 7 AutoSum .. 7 Exercise 1: Customers .. 8 Resizing Columns.
2 8 Freeze Panes (Lock Titles to Top of Page) .. 8 Format .. 9 Exercise 2: Quarter Total .. 10 Fill Handle .. 10 Format .. 10 Chart .. 10 Exercise 3: Items by Quarter .. 11 Insert Rows .. 11 Merged Title .. 11 Fill Handle Across .. 11 Total Row (AutoSum) .. 11 Exercise 4: Sales Report .. 12 Format .. 12 Math .. 12 Grand Total .. 12 1 Vocabulary Microsoft Excel is a spreadsheet program. We use it to create reports that need calculations and charts. 1. An Excel file is called a Workbook. - Default title is Book1 2. Ribbon broken into Tabs (Home, Insert, Page ) - Tabs broken into groups (Clipboard, font , Alignment) 3. Name box (left) and formula bar (right) - Name box shows address of current cell - Formula bar shows contents of current cell 4.
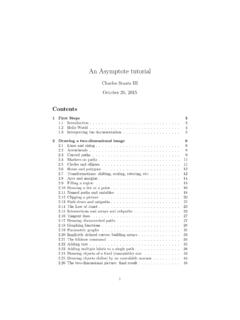
3 Columns Headings are Lettered, Rows Headings are Numbered - Columns of a building, rows of chairs 5. Worksheet navigation buttons, Worksheet tabs - Sheet1 6. Status bar - Excel behaves differently depending on the current "mode" Status Bar Modes Ready mode. This means nothing is being entered or edited on the spreadsheet. Enter mode. This mode is when you are doing data entry, just typing in the contents. Edit mode. Edit the contents of the current cell. Double click on a cell with data in it, or click inside the formula bar for this mode. Point mode. Used when linking to cell addresses within a formula or from an Excel dialog window. 13 4 5 6 2 2 Keyboard Navigation Key Ready Enter Edit Point Enter Move Down Accept changes and move down Shift Enter Move Up Accept changes and move up Tab Move Right Accept changes and move right Shift Tab Move Left Accept changes and move Left Arrow Keys Moves to another cell Moves between characters in cell Points to an address of a cell Home Moves to first column Moves to the front of the line in the cell Points to cell in column A Ctrl Home Moves to the beginning cell of the worksheet (A1) Points to the beginning of the worksheet Ribbon The images of Excel in this packet were copied from a wide screen monitor.
4 With the wide screen the ribbon is stretched across the window and I can see all the buttons. If you are working on a narrower window, Excel will try to clump the groups together and the layout may look a little different than the ones shown here, but all the buttons will be there. Here we can see how the font group is now three buttons high, and how some of the buttons like Cut and Copy have lost their text labels. Clipboard Cut, Copy and Paste are clipboard features built into Windows. The clipboard is a temporary storage place for pictures and data. The Windows clipboard can only store one item at a time. Microsoft Office has a Multi Clipboard that can store 24 items, but the Paste button and the shortcuts for the Paste option only correspond to the most recently copied item.
5 The clipboard pane must be displayed to be able to use this feature. Cut Copies selection to the clipboard. If the selection is text or an image, it will disappear. If it s a cell, Excel waits until you paste it to delete the original cell. Copy Copies selection to the clipboard. Paste Retrieves most recent text/object on the clipboard. 3 Formatting Cells The most formatting options are found on the Home Tab. All the options can be found in the Format Cells window. This contains several tabs to help us format the contents of our spreadsheet. This window can be opened by using the More Options button at the end of the Format, Alignment and Number groups. You can also use the Keyboard Shortcut Ctrl 1 or choose Format from the right click shortcut menu.
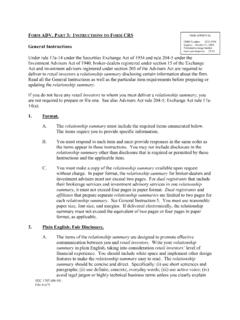
6 font 1. font Sets the font of the selected cell(s). Fonts are different ways to show the same letters. 2. font size Sets the size of the letters (the font ). larger numbers give larger fonts. 3. Increase font Increases the font size 4. Decrease font Decreases the font size 5. Bold Makes the selected cell(s) Bold 6. Italic Makes the selected cell(s) Italicized 7. Underline Makes the selected cell(s) Underlined. The drop down has a double underline. 8. Borders Adds and removes borders for the selected cell(s). The drop down has More 9. Fill Color Changes the background color of the selected cell(s). 10. font Color Changes the color of the font of the selected cell(s). 11. More Options This button will open the Format Cells dialog window.
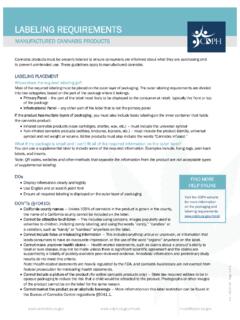
7 Alignment 1. Top Align Vertically aligns to the top of the cell. 2. Middle Align Vertically aligns to middle of the cell. 3. Bottom Align Vertically aligns to the bottom of the cell. 4. Orientation Rotates the contents of the cell to the currently displayed option. 5. Wrap Text Displays contents on multiple lines within the cell's column width. 6. Align Text Left Horizontally aligns the contents to the left side of the column. 7. Center Horizontally aligns the contents to the center of the cell. 8. Align Text Right Horizontally aligns the contents to the right side of the cell. 9. Decrease Indent Decreases the space between the text and the cell border 10. Increase Indent Increases the space between the text and the cell border 11.
8 Merge and Center Joins selected (adjacent) cells into one cell and centers the result. If there is data in more than one cell, Excel will only keep the information from the upper left cell. 12. More Options This button will open the Format Cells dialog window to the Alignment Tab. 1 2 3 4 5 6 7 8 9 10 11 1 2 3 4 5 6 7 8 9 10 11 12 4 Number 1. Number Format Allows you to change the way numeric values are displayed on the spreadsheet. The drop down arrow gives you a list of the most common formats, including a More Number Formats option. 2. Currency Style Sets the selected cell(s) to the Currency Style, this style keeps the dollar signs on the left side of the cell, and the number on the right side.
9 The drop down arrow gives you a list of other currency formats, such as the Euro ( ). 3. Percent Style Sets the selected cell(s) to the Percent Style, this style has zero decimal places. Keyboard shortcut Ctrl Shift %. This button can be reset through Cell Styles on the Home Tab. 4. Comma Style Sets the selected cell(s) to the Comma Style, this style has a comma for every thousand and two decimal places. This button can be reset through 5. Increase Decimal Increases the number of decimal places showing to the right of the decimal. 6. Decrease Decimal Decreases the number of decimal places showing to the right of the decimal. 7. More Options This button will open the Format Cells dialog window to the Number Tab.
10 Cells Structures There are a set number of cells within a Microsoft Excel worksheet. In the Ribbon versions (2007 and later) there are 16,384 columns and 1,048,576 rows. As you insert and delete structures, you are not reducing the number of cells, merely shifting where your data lies on the defined worksheet. Think about moving a painting around on a wall. You're not changing the wall, just the position of the painting. Inserting We use Insert to make new cells, columns, and rows. Excel determines what you are trying to insert based on your selection. If a full column is selected, Excel will assume you mean a full column and it will skip the Insert window. You can insert a cell, row, or column by doing one of the following: Press Shift Ctrl = on the keyboard (ctrl plus) or from the Home tab, in the Cells group, choose Insert or open the Right click menu and choose insert.