Transcription of Microsoft Office Excel 2016 for Windows
1 Microsoft Office Excel 2016 for Windows introduction to Excel Learning Technologies, Training & Audiovisual Outreach University Information Technology Services Copyright 2016 KSU Division of University Information Technology Services This document may be downloaded, printed, or copied for educational use without further permission of the University Information Technology Services Division (UITS), provided the content is not modified and this statement is not removed. Any use not stated above requires the written consent of the UITS Division. The distribution of a copy of this document via the Internet or other electronic medium without the written permission of the KSU - UITS Division is expressly prohibited. Published by Kennesaw State University UITS 2016 The publisher makes no warranties as to the accuracy of the material contained in this document and therefore is not responsible for any damages or liabilities incurred from UITS use.
2 Microsoft product screenshot(s) reprinted with permission from Microsoft Corporation. Microsoft , Microsoft Office , and Microsoft Excel are trademarks of the Microsoft Corporation. University Information Technology Services Microsoft Office : Excel 2016 introduction to Excel Table of Contents introduction .. 5 Learning Objectives .. 5 The Office 2016 Interface .. 6 The Ribbon .. 6 Customizing the Ribbon .. 7 The Quick Access Toolbar .. 9 Tell Me and Smart Lookup .. 10 The Smart Lookup Tool .. 13 The File Tab .. 14 Columns and Rows .. 15 Entering Text .. 16 Long Words and Numbers .. 16 Completing a Series .. 17 Selecting Multiple Cells .. 18 Moving Text and 19 Copying Data .. 20 Insert a Row or Column .. 21 Delete a Row or Column .. 23 Changing Column Width and Row Height .. 23 Formatting Numbers .. 25 Formatting Text and Numbers .. 25 Changing the Font.
3 26 Borders .. 26 Graphics .. 27 Clip Art .. 28 Images from a File .. 29 Printing .. 29 Saving .. 31 Additional Help .. 32 Revised: 6/2/2016 Page 5 of 32 introduction This booklet is the companion document to the Excel 2016: Intro to Excel workshop. It includes an introduction to the Microsoft Office 2016 interface and covers the various aspects of creating, formatting, editing, saving, and printing a document in Excel 2016. Learning Objectives After completing the instructions in this booklet, you will be able to: Identify the components of the Office 2016 interface Be familiar with the layout of the spreadsheet Have the ability to enter text and numbers Have the ability to modify a spreadsheet Know how to change the appearance of text and numbers within the spreadsheet Be able to apply borders Be able to insert graphics Be able to add headers and footers Be able to insert hyperlinks Be able to work with shapes Have the ability to print Know how to save a worksheet Page 6 of 32 The Office 2016 Interface The Office 2016 interface is similar to the Office 2013 interface, with a few minor changes.
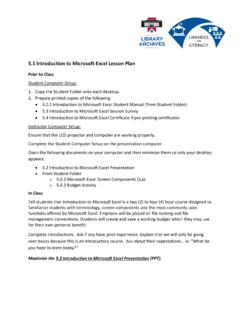
4 The following describes the Office 2016 interface. The Ribbon The Ribbon is a panel that contains functional groupings of buttons and drop-down lists organized by tabs. Each application in the Office Suite has a different set of tabs (with some tabs in common) that pertain to the functionality of that particular application. Each tab is further divided into groups (of buttons), such as the Font and Alignment groups, which are shown in Figure 1. Figure 1 - Ribbon At the bottom-right corner of some groups, there is a diagonal arrow called a Dialog Box Launcher. Clicking this button opens a dialog box for that group containing further option selections. Figure 2 - Dialog Box Launcher There are also contextual tabs that appear, depending on what you are working on. For example, if you have inserted pictures, the Picture Tools tab appears whenever a picture is selected.
5 Figure 3 - Contextual Tab Page 7 of 32 Customizing the Ribbon In Excel you can build your own tab(s). The following explains how to build your own tabs/groups: 1. Right-click anywhere in the ribbon. 2. Select Customize the Ribbon. Figure 4 - Customize the Ribbon 3. On the right side of the window, underneath the Customize the Ribbon section, click the button New Tab. Figure 5 - New Tab Button 4. You will see that New Tab has been added in the list of Main Tabs. Under New Tab, you will see New Group. Click once to select New Group. Figure 6 - New Tab Added to List Page 8 of 32 5. In the Excel Options window, you will see a pane on the left with many commands. Click to select the command that you want to add to the New Group (see Figure 7). 6. Click the Add>> button (see Figure 7). Figure 7 - Add Button 7. Repeat steps 4-5 above to add additional commands to the group.
6 8. To rename the tab or group, select New Tab or New Group. 9. Click the Rename button in the bottom-right corner of the window. Figure 8 - Rename Button 10. To hide a tab, remove the check-mark next to the name of the tab. 11. When you are done, select OK. The new tab will be added to the Ribbon. Figure 9 - New Tab added to Ribbon Page 9 of 32 The Quick Access Toolbar The Quick Access Toolbar is a small toolbar at the top left of the window that you can customize to contain the buttons for the functions that you use most often. In essence, it is the same as the toolbars from previous versions with only the buttons you want to see on it. Figure 10 - Quick Access Toolbar To customize the Quick Access Toolbar, click the Customize Quick Access Toolbar drop-down arrow. Figure 11 - Add Drop-Down Arrow From the menu, you can add or remove items from the toolbar by selecting or deselecting a menu item.
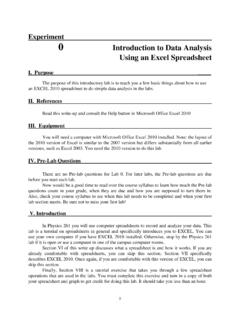
7 You can also show the toolbar below the Ribbon, instead of above the Ribbon. Lastly, you can minimize the Ribbon. Figure 12 - Quick Access Toolbar Menu Page 10 of 32 Tell Me and Smart Lookup The Tell Me dialog box lets you enter keywords and phrases related to what you want to do next to quickly access features or actions. It can also be used to look up helpful information related to the topic. It is located on the Menu bar, above the ribbon. The following explains how to use the Tell Me functionality. Figure 13 - Tell Me Dialog Box 1. Highlight your data, then enter a keyword or phrase into the dialog box to view a list of commands and features. 2. A drop-down list of options for selection appears based on the topic entered. 3. Click on the command or function you want to use. For this example, click Create Chart. Figure 15 - Create Chart Figure 14 - Tell Me Sample Searches Page 11 of 32 4.
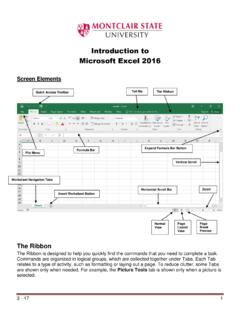
8 In this example, clicking Create Chart prompts Excel to analyze the highlighted data and to display a list of Recommended Charts for your data. Figure 16 - Recommended Charts 5. You may select from the Recommended Charts or click the All Charts tab to select from the entire library of charts. Figure 17 - All Charts Page 12 of 32 6. At the bottom of the drop-down list, there are also buttons to Get Help from Microsoft (see Figure 18) and Smart Lookup (see Figure 19) to provide access to helpful articles, links, pictures, and definitions from the Web. Figure 18 - Get Help Display Figure 19 - Smart Lookup Page 13 of 32 The Smart Lookup Tool Smart Lookup uses Bing to provide you with search results for your selected term or phrase. It is located under the Review tab within the Insights section. The following explains how to use the Smart Lookup functionality.
9 1. Highlight the word or phrase you want to find information about (see Figure 20). 2. Right click it (see Figure 20). 3. Click Smart Lookup (see Figure 20). 4. The Insights pane displays the information relevant to your selection (see Figure 20). Figure 20 - Smart Lookup 5. To close the Smart Lookup Insights pane, click the Exit (X) button in the top right corner of the pane. Figure 21 - Exit Smart Lookup Insights Pane Page 14 of 32 The File Tab The File Tab is located in the top left corner of the window. Figure 22 - The File Tab When you click the File Tab, you will be taken to the Backstage view. Figure 23 - Backstage In Backstage view, you can do the following: Save and close spreadsheets Obtain information about spreadsheets See recent files created and edited Create new spreadsheets and templates Share and Export spreadsheets Print spreadsheets Obtain help Close the Excel workbook Page 15 of 32 If you click the Print option, you will automatically see a preview of your document (see Figure 23).
10 To leave the Backstage view and return to your document, click the arrow in the top left corner. Figure 24 - Back Button Note: For more information on the Backstage, view the Excel 2016 Quick Guide located at the UITS Documentation Center ( ). Columns and Rows Column A vertical line of cells. A letter identifies each column. Notice the Name field contains the column letter and row number of the first cell of the highlighted range of cells in the column. Figure 25 - Columns Row A horizontal line of cells. A number identifies each row. Notice the Name field contains the column letter and row number of the first cell in the highlighted range of cells in the row. Figure 26 - Rows Page 16 of 32 Entering Text The following instructions explain how to enter text into cells. 1. Click the cell where you want to enter data and type the text or numbers (see Figure 27).