Transcription of Microsoft SharePoi nt 2016 - CustomGuide
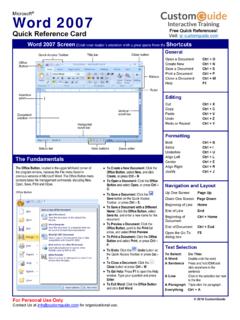
1 2021 CustomGuide , Inc. Microsoft SharePoint 2016 Quick Reference Guide The SharePoint 2016 Screen The Fundamentals Access a SharePoint Site: Enter the address for your SharePoint site into your browser, enter your username and password, then click OK (for on-premises instances), or open the SharePoint app on (for instances of SharePoint Online). Navigate a SharePoint Site: Use the links at the top of the page, and in the Quick Launch area on the left side of the page, to visit pages and subsites. Use the Ribbon: Click a ribbon tab to display its commands, then click a button on the ribbon. Click the Browse tab to close the ribbon. Search a Site: Click in the Search field, enter search keywords, and press Enter.
2 Get Help: Click the Help icon in the upper right, enter a search topic in the Search box, then click a relevant article s title. Delete an Item: Select an item in a library or list, click the Delete button on the toolbar (or on the ribbon), and click Delete again to confirm. Delete a List or Library: Open the Site Contents page, click the Show actions button next to a list or library, and select Remove. Click Delete to confirm. Use Lists and Libraries Create a List: Click the Settings icon in the upper right, select Add an app, click a type of list, give it a name, and click Create. Add a List Item: Open a list, click the New button, fill out the available fields, then click the Save button.
3 Use Quick Edit: Click the Quick Edit button, fill out the columns and rows to add list items, then click the Exit Quick Edit button. Edit a List Item: Check a check box next to a list item to select it, click the Edit button, make changes to the item data, then click the Save button. Delete a List Item: Check a checkbox next to a list item to select it, click the Delete button, and click Delete again to confirm. Add a New List Column: While viewing a list, click the Add column button at the right edge of the list. Select a column type, fill out that column s details, then click Save. Edit a Column: Click the column s list arrow, select Column Settings, and select Edit.
4 Modify that column s details, then click Save. Types of Lists Announcements: Shares news and status updates. Contacts: Stores information about people, such as names, company, phone numbers, and email addresses. Discussion Boards: Contain discussion threads, with an option to store email discussions as well. Links: Stores a list of links to websites, both external websites and internal SharePoint sites. Calendar: Stores events, meetings, and other dates in a special list that can be viewed as a calendar. Calendar lists can also integrate with Outlook. Tasks: Tracks information about projects, including who is assigned to each task, that task s progress, and due dates.
5 Task lists are also able to integrate into Outlook. Survey: Contains a list of questions to have people fill out. Custom List: This type of list allows you to create it from scratch, adding just the columns that you need. Types of Libraries Asset Library: Stores media assets like images, video, and audio files. An asset library also stores thumbnails and metadata for media assets to make them easier to use. Document Library: Stores many kinds of documents, including text documents, spreadsheets, and presentations. Form Library: Stores XML-based data entry forms. Picture Library: Stores pictures, while also offering several ways to view and edit the pictures in the library.
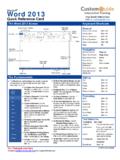
6 Report Library: Contains web pages and documents to track data reports and dashboards. Wiki Page Library: Lets you create interconnected Wiki pages that can be easily created and modified by multiple users. List and Library Types Search field Navigation pane Toolbar Settings menu Top Links Free Quick References Visit 2021 CustomGuide , Inc. Use Lists and Libraries Create a Library: Click the Settings icon in the upper right, select Add an app, click a type of library, give it a name, and click Create. Create a Document in a Library: Open the library, click the New button, and select a type of document. Upload a File: Open the library, click the Upload button, select Files or Folder, select files or a folder to upload, then click Open.
7 Sort a List or Library: Click a column header, then select a sorting option. Filter a List or Library: Click the Filter button and check the check boxes for the filters you want to apply. Clear a Filter: Click the Clear Filters button in the Filters pane. Change Views: Click the View Options button (which will be labeled with the name of the current view) on the toolbar and select a view. Create a Custom View: Click the Settings icon, select List Settings, and click Create View. Select a view type, give the view a name, configure the view s settings, then click OK. Edit a View: Click the View Options button on the toolbar, select Edit Current View, make changes to the view, and click OK.
8 Work with Documents Open a File in the Browser: Click a file s name. Open a File in Office: Select a file by checking its check box, click the Open button, and select Open in [Office Program]. Download a File: Select a file, then click the Download button on the toolbar. Check Out a File: Select a file, expand the toolbar by clicking the ellipsis button (if necessary), and click the Check out button. Check In a File: Select a file, expand the toolbar by clicking the ellipsis button (if necessary), and click the Check in button. If necessary, enter details for the check-in and click OK. View a File s Version History: Select a file, expand the toolbar by clicking the ellipsis button (if necessary), and click the Version history button.
9 Create an Alert: Select a file, expand the toolbar by clicking the ellipsis button (if necessary), and click the Alert me button. Configure the alert s settings, then click OK. Work with Documents Create a Folder: Click the New button, select Folder, enter a name for the folder, and click Create. Move a File to a Folder: Click and drag a file into a folder. Or, select a file, expand the toolbar by clicking the ellipsis button (if necessary), click the Move To button. Select a library and folder, then click Move Here. Share a File: Select a file, click the Share button, enter names or email addresses, select permissions, add a message, and click Send.
10 Work with Web Pages Create a New Page: From the SharePoint home page, click the New button and select Page. Enter a name in the Title field, then add content. Click the Save and close button. View Site Pages: Click the Settings icon in the upper right, select Site Contents, then click the Site Pages library. Edit a Page: Open a page, then click the Edit button on the toolbar. Add, edit, or remove content, then click the Save and close button. Publish a Page: While viewing a page you ve created, click the Publish button on the toolbar. Promote a Page: While viewing a page, click the Promote button in the toolbar, then select a promotion option from the pane.