Transcription of Word 2007 Quick Reference - SharePoint Training
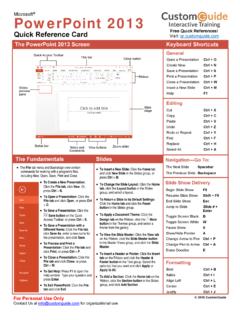
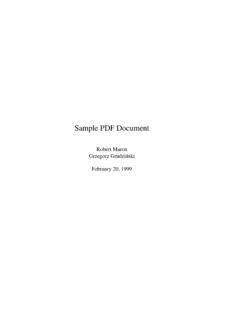
1 Microsoft Word 2007 Quick Reference Card Word 2007 Screen [Grab your reader s attention with a great quote from the Shortcuts The Fundamentals Open a document Ctrl + O Create New Ctrl + N Save a document Ctrl + S Print a document Ctrl + P Close a document Ctrl + W Help F1 General Editing Formatting Bold Ctrl + B Italics Ctrl + I Underline Ctrl + U Align Left Ctrl + L Center Ctrl + E Align Right Ctrl + R Justify Ctrl + J Cut Ctrl + X Copy Ctrl + C Paste Ctrl + V Undo Ctrl + Z Redo or Repeat Ctrl + Y Navigation and Layout Up One Screen Page Up Down One Screen Page Down Beginning of Line Home End of Line End Beginning of Ctrl + Home document End of document Ctrl + End Open the Go To F5 dialog box Office Button Text Selection To Select: Do This: A Word Double-click the word A Sentence Press and hold Ctrl and click anywhere in the sentenceA Line Click in the selection bar next to the line A Paragraph Triple-click the paragraph Everything Ctrl + A The Office Button, located in the upper left-hand corner of the program window, replaces the File menu found in previous versions of Microsoft Word.]
2 The Office Button menu contains basic file management commands, including New, Open, Save, Print and Close. To Create a New document : Click theOffice Button, select New, and clickCreate, or press Ctrl + N. To Open a document : Click the OfficeButton and select Open, or press Ctrl +O. To Save a document : Click theSave button on the Quick AccessToolbar, or press Ctrl + S. To Save a document with a DifferentName: Click the Office Button, selectSave As, and enter a new name for thedocument. To Preview a document : Click theOffice Button, point to the Print listarrow, and select Print Preview. To Print a document : Click the OfficeButton and select Print, or press Ctrl +P. To Undo: Click the Undo button onthe Quick Access Toolbar or press Ctrl + Z.
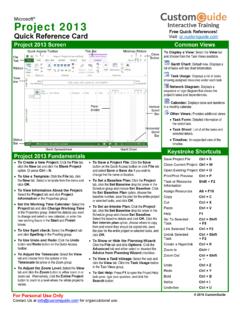
3 To Close a document : Click theClose button or press Ctrl + W. To Get Help: Press F1 to open the Helpwindow. Type your question and pressEnter. To Exit Word: Click the Office Buttonand click Exit Button Quick Access Toolbar Title bar RulerZoom slider RibbonView buttonsClose buttonInsertion point Status bar document window Vertical scroll bar Horizontal scroll bar Free Quick References!Visit: 2016 CustomGuide For Personal Use Only Contact Us at for organizational use. Formatting Drawing and Graphics Mail Merge To Change Paragraph Line Spacing: Click the Line Spacing button in the Paragraph group on the Home tab and select an option from the list. To Create a Bulleted or Numbered List: Select the paragraphs you want tobullet or number and click the Bullets or Numbering button in theParagraph group on the Home tab.
4 To Change a document s Margins: Click the Page Layout tab on theRibbon, click the Margins button in the Page Setup group, and select asetting. To Change Page Orientation: Click the Page Layout tab on the Ribbon, clickthe Orientation button, and select an option from the list. To Insert a Header or Footer: Click the Insert tab on the Ribbon and clickthe Header or Footer button in the Header & Footer group. To Insert a Manual Page Break: Click the Insert tab on the Ribbon and clickthe Page Break button in the Page Setup group. To Insert a Section Break: Click the Page Layout tab on the Ribbon, clickthe Breaks button in the Page Setup group, and select the type of break youwant to insert. To Correct a Spelling Error: Right-click the error and select a correction fromthe contextual menu.
5 Or, press F7 to run the Spell Checker. To Find Text: Click the Find button in the Editing group on the Home tab. To Replace Text: Click the Replace button in the Editing group on theHome tab. To Move Text with the Mouse: Select the text you want to move, drag thetext to a new location, and release the mouse button. To Cut or Copy Text: Select the text you want to cut or copy and click theCut or Copy button in the Clipboard group on the Home tab. To Paste Text: Place the insertion point where you want to paste and clickthe Paste button in the Clipboard group on the Home tab. To Format Selected Text: Use the commands in the Font group on theHome tab, or click the Dialog Box Launcher in the Font group to open theFont dialog box.
6 To Copy Formatting with the Format Painter: Select the text with theformatting you want to copy and click the Format Painter button in theClipboard group on the Home tab. Then, select the text you want to applythe copied formatting to. To Change Paragraph Alignment: Select the paragraph(s) and click theappropriate alignment button ( Align Left, Center, Align Right,or Justify) in the Paragraph group on the Home tab. To Indent a Paragraph: Click the Increase Indent button in theParagraph group on the Home tab. To Decrease an Indent: Click the Decrease Indent button in theParagraph group on the Home tab. To Add a Tab Stop: Click the Tab alignment box on the Ruler until yousee the type of tab you want to insert.
7 Then, click on the Ruler where youwant to insert the tab stop. To Adjust or Remove a Tab Stop: Click and drag the tab stop to thedesired position on the Ruler. Click and drag the tab stop off the Ruler toremove Select a document type: Click the Mailings tab on the Ribbon, click theStart Mail Merge button in the Start Mail Merge group, and select the typeof document you want to Connect the document to a data source: In the Start Mail Merge group onthe Mailings tab, click the Select Recipients Refine recipients: In the Start Mail Merge group on the Mailings tab, clickthe Edit Recipient List merge fields: Position the insertion point where you want to insertthe merge field(s) and use the commands found in the Write & Insert Fieldsgroup on the Mailings Preview your letters.
8 In the Preview Results group on the Mailings tab,click the Preview Results Complete the merge: In the Finish group on the Mailings tab, click theFinish & Merge button and select an option from the list. To Insert a Clip Art Graphic: Click the Insert tab on the Ribbon and click theClip Art button in the Illustrations group. Type the name of what you relooking for in the Search for box and click Go. To Insert a Picture: Click the Insert tab on the Ribbon and click the Picturebutton in the Illustrations group. Find and select the picture you want to insertand click Insert. To Adjust Text Wrapping: Double-click the object, click the Text Wrappingbutton in the Arrange group, and select an option from the list.
9 To Draw a Shape: Click the Insert tab on the Ribbon, click the Shapesbutton in the Shapes group, and select the shape you want to insert. Then,click where you want to draw the shape and drag until the shape reaches thedesired size. Hold down the Shift key while you drag to draw a perfectlyproportioned shape or straight line. To Move an Object: Click the object and drag it to a new location. Releasethe mouse button when you re finished. To Resize an Object: Click the object to select it, click and drag one of itssizing handles ( ), and release the mouse button when the object reachesthe desired size. Hold down the Shift key while dragging to maintain theobject s proportions while resizing it. To Delete an Object: Select the object and press the Delete key.
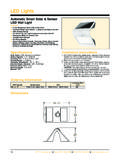
10 To Format an Object: Double-click the object and use the commands locatedon the Format tab. To Insert a WordArt Object: Click the Insert tab on the Ribbon, click theWordArt button in the Text group, and select a design from the WordArtGallery. Enter the text you want WordArt to format and adjust the font typeand size, if necessary. Click OK. Tables Dialog Box LauncherGroup To Insert a Table: Click the Insert tab on the Ribbon, click the Table buttonin the Tables group, and select Insert Table from the menu. To Insert a Column or Row: Click the Layout tab under Table Tools anduse the commands located in the Rows & Columns group. To Delete a Column or Row: Select the column or row you want to delete,click the Layout tab under Table Tools, click the Delete button in the Rows& Columns group, and select an appropriate option from the menu.