Example: dental hygienist
MICROWAVE HOOD COMBINATION INSTALLATION …
NOTE: If no wall studs exist within the cabinet opening, do not install the microwave oven. See illustrations in “Possible Wall Stud Configurations.” 1. Using a stud finder, locate the edges of the wall stud(s) within the opening. 2. Mark the center of each stud, and draw a plumb line down each stud center. See illustrations in “Possible ...
Tags:
Information
Domain:
Source:
Link to this page:
Documents from same domain

Use & Care Guide - Whirlpool
www.whirlpool.comUse the Automatic Cycles to provide the most energy savings and enhanced fabric care from the dryer. During Automatic Cycles, drying air temperature and moisture level are sensed in the load.

INSTALLATION INSTRUCTIONS AND OWNER’S …
www.whirlpool.comINSTALLATION INSTRUCTIONS AND OWNER’S MANUAL Top Mount Refrigerator Do Not Throw Away — Additional important safety information included. Para las instrucciones en español, visite nuestro sitio de internet.

MICROWAVE HOOD COMBINATION …
www.whirlpool.comMICROWAVE HOOD COMBINATION INSTALLATION INSTRUCTIONS MICROWAVE HOOD COMBINATION SAFETY This product is suitable for use above electric or gas cooking products up to 36" (91.4 cm) wide.

Use & Care Guide - Whirlpool
www.whirlpool.comW10607424B W10607425B - SP If you have any problems or questions, visit us at www.whirlpool.com Pour tout problème ou toute question, consulter www.whirlpool.ca Use & Care Guide

Use & Care Guide - Whirlpool
www.whirlpool.comW10680139D W10680140D - SP If you have any problems or questions, visit us at www.whirlpool.com Pour tout problème ou question, consulter www.whirlpoolappliances.ca Use & Care Guide Guide d’utilisation et d’entretien
DISHWASHER USER INSTRUCTIONS - Whirlpool
www.whirlpool.comTHANK YOU for purchasing this high-quality product. If you should experience a problem not covered in TROUBLESHOOTING, please visit our website at www.whirlpool.com for additional information. If you still need assistance, call us at 1-800-253-1301.
WHIRLPOOL CORPORATION MAJOR APPLIANCE LIMITED …
www.whirlpool.com2/14 WHIRLPOOL CORPORATION MAJOR APPLIANCE LIMITED WARRANTY ATTACH YOUR RECEIPT HERE. PROOF OF PURCHASE IS REQUIRED TO OBTAIN WARRANTY SERVICE. Please have the following information available when you call the
ELECTRIC RANGE USER INSTRUCTIONS - Whirlpool
www.whirlpool.comTHANK YOU for purchasing this high-quality product. If you should experience a problem not covered in TROUBLESHOOTING, please visit our website at www.whirlpool.com for additional information. If you still need assist ance, call us at 1-800-253-1301.

REFRIGERATOR USER INSTRUCTIONS - Whirlpool
www.whirlpool.comYour safety and the safety of others are very important. We have provided many important safety messages in this manual and on your appliance. Always read and obey all safety messages. This is the safety alert symbol. This symbol alerts you to potential hazards that can kill or hurt you and others.

ELECTRIC DRYER OWNER’S MANUAL GUIDE D’UTILISATION …
www.whirlpool.comELECTRIC DRYER OWNER’S MANUAL GUIDE D’UTILISATION DE LA SÉCHEUSE ÉLECTRIQUE Table of Contents Dryer Safety.2 Dryer Safety.2 Dryer Maintenance and Care.5 Cleaning the Dryer Location.5 Cleaning the Dryer Interior.5 Removing Accumulated Lint.5 Cleaning the Lint Screen.5 Changing the Drum Light (on some models).6 Check Your Vent …
Related documents

Mechanical Properties of Steel Bolts, Screws and Studs
powah.hk4. Marking of Bolts, Screws and Studs - Marking of all property classes is obligatory for hexagon bolts and screws with nominal diameters d ≥ 5mm, preferably on top of the head. - Studs shall be marked for property classes ≥ 8.8 and with nominal diameter ≥ 5mm. For studs with interference fit, the marking shall be at the nut end.

Cooler for Your Small Farm How to Build a Walk-In
agriculture.sc.govAttach insulation over the studs, not in between Tack the rigid foam up on the outside of the studs, not in between them. Cutting up your insulation to go in between studs will not only leave gaps and holes, but no matter how careful you are, polyisocyanurate and polyurethane will shrink a bit over time, exposing your cooler even more.

DESIGN FOR SPLICING OF COLD-FORMED STEEL WALL …
cracometals.comSplicing of wall studs may be required in the field to extend studs to the ... Designs cited herein are not intended to preclude the use of other materials, assemblies, structures or designs when these other designs and materials demonstrate equivalent performance for the intended use; CFSEI ... = 12 ft Top of stud elevation s := 16 in Stud ...

HOW TO BUILD A 12X8 SHED
www.myshedplans.comCut twenty-seven studs at 92 5/8", and cut six at 81 1/2" to serve as jack studs. 5. Build three headers with 2 × 6s and 1/2" plywood: one at 65" for the door opening, one at 67" for the right side window, and one at 35" for the rear window. 6. Assemble, raise, and brace the walls one at a time, then add the double top plates. Want more shed ...

Timber Wall Framing. Studs are Consistently Placed @ 600 ...
www.timberdesign.org.nzto the top and bottom sheets at the horizontal join. The pieces of gib are long enough to fit neatly between the studs and are glued half on to the top sheet and half on to the bottom. We revisited the site after plastering and painting and the finished product look flawless.

Wire Shelving Specifications - ClosetMaid
design.closetmaid.comHorizontal track mount, level track, secure with screws and/or mollies in studs or drywall. Horizontal track can also be mounted to the top wall/ceiling plate with #12 x 2 in. pan head screw #2876. Secure to at least one stud. Vertical installation of standards no more than 24 in. …
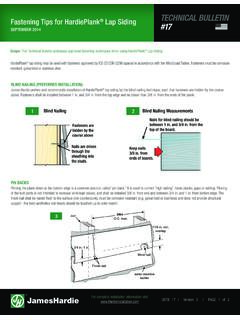
Fastening Tips for HardiePlank Lap Siding TECHNICAL ...
www.jameshardie.comthe studs. 1 Blind Nailing Measurements Keep nails 3/8 in. from ends of boards. Nails for blind nailing should be between 1 in. and 3/4 in. from the top of the board. 2 3 water-resistive barrier Finish nail Blind nail 3/4 in.-1 in. 24in. O.C. max. stud 11/4 in. min. overlap

INSTALLATION INSTRUCTIONS FOR FIBER GLASS BATTS AND …
www.jm.comLeave a little extra on each end to cover the top plate of the outside wall. In attic installations, make sure the insulation completely covers the top plate of the outside wall at the end of each joist run. However, it should not block the flow of air from the eave vents. If necessary, install baffles at the inside of eaves. 4.