Transcription of Model Rocketry Technical Manual
1 By William SimonUpdated and edited by Thomas Beach and Joyce RocketryTechnical ManualWelcome to the Exciting World of Estes Model Rocketry ! 2012 Estes-Cox TABLE OF CONTENTST opicPageWhy Estes Model Rocketry3A Safe Program3 Your First Model Rocket3 Construction Techniques3 Types of Glues3 Finishing6 Stability7 Swing Test For Stability8 Preparing For Flight8 Igniter Installation9 Launching9 Countdown Checklist10 Tracking10 Trackers 10 Recovery Systems11 Multi-Staging11 Clustering13 Model Rocket Engines14 NAR Safety Code15 Publicationsback coverINTRODUCTIONW elcome to the exciting world of Estes Model Rocketry ! This Technical Manual waswritten to provide both an easy-to-follow guidefor the beginner and a reference for the experi-enced rocket enthusiast.
2 Here you ll find theanswers to the most frequently asked ques-tions. More complete Technical information onall the subjects can be found on the Estes website ( ) and the EstesEducator website ( )2*Copyright 1970, 1989,1993, 2003 Estes-Cox Corp. All Rights is a registered trademark of Estes-Cox ESTES Model Rocketry ?The hobby of Model Rocketry originated at the dawn of thespace age in the late 1950 s. Seeing space boosters carry thefirst artificial satellites into Earth s orbit inspired many enthu-siastic young people to try to emulate the rocket pioneers bybuilding their own rockets. Unfortunately, these homemade rockets usually involved stuffing flammable chemicals intometal pipes, very often with tragic results.
3 Newspapers told offingers and eyes lost and all too frequently of lives lost. Whatwas needed was a safe alternative that would allow young peo-ple to experience the thrill of constructing and launching theirown rockets and provide them with the opportunity to explorethe fascinating science of Rocketry . Estes Model Rocketry is SAFE PROGRAME stes Model Rocketry is a safe activity because it incorporatesthree important features. The first is the Model rocket engine, aprofessionally manufactured, low cost, solid-fuel rocket frees the rocket builder from the inherently dangerous pro-cedures of mixing chemicals and packing second feature is the use of safe materials for constructingthe rockets. All Model rockets are built using only lightweightmaterials such as paper, plastic, and wood.
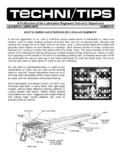
4 Metal parts arenever used for the main structural components of the third feature is the incorporation of the Model RocketSafety Code into all our flying activities. The safety code pro-vides guidelines for the safe operation of Model rockets, suchas launching the rockets electrically from a safe distance, andusing recovery systems to gently return the Model to the safety code is followed, Model Rocketry is an extreme-ly safe activity, safer than baseball, soccer, or swimming. Ourhobby s excellent safety record spans over 45 years and 300million rocket FIRST Model ROCKETThe Estes Alpha is shown here to illustrate the parts of atypical Model rocket for the beginning rocket builder. Theconstruction techniques used in this and other Model rocketsare explained in greater detail in this your first Model rocket we recommend one of the EstesE2X series.
5 No modeling experience is needed to build anE2X Model . Construction involves almost no cutting or sand-ing, and the models do not need Skill Level 1 models are an excellent choice for your sec-ond or third Model . These models are also a good startingpoint if you have previous Model building your knowledge of Rocketry and your modeling skillsincrease you can move up to building higher skill level models,and eventually to building your own custom designs from partsavailable in the Estes TECHNIQUESIn the construction of your Estes Model rockets you will typi-cally need the following tools and supplies (see kit instructionsfor specific requirements): Modeling knife Scissors Ruler Spray Primer Spray paint Tube-type plastic cement Masking tape Fine and extra fine sandpaper White glue or carpenter s glueAlways exercise care when using a modeling knife (they arevery sharp!)
6 And don t leave the knife laying around after youfinish with it. Use some sort of cutting board under the smooth, flat piece of board is great; an old phone book orthick catalog also works well on a hard surface. Use newspa-per to protect your work surface from accidental glue OF GLUES everal types of glues and adhesives are commonly used inthe construction of Model rockets; the proper glue to usedepends on the White Glue: This glue works on porous materials such aspaper and balsa. It is a good choice for engine mounts,balsa and fiber fins, launch lugs, paper parts, and forapplying fillets to fin-body Aliphatic Glue: Also known as wood glue or carpen-ter s glue ; it is usually yellow or tan in color. It is usedjust like white glue, but it is stronger and dries Tube-type Plastic Cement: This thick, clear liquid is usedto glue styrene plastic parts to porous materials such aspaper.
7 It is typically used to glue plastic parts to bodytubes. Some E2X series kits use this glue for Liquid Styrene Cement: This thin, clear liquid is used tobond styrene parts together. The cement comes in a bot-tle and is applied with a small Cyanoacrylate: Commonly known as super or instant glues, these adhesives are available in both thin andthick formulations. Because this type of glue caninstantly bond skin, it should never be used by unsuper-vised children. Eye protection and gloves are recom-mended. These adhesives are useful for quick assemblyor field repairs. They work well for gluing plastic partsto balsa or body Epoxies: These two-part adhesives are also recommend-ed for the advanced modeler. Epoxy provides extrastrength for the engine mounts and fins of high-thrustrocket kits.
8 It also makes excellent fin fillets in one ENGINE MOUNTING METHODSIt is important to have a strong engine mount. This securesthe engine, allowing it to push your rocket into the Block InstallationSome models use an engine block to keep the engine fromtraveling too far forward in the rocket body when the rocket building a Model , use an engine casing (or the specialspacer tube supplied in some kits) to push the engine block intoposition. First, mark the engine casing 1/4 inch from the glue to the inside of the tube using a cotton swab or smalldowel. Place the engine block just inside the rear of the bodytube, then push the block forward into position with the enginecasing in one smooth motion so the glue will not freeze theblock in the wrong place.
9 When the mark on the engine casingis even with the rear of the body tube the block will then be inthe correct position. Remove the engine casing MOUNTASSEMBLYE ngineHookEngineHolder Tube Shock CordMountBody TubeLaunch LugEngine MountAssemblyEngineHookFinsParachuteShoc kCordNoseConeShroudLines3444520505560708 04333 When mounting the engine in a Model with an engine block,wrap the engine with masking tape until it makes a tight fric-tion fit in the tube, then slide the engine into place. If the fit istoo loose, the engine will kick out at ejection and may notdeploy the recovery system. If the fit is too tight, you may dam-age the Model trying to push the engine in place. Adjust theamount of tape as the arrangement of the engine mount tube and fins allowsenough space, a wrap of tape around the tube and engine jointcan help hold the engine in the HoldersIn many models a quick release engine holder (also called anengine hook) is the best device to use for mounting an forward end of the engine holder is inserted through a 1/8inch wide slit in the tube, and prevents forward movement ofthe engine.
10 Apply glue fillets where the engine mount spacerrings attach to the engine mount tube for extra mount an engine in a Model with an engine holder, springthe end of the holder up and slide the engine into place. Checkto make sure the end of the holder latches securely over theend of the SHOCK CORD MOUNTSA ttach the shock cord securely. Both methods shown yieldgood results. The slit-n-glue method is good for body tubes toosmall for an anchor anchor is cut from paper or index card stock. Be sure toglue the anchor far enough into the tube or it will interferewith the proper fit of the nose SECURING A SCREW EYEIf your Model uses a screw eye to attach the shock cord to abalsa nose cone or adapter, make sure the screw eye is secure-ly attached.