Transcription of No-Ream King Pin Kits Service Parts Instructions
1 TP-1634 Issued 01-16 Service PartsInstructionsInstalling Meritor FastSet No-Ream King Pin KitsMeritor Front Non-Drive Steer AxlesTP-1634 Issued 01-161 Technical BulletinHazard Alert MessagesRead and observe all Warning and Caution hazard alert messages in this publication. They provide information that can help prevent serious personal injury, damage to components, or prevent serious eye injury, always wear safe eye protection when you perform vehicle maintenance or the vehicle on a level surface. Block the wheels to prevent the vehicle from moving. Support the vehicle with safety stands. Do not work under a vehicle supported only by jacks. Jacks can slip and fall over. Serious personal injury and damage to components can to Obtain Additional Maintenance, Service and Product InformationRefer to Maintenance Manual 2, Front Non-Drive Steer Axles/All Meritor Conventional, Easy Steer Plus and MFS Series.
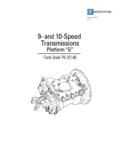
2 To obtain this publication, visit Literature on Demand at to Obtain Kits and ToolsCall Meritor s Commercial Vehicle Aftermarket at 888-725-9355 in Florence, FastSet No-Ream King Pin KitsThis publication provides Instructions for installing Meritor FastSet No-Ream king pin kits. Each kit includes four spiral bushings. These kits can be used to Service Meritor front non-drive steer axles. Figure 1 ProceduresRemove the Knuckle Assembly and BushingsRefer to Maintenance Manual 2 for the correct procedures to remove the steering knuckle assembly and old the Meritor FastSet No-Ream King Pin Kit and Knuckle all grease and lightly hone the bushing bores to treat scratches and 14012524aGREASEFITTINGGREASEFITTINGOPENI NG FORTIE ROD ARMBEARINGCAPKING PINSPIRALBUSHINGSPIRALBUSHINGCAPSTEERARM SEALSEALSHIMSTP-1634 Issued 01-16(16579)Page 2 Copyright Meritor, Inc.
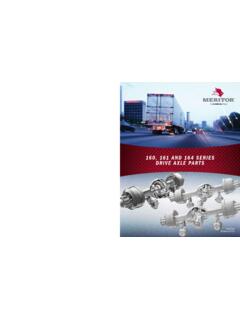
3 , 2016 Printed in the new spiral bushings in clockwise from the top and bottom of the knuckle. Figure 2. Start by hand at a slight angle, then use the spiral bushing T-handle installation tool R212087 to continue installation until the bushing is below the top of the bore. If the knuckle has a threaded cap, continue installation until the bushing is just below the threads..Figure 2 CAUTIONWhen installing the upper and lower grease seals, both seal lips must face away from the bores. If the seals are installed incorrectly, grease will not purge from the knuckle. Damage to components may the upper and lower grease seals so that the seal lip V s all open away from the bores. Seals must be even with the machined surface of the knuckle bores.
4 Figure 3 and Figure the new king pin and check the fit. The king pin must fit freely and rotate. If the king pin is tight: Remove the king pin and bushing, re-hone and clean the bushing bore, and reinstall the bushing and king the thrust bearing with the knuckle assembly to the axle with the new king pin and thrust bearing. Add shims until the fit is snug and the thrust bearing requires a slight tap to align with the king pin. Figure 1 and Figure the king pin with the lock pin flats. Install the lock pins and tighten to the torque specified in Maintenance Manual 2 for your the vertical end play. Add or remove shims until the end play is within specification for your application. Refer to Maintenance Manual 2 for complete end play check procedures and specifications.
5 Figure the knuckle from side to side and check to ensure it rotates freely. If the knuckle is tight: Re-hone the 2 Figure 34012524bSPIRALBUSHINGSPIRALBUSHINGSEALS EAL1000382bBoth upper and lowerinside seal lips mustbe away from 4 Figure 5 KNUCKLESHIMS,BETWEENKNUCKLEAND BEAMTHRUSTBEARING AND SEALUse BAR1000004cInformation contained in this publication was in effect at the time the publication was approved for printing and is subject tochange without notice or liability. Meritor Heavy Vehicle Systems, LLC, reserves the right to revise the information presented orto discontinue the production of Parts described at any 2016TP-1634 Meritor, Inc. Issued 01-16 All Rights ReservedPrinted in USA(16579)Meritor Heavy Vehicle Systems, LLC2135 West Maple RoadTroy, MI 48084 USA866-OnTrac1 (668-7221) Install the end caps, bolts and grease the knuckle locks up during greasing, stop greasing immediately or damage to components may result.
6 Remove one end cap bolt to relieve trapped air, re-install the bolt, then resume Add grease slowly at the fitting and rotate the knuckle to spread the grease. Repeat this process multiple times for the top and bottom until grease purges between the axle and knuckle.