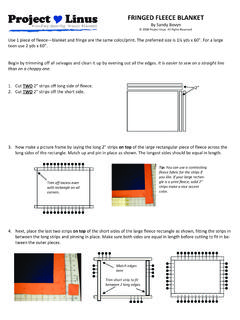
Transcription of No Sew Fleece Blanket - Project Linus
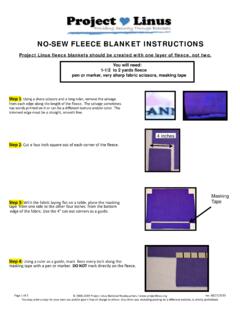
1 No Sew Fleece Blanket You will need: Fleece : 1 yard piece or choose your own custom size. ( Fleece is usually 50-60 wide). Ruler or Shape Cut Ruler and Rotary Cutter : Works best to create neatly cut fringe. If you are using scis- sors, make sure your cuts are clean, even, and straight with no frayed edges. This Blanket is simply made in 5 easy steps. Step #1: (Fig. 1) Step #2: (Fig. 2) Step #3: (Fig. 3). VERY IMPORTANT! Before you Cut a 4 square from each cor- Cut 4 x 1 wide fringe around begin, trim off selvage edges and ner of the Fleece . Blanket square uneven edges as needed. Remove selvages Cut a four inch square & square up Fleece from each corner and discard.
2 (See tip below).. Figure 1 Figure 2 Figure 3. Tip: Cut a 4 piece of fabric or batting to use as your corner template. (Fig. 2) It won't slip and will make cut- ting easier. Using your ruler and rotary cutter cut vertically and horizontally (arrow) ALMOST to the corner (red circle) but NOT QUITE. Then use your scissors to finish the corner cut. This will give you a crisp, clean cut and you won't cut into the neighboring fringe. NOTE: Fringe may be cut in 1/2 or 1 increments. Step #4: Step #5: Using a seam ripper, make a tiny Feed the end of the fringe through the back side of the slit you just slit at top of each fringe piece.
3 Cut and pull through to create a neat and secure fringed edge. Visit us at: 2006-2020 Project Linus National Headquarters All Rights Reserv