Transcription of No Sew Fleece Blanket - Project Linus-Home
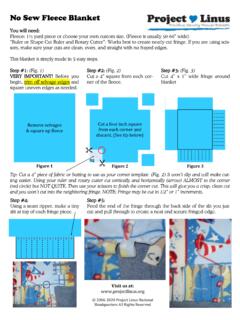
1 Step 1: Using a sharp scissors and a long ruler, remove the selvage from each edge along the length of the Fleece . The selvage some9mes has words printed on it or can be a different texture and/or color. The trimmed edge must be a straight, smooth line. You will need:1-1/2 to 2 yards Fleece pen or marker, very sharp fabric scissors, masking tape! NO-SEW Fleece Blanket INSTRUCTIONSStep 2: Cut a four inch square out of each corner of the 3: With the fabric laying flat on a table, place the masking tape from one side to the other four inches from the boDom edge of the fabric. Use the 4 cut-out corners as a 4: Using a ruler as a guide, mark lines every inch along the masking tape with a pen or marker. DO NOT mark directly on the Linus Fleece blankets should be created with one layer of Fleece , not Ta p e 4 inchesPage 1 of 2 2006-2019 Project Linus National Headquarters / You may print a copy for your own use and/or give it free of charge to others.
2 Any other use, including posting on a different website, is strictly 08/27/2019 Step 6. Tie a knot in the middle of each fringe. (A) Do not 9e the fringe too 9ghtly or at the base of the fringe. (B) Do not 9e two pieces of fringe together. (C) The Blanket must lay flat when finished. EXTRA NOTES:SMOKING: Project Linus cannot accept any blankets that have been made or stored in a smoking environment. PETS: If you have a pet, please wash & dry the Blanket and place in a plastic bag. Check for pet hair before donating. FABRIC: Use only Fleece . Do not create a tied Blanket using flannel, cotton, wool or donating, spread the Fleece Blanket out on a table. If it does not lay flat, the fringe has been knotted too tightly. Please loosen the 5.
3 Star9ng from one side, cut a straight line up to the tape at each mark. The fringe will measure 1 x 4. ALer finishing the fringe on the first side, pick up the tape and place it on the next side. Cut fringe as before. Repeat moving the tape and cuOng the fringe on the remaining sides of the Fleece . ( B ) (C) ( A )Page 2 of 2 2006-2019 Project Linus National Headquarters / You may print a copy for your own use and/or give it free of charge to others. Any other use, including posting on a different website, is strictly 08/27/2019