Transcription of Office 365 Quick Reference - CustomGuide
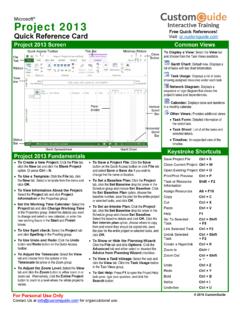
1 2020 CustomGuide , Inc. Click the topic links for free lessons! Contact Us: Word Microsoft Office 365 Es sentials Quick Reference Guide An Office 365 Program Screen Office Fundamentals Create a Blank File: Click the File tab, select New, and click the Blank template; or, press Ctrl + N. Create a File from a Template: Click the File tab, select New, search for a template category or select a search suggestion, select a template, then click Create. Open a File: Click the File tab and select Open, or press Ctrl + O. Select a location with a file you want, then select a file and click Open. Save a File: Click the Save button on the Quick Access Toolbar, or press Ctrl + S. If it s the first time you re saving the file, choose a location where you want to save the file, give it a name, and then click Save. Save a Copy of a File: Click the File tab, then select Save As or Save a Copy. Choose a location where you want to save the file, give it a name, and then click Save.
2 Print: Click the File tab, select Print, view the print preview, set up your print settings, and then click Print. Get Help: Click the Help tab on the ribbon, then click the Help button to open the Help pane. Search for a topic in the Search field, then select a topic from the results. Editing Select Text: Click and drag across the text you want to select; or, click at the beginning of a text block, hold down the Shift key, and click at the end of a text block. Edit Text: Select the text you want to replace and type new text. Cut, Copy and Paste: Select the text or object you want to cut or copy and click the Cut or Copy button on the Home tab. Click where you want to paste, and click the Paste button. Add a Comment: Select the text or object you want to comment on, click the Review tab, then click the New Comment button. Type a comment, then click outside of the comment bubble. Formatting Text Change the Font: Select the text you want to change, click the Font menu arrow, and select a font.
3 Change the Font Size: Select the text you want to change, click the Font Size menu arrow, and select a font size. Apply Bold, Italic, or an Underline: Click the Bold , Italic , or Underline button in the Font group on the Home tab. General Open a Ctrl + O Create a new Ctrl + N Save a file .. Ctrl + S Print a file .. Ctrl + P Close a file .. Ctrl + W Help .. F1 Tell Me / Search field .. Alt + Q File tab .. Alt + F Home tab .. Alt + H Insert tab .. Alt + N Review tab .. Alt + R View tab .. Alt + W Show or hide the ribbon .. Ctrl + F1 Navigation Move the text cursor .. , , , Up one screen or slide .. Page Up Down one screen or slide .. Page Down Beginning of a line .. Home End of a line .. End Editing Cut .. Ctrl + X Copy .. Ctrl + C Paste .. Ctrl + V Undo .. Ctrl + Z Redo .. Ctrl + Y Find .. Ctrl + F Replace .. Ctrl + H Select all .. Ctrl + A Check spelling .. F7 Open thesaurus .. Shift + F7 Insert hyperlink.
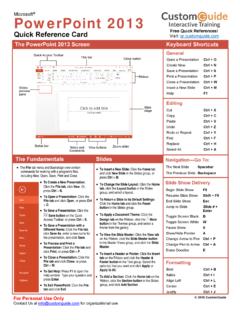
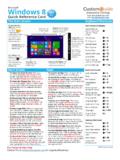
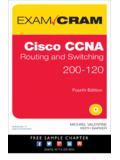
4 Ctrl + K Group selected objects .. Ctrl + G Duplicate an object .. Ctrl + D Repeat the last command .. F4 Formatting Bold .. Ctrl + B Italics .. Ctrl + I Underline .. Ctrl + U Align Left .. Ctrl + L Align Center .. Ctrl + E Align Right .. Ctrl + R Display the Font dialog box .. Ctrl + Shift + F Keyboard Shortcuts Free Cheat Sheets Visit File Name Search Field User Icon Quick Access Toolbar Ribbon Status Bar Zoom Slider 2020 CustomGuide , Inc. Click the topic links for free lessons! Contact Us: Word Fundamentals Change Line Spacing: Select the paragraph you want to adjust, click the Line Spacing button, and select a spacing option. Change Paragraph Spacing: Click the Paragraph group s dialog box launcher , change the values in the Before or After spacing fields, and click OK. Indent Paragraphs: Click anywhere in the paragraph you want to indent and click the Increase Indent or Decrease Indent button on the Home tab.
5 Set Custom Indents: Click anywhere in the paragraph you want to indent and click the Paragraph group s dialog box launcher . Adjust the values in the Left and Right fields, then click OK. Choose a Margin Size: Click the Layout tab, click the Margins button, and select a common margin setting. Or, click and drag the Adjust Left, Adjust Right, Adjust Top, or Adjust Bottom line on the Ruler. Use a Header or Footer: Click the Insert tab, click either the Header or Footer button, and select an option. Add Page Numbers: Click the Insert tab, click the Page Number button, select a part of the page, and select a page number style. Insert Page Breaks: Place your cursor where you want to start a new page, click the Insert tab, and click the Page Break button. Insert a Table: Click the Insert tab, click the Table button, and select the number of rows and columns that you want. Add a Row or Column: Click in a cell next to where you want to add a row or column.
6 Click the Table Tools Layout tab, then click Insert Above , Insert Below , Insert Left , or Insert Right , depending on where you want the row or column to be added. Delete a Row or Column: Click in a cell in the row or column you want to delete, click the Table Tools Layout tab, click the Delete button, then select Delete Row or Delete Column . Position an Object on the Page: Select an object, click the Format tab, click the Position button, and select a position. Wrap Text Around an Object: Select an object, click the Format tab, click the Wrap Text button, and select a text wrapping style. Apply a Style: Place the text cursor in a paragraph and select a style from the Styles gallery on the Home tab. Click the gallery s More button to see additional styles. Display the Styles Pane: Click the dialog box launcher in the Styles group on the Home tab. Change Style Sets: Click the Design tab, click the Style Set gallery s More button, then select a style set.
7 Use Outline View: Click the View tab and click the Outline button. Click the Close Outline View button to return to the previous view. Demote or Promote Items: While in Outline view, click the item you want to demote or promote and click the Demote or Promote button (or the Demote to Body Text or Promote to Heading 1 button). Formatting Align justified .. Ctrl + J Indent a paragraph .. Ctrl + M Remove an indent .. Ctrl + Shift + M Create a hanging indent .. Ctrl + T Remove a hanging Ctrl + Shift + T Increase font size .. Ctrl + Shift + > Decrease font size .. Ctrl + Shift + < Increase font size 1pt .. Ctrl + ] Decrease font size 1pt .. Ctrl + [ Copy formatting .. Ctrl + Shift + C Paste formatting .. Ctrl + Shift + V Remove formatting .. Ctrl + Q Apply single line spacing .. Ctrl + 1 Apply double line spacing .. Ctrl + 2 Apply Ctrl + 5 Show/hide formatting marks .. Ctrl + Shift + * Styles Apply Normal style.
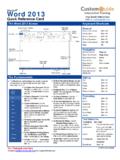
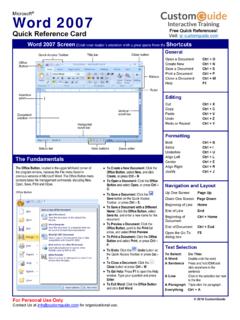
8 Ctrl + Shift + N Apply Heading 1 style .. Ctrl + Alt + 1 Apply Heading 2 style .. Ctrl + Alt + 2 Apply Heading 3 style .. Ctrl + Alt + 3 Toggle the Styles Ctrl + Alt + Shift + S Cursor Navigation One word to the left .. Ctrl + One word to the right .. Ctrl + Up one paragraph .. Ctrl + Down one paragraph .. Ctrl + Beginning of the document .. Ctrl + Home End of the Ctrl + End Top of the next page .. Ctrl + Page Down Top of previous page .. Ctrl + Page Up Insert Special Characters Line break .. Shift + Enter Page break .. Ctrl + Enter Column break .. Ctrl + Shift + Enter Copyright ( ) .. Ctrl + Alt + C Registered trademark .. Ctrl + Alt + R Trademark .. Ctrl + Alt + T Ellipsis (..) .. Ctrl + Alt + . The Word Program Screen Keyboard Shortcuts Page Number Rulers NumbeDocument Views 2020 CustomGuide , Inc. Click the topic links for free lessons! Contact Us: Excel Fundamentals Select a Cell: Click a cell or use the keyboard arrow keys to select it.
9 Select a Cell Range: Click and drag to select a range of cells. Or, press and hold down the Shift key while using the arrow keys to move the selection to the last cell of the range. Select an Entire Worksheet: Click the Select All button where the column and row headings meet. Select Non-Adjacent Cells: Click the first cell or cell range, hold down the Ctrl key, and select any non-adjacent cell or cell range. Edit Cell Data: Select a cell and click in the Formula Bar or double-click the cell. Edit the cell s contents and press Enter. Clear Cell Data: Select the cell(s) and press the Delete key. Or, click the Clear button on the Home tab and select Clear Contents. Insert Cells: Select the cell(s) where you want to insert cell(s), click the Insert button menu arrow on the Home tab, select Insert Cells, select how you want to move existing cells, then click OK. Insert a Column or Row: Right-click to the right of the column or below the row you want to insert.
10 Select Insert in the menu, or click the Insert button on the Home tab. Move or Copy Cells Using Drag and Drop: Select the cell(s) you want to move or copy, position the pointer over any border of the selected cell(s), then drag to the destination cells. To copy, hold down the Ctrl key before starting to drag. Delete Cells: Select the cell(s) you want to delete, click the Delete button menu arrow on the Home tab, select Delete Cells, select how you want to move cells to fill the deleted area, then click OK. Delete a Column or Row: Select the row or column heading(s) you want to remove. Right-click and select Delete from the contextual menu, or click the Delete button in the Cells group on the Home tab. Adjust Column Width or Row Height: Click and drag the right border of the column header or the bottom border of the row header. Double-click the border to AutoFit the column or row according to its contents. Set a Fixed Column Width or Row Height: Select a cell in the column or row you want to adjust, click the Format button on the Home tab, select Column Width or Row Height, enter a column width or row height value, then click OK.