Transcription of OMRON H3CA Solid-State Timer - Farnell element14
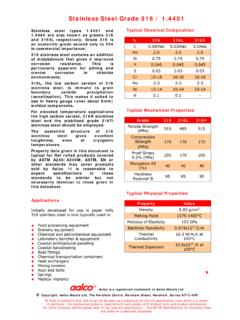
1 Product Operation and Setup Instructions 1A983 Please read and save these instructions. Read carefully before attempting to assemble, install, operate, or maintain theproduct described. Protect yourself and others by observing all safety information. Failure to comply with instructionscould result in personal injury and/or property damage! Retain instructions for future h3ca Solid-State TimerH3CA Solid-State TimerDescriptionOMRON multi-mode/multi-range Solid-State Timer is digital setwith wide sec to 9990 hour range in a compact, 1/16 DINplug-in unit. Easy-to-read LCD time remaining bar graph andoutput status indicators. Many control modes to match mostapplications. Thumbwheel switch selects time unit, controlmode, and time limit setting.
2 Wide supply range. Timer is ULRecognized and CSA DELAYA djustment .. 5-digit switchesRange .. sec to 9,990 hoursRepeatability .. +/- , +/- seconds over specified timing rangeReset Time .. sec Voltage -24 to 240 VAC or 24 to 240 VDCP ower Consumption .. AC 3VA or DC 3 WFrequency .. 50/60 HzOUTPUTType .. Relay .. Mechanical - 10,000,000 operationsDielectric .. 2,000 volts RMS at50/60 Hz between current carryingand non-current carrying partsENVIRONMENTALO perating Temperature .. -14 to 131 degrees FHumidity .. 35 to 85% RHMECHANICALT ermination .. 11 pin plugMounting ..Panel, track, surfaceGENERAL SAFETYRECOMMENDATIONSD isconnect power whenconnecting or disconnecting thetimer or its not change the time unit ortime range while the Timer is inoperation.
3 Otherwise, the timermay malfunction or be sure to turn off the powersupply to the Timer beforechanging any of the This Timer should be wired by qualified personnel according to the National Electrical Code (NEC) and local Do not connect input or contact terminals to voltages higher than those indicated on Protect the coil and load circuits with properly rated Do not install in damp or moist Any application of this Timer should be designed to prevent bodily injury, or property damage, in the event of product failure or normal wearout of this Voltage or Dry ContactThe inputs (Start, Reset, Gate,and Check) on this Timer areconsidered a no voltage or drycontact thus requires no externalvoltage source to activate. Simplyconnecting them to the commonterminal (Pin 3 or 15) via a switch,relay contact, open collectorsensor, and etc.
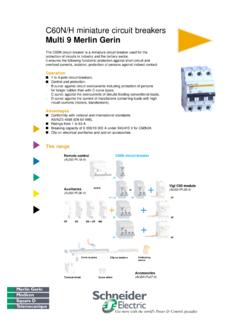
4 , is all that isrequired to activate each Input (Pause)When the gate input is closed,timing is temporarily the gate opens, timingresumes at the point InputWhen check input is used in ON-delay mode, the elapse timemeasurement of the set time is notperformed - especially usefulwhere ON-delay override isdesired. In Repeat Cycle mode,the check input allows the Timer tobe used like a binary flip-flop oralternating relay. CAUTION! WARNING! h3ca -A316245987 ResetStartCOM1110 Supply voltagecan be either aAC or DC sourcePins 8, 9, and 11 areterminals for the Timer 'sinternal output 3 & 7 is the Reset InputPins 3 & 6 is the Start InputPins 3 & 5 is the Gate InputPins 3 & 4 is the Check InputGateCheckProduct Operation and Setup Instructions 1A983 Supply VoltageA11618E1XA215D1C1B1H3CA-FACheckRe setStartGateSupply voltagecan be either aAC or DC source*Outputs: Pins 15, 16, and 18 arethe terminals for the Timer 's internaloutput 15 is the 16 is the NC 18 is the NO **Terminal/Pin ConfigurationOutputs: Pins 1,3,4,5,6, and 8 are the terminals forthe h3ca -8H internal output #1: Is an instantaneous contact.
5 Which meansthis relay will immediately switch when power is applyto 1 is the COM for relay # 3 is the NO contact for relay # 4 is the NC contact for relay # #2: Is a timed contact. Which means thisrelay will only switch at the end of the time 8 is the COM for relay # 6 is the NO contact for relay # 5 is the NC contact for relay # both internal relay outputs are totallydifferent in function. Please make sure not to wirethese relays together in an : Pins 1,3,4,5,6, and 8 are the terminals forthe h3ca -8 internal output 1 is the COM for relay # 3 is the NO contact for relay # 4 is the NC contact for relay # 8 is the COM for relay # 6 is the NO contact for relay # 5 is the NC contact for relay # SELECTIONT here are seven different timingranges from which to the rightmost thumbwheelswitch to select the desired timeunit.
6 When making your choicethe selected time unit will bedisplayed in the time unit seven time units are:Time units Timing ranges s to seconds s 1 to 999 seconds m to minutes m 1 to 999 minutes h to hours h 1 to 999 hours 10 h 10 to 9990 hoursBe sure turn off the power supplyto the Timer before changing any ofthe SELECTIONST here are eight different operatingmodes from which to the leftmost thumbwheelswitch to select the desiredoperation mode. When makingyour choice the operation modewill be displayed in the operationmode display eight operation modes are: Mode Operation A ON-delay B Repeat (50% fixed duty cycle) C Signal Interval/OFF-delay D Signal OFF-delay ( l ) E Interval F Cycle One-shot G Signal ON-delay/OFF-delay H Signal OFF-delay ( ll )Note:The operation mode is fixed to "A"in type h3ca -8 and thru the operation andapplication sections of thisinstruction manual to determinethe proper function selection foryour application.
7 To insure properoperation, the supply voltageshould be disconnected beforechanging A ON-delay(Power-ON Start/Power OFFR eset): Connect start terminals (3& 6). Upon application of power tothe Timer , time delay periodbegins. At the end of time delayperiod, output contacts switches,either connecting or disconnectingload. Output remains switcheduntil power is removed or a resetinput is 1 Mode A ON-delay(Signal Start): Power is appliedcontinuously. Time delay periodbegins at the leading edge of startinput. Output contact switcheswhen the accumulated time equalsthe set time. Subsequent startsignals during or after timing willnot be accepted. The output relaywill remain switched until a resetinput is applied or power 2 Mode B Repeat Cycle - SignalStart (50% fixed duty cycle):Power is continuously OFF/ON cycle is initiated atthe leading edge of the start output relay will be OFF forthe set time and ON for the settime.
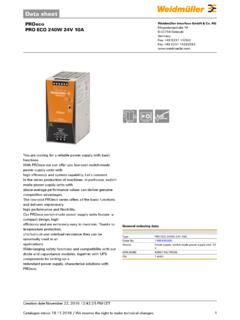
8 The ON and OFF cycle willcontinue to alternate until a resetinput is applied or power 3 Mode B Repeat Cycle - PowerON Start/Power-OFF Reset(50% fixed duty cycle): Connectstart terminals (3 & 6). Uponapplication of power to the Timer ,the OFF delay is initated for theset time and then ON for the settime. The ON and OFF cycle willcontinue to alternate until a resetinput is applied or power 4 Mode CSignal Interval/OFF-delay:Power is continously delay period begins on boththe leading and trailing edges ofthe start input. Output contactswitches during time delay period,either connecting or disconnectingload. Once the Timer has timedout from the trailing edge, it resetsand is ready for subsequent startinputs. Refer to Figure Operation and Setup Instructions 1A983 Power2 - 10 ONOFFS tart 3 - 6 ONOFFONOFFT imingOutput9 - 11 Power2 -10 ONOFFS tart 3 -6 ONOFFONOFFT imingOutput9 - 11 Power2 -10 ONOFFONOFFO utput9 - 11On TimeOff TimeStart 3 - 6 ONOFFP ower2 -10 ONOFFS tart 3 - 6 ONOFFONOFFO utput9 - 11On TimeOff TimeProduct Operation and Setup Instructions 1A983 Power2 -10 ONOFFS tart 3 - 6 ONOFFONOFFO utput9 - 11ttttONOFFR eset 3 - 7ttLess than set timeOperation (Continued)Figure 5 Mode DSignal OFF-delay ( l ):Power is continuously output relay switches at theleading edge of the start input,either connecting or disconnectingload.
9 Time delay period begins atthe trailing edge of the start relay switches again whenaccumalated time equals the 6 Mode E - IntervalSignal Start: Power is appliedcontinously. Timing begins at theleading edge of the start output relay is switched, eitherconnecting or disconnecting load,only during timing. The Timer isreset when power is disconnectedor a reset input is to Figure 7 Figure 7 Mode E - IntervalPower-ON Start/Power-OFFreset: Connect start terminals (3& 6). Upon application of power tothe Timer , timing starts. The outputrelay is switched during timing,either connecting or disconnectingload. Output remains switcheduntil power is removed or a resetinput is 8 Mode F Cycle One-shotPower-On Short/Power-OFFR eset: Connect start terminals (3& 6). Upon application of power tothe Timer , timing starts. The outputrelay is OFF for the set time andthen ON for the set time for onecycle only.
10 The Timer is resetwhen power is removed or a resetinput is 9 Mode F Cycle One-shotSignal Start: Power iscontinously applied. The OFF/ONcycle is initated at the leadingedge of the start input. Theoutput relay will be OFF for the settime and then ON for the set timefor one cycle only. The Timer isreset when power is removed or areset input is applied. Refer toFigure -10 ONOFFS tart 3 - 6 ONOFFONOFFO utput9 - 11ttONOFFR eset 3 - 7tPower2 -10 ONOFFS tart 3 - 6 ONOFFONOFFT imingOutput9 - 11 TimingONOFFR eset3 - 7 Power2 -10 ONOFFS tart 3 - 6 ONOFFONOFFT imingOutput9 - 11 TimingPower2 -10 ONOFFONOFFO utput9 - 11On for settimeOff for settimeStart 3 - 6 ONOFFP roduct Operation and Setup Instructions 1A983 Operation (Continued)Figure 10 Mode GSignal ON-delay/OFF-delay:Power is continuously begins on both the leadingand trailing edges of the startinput.