Transcription of OPTALIGN PLUS - LaserAlignment.Net
1 OPTALIGN plus Operating Instructions InstructionsandOPTALIGN PLUSV oelzow & Company, Box 0158 Wingate, NC 28174704-233-9222 Fax 704-233-9211E-mail: us at: (0369) measurement mode4-124-13 Static (or 0,3,6,9) mode3694-12 OPTALIGN plus Operating Instructions functions : Measurement ModesStatic (0369) measurement modeThis mode is ideal for: comparison with dial gauges and with the original OPTALIGN uncoupled shafts non-rotatable shafts - see page 4-14. '4-feet' machines that are mounted vertically. using the 10:30 position for the MOVE function (page 3-30). using the MOVE function to monitor vertical (shimming) correction (page 3-29).In static mode individual measurements are made at the eight 45 clock positions, using external inclinometer(s) or protractor to setthe angles. The OPTALIGN plus internal electronic inclinometer isNOT active in this uncoupled shafts both halves must be turned (or 0,3,6,9) modeMeasurements are made at the clock positionswith aid of external inclinometer(s) or similarExternal inclinometer ALI onto the bracket posts foraccurate positioning at 0 45 and90 , and multiples plus Operating Instructions procedure1.
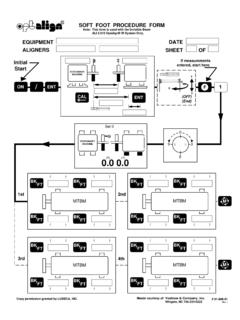
2 Mount components, enter dimensions etc.(pages 3-8 to 3-17.)2. Turn shaft, select measurement angleTurn the shaft to any of the eight available positions( 0:00, 1:30, 3:00, 4:30, 6:00, 7:30, 9:00 or 10:30o'clock position) for measurement. Position shaft asaccurately as possible using an external inclinometeror a spirit level or a shafts: Set the positions of both shafts asaccurately as possible, using the same method onboth Press , then center laser beam(pages 3-18 to 3-21).4. Take measurementThe first measurement is taken when you press thenumber key of the clock position ( '0' for 0:00, '3'for 3:00 etc.; the ENT key is not needed here). Thedisplay shows 'tStX' (X=1,2, ), then 'Pt. 1' whenthe first measurement point is recorded, followed bythe laser coordinates. The end view of the machine isshown, with the current measurement position clear-ly marked by a black functions : Measurement ModesPreviously measuredpositions, see belowSubsequent measurements in 45 positions may beentered, for example, by pressing the following keys: for 1 Repeat for each clock positionProceed to the next position.
3 Any position may beused as desired. A minimum of 3 positions is required for results. Any position may be remeasured. END or OFF? page 4-27; Cable tangled? page the key when plus Operating Instructions functions : Measurement ModesMeasuring a non-rotatable shaftTo measure a non-rotatable shaft: Use a magnetic sliding bracket, ALI (described opposite)mounted on the coupling face on the non-rotatable side. Theface and edge must be ferrous, surface-finished, clean & lightlyoiled. External inclinometers or similar are used to set the measure-ment positions of the transducer AND shafts non-rotatable!Yes, you can do this too, with two sliding brackets, but accuracyachieved is very dependent on the quality of the coupling faces. Thetransducer should mount on the face with the better finish. Thisshould be seen only as a method of last resort!
4 Measuring a non-rotatable shaftUsing a magnetic sliding bracket andexternal inclinometers, together withthe 'Static' measurement modeNon-rotatingshaftRotatableshaftOilMa gneticslidingbracketExternalinclinometer s Use Multipoint mode and refer to Technote plus Operating Instructions functions : Measurement ModesNon-rotational measurement procedure:1. Prepare non-rotating coupling faceThe face and edge must be ferrous (steel), andsurface-finished, with a large contact area over whichthe bracket magnets can slide. Clean and lightly oilthe sliding bracket & reflector on non-rotating sideThe transducer mounts on the rotating side as usual(pages 3-8 to 3-12). Fit cable & switch Prepare to measureEnter dimensions, press the 'M' key and zero thebeam coordinates (see pages 3-15 to 3-21).4. Turn shafts/bracketsSee page 4-13, step 3 for details.
5 Set the positions asaccurately as possible with external inclinometer aspirit level or protractor, using the same method onboth Repeat for each clock positionWatch out for 'END' or 'OFF' - see page view the results in the usual way (page 3-24).Magnetic sliding bracketALI magnetic sliding bracketfits onto the coupling flangeas shown and simply slidesaround to the requiredmeasurement positions. Itspowerful magnets ensure themounting stability needed foraccurate measurement. It issuitable for all shaft diametersover 80 mm (3 1/8").


