Transcription of OPTICS - Leapers, Inc. - Hunting/Shooting, Sporting Goods ...
1 1 LEAPERS , Installation andOperating Capitol StreetLivonia, MI 48150 :(734)542-1500 Fax:(734)542-7095 LEAPERS FOR ALL YOUR HUNTING AND shooting NEEDSI nnovation, Quality, Value, and Bahndamm 7 63683 Ortenberg, Germany Tel: +49 (0) 6041 969686 0 Fax: +49 (0) 6041 969686 66 Email: A. Scope Components Illustration 4B. Highlighted Features 7C. Scope Ring Installation 8D. Scope Installation 9E. Summary of Reticles 10F. Using the Reticles 12G. Eyepiece Diopter & Locking Ring Adjustment 13H. Battery Installation 14I. Reticle Illumination Adjustment 14J. Magnification Adjustment 15K. Parallax Adjustment 15L. Understanding the Turrets 16M. General Zeroing Instructions 21N. Lens Cap Removal and Installation 21O. Sunshade Installation and Removal 21P. General Care and Maintenance 22Q. Warranty Information 22R.
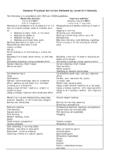
2 BG4 Reticle 234501 Ocular Lens02 Eyepiece Diopter03 Diopter Locking Ring04 EZ-TAP IE Control Panel05 Battery Compartment 06 Magnification Adjstment Ring07 Windage Adjustment Turret08 Locking Hex Screw for Resetting Turret Zero09 Elevation Adjustment Turret10 Red/Green Reticle Illumination RheostatOR Side Parallax Adjustment Wheel 11 Zero Locking Ring12 Objective Parallax Adjustment Ring 13 Threaded Objective Ring with Thread Protector14 Objective Lens15 TactEdge Integral Sunshadea. Scope Components IllustrationRead entire manual prior to installing scope. Make sure firearm is unloaded prior to installation.!WARNING:020304051201131409 1011070615 Note:Scope depicted is for illustration purposes and may not represent your actual product and its featured Highlighted Features Signature True Strength Platform Completely Sealed and Nitrogen Filled for Shockproof, Fogproof, and Rainproof Performance Rugged One-piece Aluminum Main Tube Internal Smart Spherical Structure (SSS)
3 Simplifies and strengthens the interaction between the inner and outer scope tube for a more responsive, precise, and reliable windage and elevation adjustment and hold Disciplined quality control and extensive shock and live fire testing guarantees optimal recoil resistance for long-standing dependability and performance Broadband Multi-coated Lenses Individually multi-coated lenses provide a bright and crisp image with a high light transmission rate Ensures complete utilization of all available ambient light resulting in higher resolution and clarity Quality Precision Machined Components Guarantees reliable, consistent, and accurate performance across the board Red/Green Dual Color and or 36-color IE (Illumination Enhancing) Reticle Options User adjustable reticle color and brightness intensity provides the optimum contrast in various light, weather, and environmental conditions Flip-open Lens Caps(Appearance may Vary)Cleaning ClothScope Rings(Not All Scopes Include Rings and Vary Depending on Model)Optional - 3 Sunshade (for 44/50/56mm Obj.)
4 Dia. Scopes)Optional - Sunshade (for 40mm Obj. Dia. Scopes)Optional - 2 Sunshade (for 32mm Obj. Dia. Scopes)ACCESSORIESUTG89c. Scope Ring InstallationCAUTION: Make sure firearm is unloaded. Remove magazine (if applicable) and examine chamber. Use safe handling procedures at all QD Lever Lock Scope RingsC-2. Twist Lock Scope RingsC-3. Thumb Nut Locking Scope RingsC-1. Mounting QD Lever Lock Scope Rings1. Turn the Cam Lever in the direction that widens the spring loaded locking plate and provides the needed mounting clearance for installation. Make sure the QD mount base s cross bolt seats properly within the Picatinny Turn the Cam Lever in the opposite direction to close the spring loaded locking plate, locking the QD mount base to the Picatinny Should the QD mount base be loose, unlock the Cam Lever and use the included Hex Wrench to adjust the Hex Screw found within the Cam Lever Housing.
5 Turning the Hex Screw clockwise will increase the locking plate tension by decreasing the clamping Should the Cam Lever not fully turn into the locked position and you feel heavy resistance, the tension is adjusted too high. Use the included Hex Wrench to adjust the Hex Screw counterclockwise to decrease the locking plate tension by increasing the clamping The optimal tension is achieved when the locking plate first makes contact with the Picatinny rail while the Cam Lever still has enough travel left for you to turn the Cam Lever to the locked Turn the Hex/Torx Screws counterclockwise with the included Hex Wrench/Torx Key Wrench to widen the locking plate and provide the needed mounting clearance to evenly seat onto the Dovetail Rail(For C-4, C-5) or Picatinny Rail(For C-6).
6 2. For C-4, C-5, if applicable, seat the rings in a position along the rail where the ring s Stop Pin can fully seat and make contact with the Dovetail rail s recessed stop pin Once seated, turn the Hex/Torx Screws clockwise using the included tool to tighten locking plate to 40 in-lbs for C-4, C-5 and 30 in-lbs for , C-5. C-6 Mounting Hex/Torx Screw locking Scope Rings1. Turn the Twist Lock or Thumb Nut counterclockwise to widen the locking plate and provide the needed mounting clearance to evenly seat onto the Picatinny Once seated, turn the Twist Lock or Thumb Nut clockwise to tighten. Recommended Torque: 30 in-lbs. C-2., C-3. Mounting Twist Lock and Thumb Nut Locking Scope RingsD. Scope Installation(ring style depicted in the following images is for illustration purposes only. Your specific style may vary.)
7 1. Using the included Hex Wrench/Torx Key Wrench, turn the screws counterclockwise to completely remove the top half of the Place the scope within the scope ring bases, taking care to properly adjust for a comfortable eye relief and that the scope s reticle is leveled. C-4. Hex Screw Locking Scope RingsC-5. Torx Screw Locking Scope RingsC-6. ACCU-SYNC Scope Rings & Integral MountsStop Carefully reinstall the top half of the rings evenly and securely in a cross-torque pattern. Do not exceed over 15 inch-pounds of torque as damages to the scope tube may occur. It is recommended to grasp the Hex Wrench/Torx Key Wrench by it s short end to perform final tightening. The scope is now ready to be current UTG scopes have second focal plane reticles. The reticle does not change when magnification is adjusted, but the subtensions relative to the target image does.
8 The smaller the magnification, the larger the space the reticle occupies on the target image. All reticles are calibrated at 10x Summary of ReticlesLeapers offers a variety of reticles for different scopes. See the following reticle information for details pertaining to your specific scope reticle. E-3. ETCHED UMOA RETICLE: The UMOA reticle features hash marks at MOA increments for precise bullet drop and wind drift compensation as well as range estimation. The reticle provides a 4 MOA (from end to end) center cross and equally distanced hash marks at 2 MOA all the way to 50 MOA for hold over, 20 MOA for hold under, and 30 MOA on each side for wind drift compensation. The center cross can be illuminated to assist aiming under different light ETCHED TMOA RETICLE: The TMOA reticle features hash marks at MOA increments for precise bullet drop and wind drift compensation as well as range estimation.
9 The reticle provides a 4 MOA (from end to end) center cross and equally distanced hash marks at 2 MOA all the way to 40 MOA for hold over, 10 MOA for hold under, and 30 MOA on each side for wind drift compensation. The center cross can be illuminated to assist aiming under different light conditions. E-5. PRO 5-STEP RETICLE: The Pro 5-step reticle is designed for crossbows. The reticle consists of five horizontal lines and a vertical line. There is a thin crosshair in the center. The horizontal lines are for aiming at 10, 20, 30, 40 and 50 yard distances. The lines are calibrated for 300fps crossbows. The user needs to find out the exact yardage of each line using the zeroing procedure on page 13, PDC RETICLE: The PDC (Projectile Drop Compensation) reticle of our handgun scope has 3 uniquely shaped marks positioned below the crosshair for ballistic compensation at different yardages.
10 Users can determine the actual Point of Impact at each mark for their particular firearm and cartridge following the zeroing procedure on page 13, ETCHED G4 RETICLE: The G4 reticle integrates the classic German #4 design with our innovative 36-color illumination Enhanced (IE ) system. Thick bars at 3, 6, and 9 O clock positions help the eye quickly locate the center of the reticle, and leave a space of 10 milliradians from left to right allowing a less obstructed view. The fine horizontal and vertical lines along with a MOA center dot at 10X provide the ability for precise aiming whenever needed. E-8. ETCHED BG4 RETICLE: The BG4 Reticle is designed to be fast and intuitive to use and features ballistic drop compensation and rangefinder markings out to 600 yards.