Transcription of Outlook Quick Reference - CustomGuide
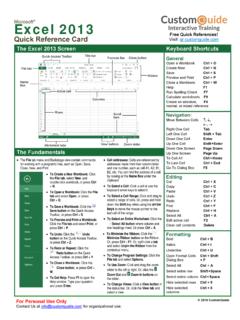
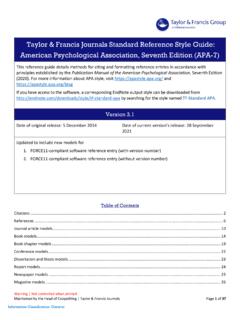
1 2021 CustomGuide , Inc. Click the topic links for free lessons! Contact Us: Microsoft Outlook Quick Reference Basic SkillsThe Outlook Program Screen The Fundamentals Navigate Outlook : Click the icon (or label) for the view you want to open. Mail view displays your inbox and lets you browse your mail. The ribbon will display commands related to composing and managing email messages. Calendar view displays your calendar. The ribbon will display commands that let you view, create, and edit meetings and appointments. People view displays your contacts list. The ribbon will show commands that let you create and edit your contacts and contact groups. Tasks view displays your task list.
2 The ribbon will show commands that let you create and modify tasks. Use the Folder Pane: Click a folder in the Folder pane to display that folder s contents. Delete an Item: Select an email, contact, appointment, or task, then click the Delete button on the Home tab of the ribbon. Restore a Deleted Item: Click the Deleted Items folder in the Folder pane, then click and drag an item back to its original folder. Change Views: Click the View tab on the ribbon, then click the Change View button and select a view. Search Search: Click in the Search field at the top of the inbox and begin typing your search. Refine Search Results: While searching, use the options in the Scope group on the Search tab.
3 Current Mailbox searches all folders withinthe selected mailbox. Current Folder only searches within thecurrent folder. Subfolders expands the search to include allthe current folder s subfolders. All Outlook Items searches everything. From lets you filter messages from specificsenders. Subject lets you filter by words in the subjectline. Has Attachments lets you filter results bywhether they have attachments. Categorized filters by categories. This Week displays only items from the current week. Unread searches only unread messages. Flagged searches only flagged items. Important only displays items set to highimportance. More lets you apply advanced Print .. Ctrl + P Undo.
4 Ctrl + Z Copy .. Ctrl + C Cut .. Ctrl + X Paste .. Ctrl + V New Item .. Ctrl + N Delete selected item .. Delete Help .. F1 Find an F3 Spell Check .. F7 Navigation Mail view .. Ctrl + 1 Calendar Ctrl + 2 Contacts view .. Ctrl + 3 Tasks view .. Ctrl + 4 Notes .. Ctrl + 5 Mail New Ctrl + Shift + M Ctrl + R Reply All .. Ctrl + Shift + R Forward .. Ctrl + F Save message as a draft .. Ctrl + S Send .. Alt + S Find and replace text .. Ctrl + H Check for New Messages . Ctrl + M Mark as Read .. Ctrl + Q Mark as Unread .. Ctrl + U Calendar New Appointment .. Ctrl + Shift + A Go to Today .. Ctrl + T Go to a Date .. Ctrl + G Go to Previous Appointment .. Ctrl + , Go to Next Ctrl +.
5 Day view .. Ctrl + Alt + 1 Work Week view .. Ctrl + Alt + 2 Week view .. Ctrl + Alt + 3 Month view .. Ctrl + Alt + 4 Contacts New Contact .. Ctrl + Shift + C New Contact Group .. Ctrl + Shift + L Open the Address Book .. Ctrl + Shift + B Keyboard Shortcuts Navigation Bar Folder Pane Ribbon Title Bar Minimize Windows Close Preview Pane Zoom Inbox Search field Free Cheat SheetsVisit 2021 CustomGuide , Inc. Click the topic links for free lessons! Contact Us: Mail Insert a Link: While composing an email, click the Insert tab, click the Link button, select a type of link, fill in where the link will lead, and click OK. People Add a New Contact: Click the New Contact button on the Home tab.
6 Fill in the fields with the information that you have, then click the Save & Close button. View the Address Book: Click the Address Book button on the Home tab. Double-click a contact to open it and see more information. Add a Contact from the Address Book: Click the Address Book button on the Home tab, double-click a contact, click the Add to Contacts button, enter any additional information you have, then click the Save & Close button. Edit a Contact: Double-click a contact to open it in a new window, fill in the information fields with any additional information you have, then click the Save & Close button. Import Contacts: Click the File tab, click Open & Export, and click Import/Export.
7 Select Import from Another Program or File, then click Next. Select a type of file to import, then click Next. Click Browse, select a file, click OK, then click Next. Select your Contacts folder, click Next, then click Finish. Share a Single Contact: Select a contact, click the Forward Contact button on the Home tab, and select a sharing format. Address and compose the resulting email, then click Send. Create a Contact Group: Click the New Contact Group button on the Home tab, give the contact group a name, and click the Add Members button. Select a source for a contact and double-click a contact to add it. Add as many contacts as you would like, click OK, then click the Save & Close button.
8 Add Members to a Contact Group: Double-click a contact group to open it, click the Add Members button, select a source, and double-click a contact to add it. Click OK, then click the Save & Close button. Remove Members from a Contact Group: Double-click a contact group to open it, select a contact from the list, and click the Remove Member button. Calendar Create an Appointment: From the Calendar view, click the New Appointment button on the Home tab. Enter the appointment s details, subject, location, and start and end time. Click the Save & Close button. Edit an Appointment: Double-click an appointment to open it, edit the appointment details, then click the Save & Close button.
9 Mail Compose Email: Click the New Email button on the Home tab. Enter recipients, a subject, and a message body, then click Send. Types of Recipients: When composing a new email, enter email addresses in the address fields. To contains the primary recipients, whomthe message is directed to. Cc (Carbon Copy) sends a copy of the message. While not the primary audience,these recipients may want to see theinformation presented. The Cc field isvisible to all recipients. Bcc (Blind Carbon Copy) sends a copy ofthe message, while keeping the Bcc fieldsecret to other an Email in the Reading Pane: Select an email from the inbox to display it. Open an Email in a New Window: Double-click an email in the inbox.
10 Mark an Email Read or Unread: Opening an email, or displaying it in the Reading pane, will automatically mark an unread email as read. Click the Unread/Read button on the Home tab to toggle an email read or unread. Reply to an Email: Select an email in the inbox (or open an email in its own window) and click the Reply button on the ribbon. Reply to All Recipients of an Email: Select an email in the inbox (or open an email in its own window) and click the Reply All button on the ribbon. Forward an Email: Select an email in the inbox (or open an email in its own window) and click the Forward button on the ribbon. Create a Signature: While composing an email, click the Signature button on the Message tab and select Signatures.