Transcription of Outlook Web App (OWA) - Information Technology Services
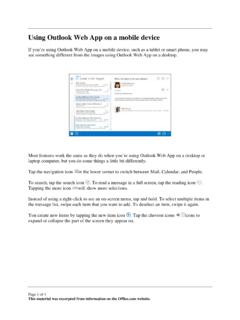
1 MicrosoftOutlook 365 Outlook Web App (OWA) OUT 100i Updated 7/2/13 What you see in Outlook 1. The folder list includes the folders in your mailbox. 2. Type what you want to search for in the search box, such as the name of a person, or text in a messge. You can also filter your messages to those that are unread, sent to you or you have flagged. 3. The message list is a list of the messages in the current folder. A conversation can have one or more messages and can be expanded or collapsed. To open a message in a separate window, double-click the message. 4. The reading pane is where the conversation that you ve selected is displayed. The reading pane is fixed and can t be moved or turned off. Outlook 365 OWA 2 Create a New Mail Message 1. Click + new mail above the folder list. A new message will appear in the reading pane. 2. To add recipients, you can type the name of anyone who is in your contacts folder or organization s address list, or you can type the email address in the To or cc field.
2 If Outlook doesn t recognize the name you type, click the Search Contats & Directory that appears or click the extended menu and click check names. To open the People with your contacts and the UNL address book, click To: / Cc: or at the end of the line. 3. Add a subject. 4. Type and format the message you want to send. [optional] Click INSERT. a. To attach a file, click attachment and browse to the file you want to attach. Total message size is limited to 25MB including attachments. For larger attachments, use b. To embed a picture in the message so that it appears without the recipient having to open it, click picture, and browse to the picture you want to add to your message. 5. When you re done and your message is ready to go, click SEND. A copy of each message you send appears in the Sent Items folder. Outlook 365 OWA 3 Create your signature block 1. Click the Options menu (the cog) in the upper-right corner and click Options.
3 2. On the left, click settings. 3. Type and format your signature block. 4. Click save at the bottom of the screen. Organize your Inbox with Folders Create a Folder 1. Right-click your name at the top of the Folders List, and then click create new folder. 2. Type a name for the new folder, and then select where the folder is to be saved. Move a Folder 1. Drag and drop a folder into another to move it and its contents. 2. To move a subfolder back to the top level, drop it on top of your e-mail account name. Delete a Folder Right-click and select Delete. Drafts Outlook Web App automatically saves your message as you create it and adds it to your drafts folder. 1. Find the Drafts folder in the folder list and click on it. 2. Click on the message you were working on to see it in the reading pane. 3. Click CONTINUE EDITING or, if you ve decided you don t want to send the message after all, click DISCARD.
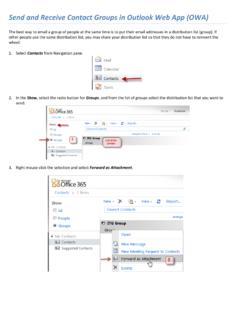
4 4. If you still want to send the message, finish editing it and click SEND. Outlook 365 OWA 4 Sent All message sent (new, replies and forwards) are automatically saved in the Sent Items folder. You can save any of these messages in another folder by dragging it to the new folder in the Folders List. Deleted Items To empty your Deleted Items folder, right-click the Deleted Items folder, and then click empty. Junk Mail (Spam) Any message that is suspected to be junk is moved to the Junk E-mail folder. We recommend that you periodically review the messages in the Junk E-mail folder to check for legitimate messages that were incorrectly classified as junk. To mark or unmark messages as junk, click the extended menu and click mark as junk or mark as not junk. You can also drag the message in or out of the Junk Email folder. What you ll see in Calendar Week view is the default view when you first visit your calendar in Outlook Web App.
5 You can change that to Day, Work week, or Month by using the options in the upper corner. Because the month view can be very crowded, there s an agenda displayed for the selected day on the right. Click any event in your calendar to see a quick view of that event. Outlook 365 OWA 5 Creating calendar items In Outlook , an appointment is a calendar item that has a specific start date and end date and a specific start time and end time. If you invite other people to an appointment, it is considered a meeting. 1. Click new event. OR Double-click any white space in this window to create a new calendar item. OR Click and drag to create a new item in the time you ve selected. 2. Enter a short description of the event. This will appear on your calendar. 3. Add a location if you want. Use the add a room button to schedule a room in the UNL system. a. If creating a meeting, add attendees the same way you address a mail message.
6 B. To check meeting attendees availablity, use the SCHEDULING ASSISTANT. 4. Select the starting date and time. 5. Select the duration. Select All day for an all-day event. All-day events appear at the top of the calendar. 6. Use Show as to choose how you want the time to appear on your calendar. 7. Change or turn off the reminder. 8. If you have more than one calendar, choose which calendar to save it to. 9. Set a repeating pattern if you want this event to repeat. 10. Use the Notes area to add any other Information you want. 11. Click SAVE to save your changes or DISCARD to cancel. Manage your appointments To change the date or time for an event, drag the appointment to a new location on the calendar. Or click the event and then click EDIT and make the changes that you want. To delete an event, select the event on the calendar, and then click DELETE. Small icons appear on appointments to indicate that a reminder is set ( ), that other people are invited ( ),the event repeats ( ), and is private ( ).
7 Outlook 365 OWA 6 Sharing your calendar 1. Click SHARE at the top-right of the calendar window. 2. Enter the name of the person you want to share your calendar with in the Share with box. Outlook Web App will automatically search for them in the address book. 3. After they ve been found, they ll be automatically added to the list of people to share with. You can add as many people as you want. 4. Choose how much Information you want to share. Full details lets that person see all the Information about events on your calendar, except events that you ve marked as Private. Limited details will show the subject and location. Availability only shows only that you have an event at a particular time, but no other details. Private events will always show only as busy. 5. You can edit the subject if you like. 6. If you have more than one calendar, choose which you want to share. Most people share their default calendar (called Calendar), but you can share any calendar that s part of your mailbox.
8 7. After you ve added everyone you want to share with and what level of access you want them to have, click SAVE to save your changes or DISCARD to cancel. Outlook 365 OWA 7 Out of Office When scheduling your leave on your calendar, select Show as: away. This will NOT send an out of office message. To create the out of office message, 1. Click the Options menu (the cog) in the upper-right corner and click Set automatic replies. 2. Select Send automatic replies and also check Send replies only during this time period: a. Enter a start time and end time to control when automatic replies are sent. 3. Use this box to create a message that will be sent only to senders who are a part of UNL or 4. Select this check box if you want automatic replies to be sent to all other senders. 1. Send replies only to sends in my Contacts list will limit automatic replies to senders who are in your Contacts folder.
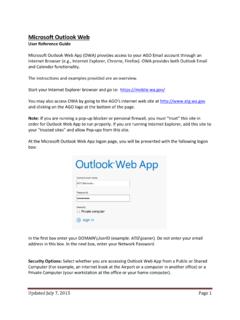
9 Senders who aren't in your Contacts folder won't receive the automatic reply. Send replies to all external senders will send your reply to all senders outside UNL. 5. You can type a different message for those outside of UNL, or you can copy/paste the messge from above. 6. When complete, click save at the bottom of the window. Outlook 365 OWA 8 What You ll see in People A miniature contact card You can hover over or select any name in the sender, To, or Cc fields of a message to see a brief summary of their contact Information . This same Information appears in the reading pane at the top in People. Create a new contact 1. To create a contact, select the folder under My Contacts that you want to create the contact in, then select new and select create contact. 2. Fill in any details that you want. Select the icon to see more options for that type of Information . 3. When you re done, click SAVE to save your changes or DISCARD to cancel.
10 Outlook 365 OWA 9 Create a group 1. Select the folder under My Contacts that you want to create the gourp in, then select new and select create group. 2. Enter the group name that you want. 3. To add members, type the name of the person you want to add in Members. Outlook Web App will search for a match in your Contacts and in your organization s address book. If a match isn t found, you can search for that person. You can also type an email address directly in Members. Press Enter to add your selection to the group. 4. Add notes about the group if needed. 5. When you re done, click SAVE to save your changes or DISCARD to cancel. Create a contact from a message You can add any contact that you see in a message to your Contacts. To add a contact from a message: 1. Select the name to see the miniature contact card. 2. Select the downward chevron in the bottom corner to expand the card.