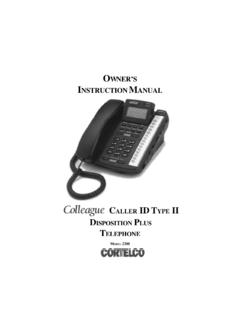
Transcription of OWNER’S INSTRUCTION MANUAL - Cortelco Inc.
1 owner SINSTRUCTION MANUAL CALLER ID TYPE II MULTI-FEATURE TELEPHONEMODEL 27002 Thank You for Purchasing the 2700 Caller ID Type IIMulti-Feature TelephoneWe want you to know all about your new Telephone, how to install it, the features it provides, and the services you can expect from its use. We have included this information in your owner s Instruc-tion READ BEFORE INSTALLINGAND USING YOUR NEW TELEPHONE SAFETY instructions 5 Telephone Part Identification 6 INSTALLATION 7 ANSWERING MACHINE 7 UNIT SETUP 8 TELEPHONE
2 FEATURES 9 DIALING 9 RECEIVING A PHONE CALL 9 PLACING A PHONE CALL 9 PREDIAL 9 SPEAKER BUTTON 9 DURATION COUNTER 9 MUTE BUTTON 9 AUTOMATIC MEMORY 10 Storing A Number 10 Dialing A Number 10 VOLUME BUTTON
3 10 REDIAL BUTTON 10 PAUSE BUTTON 10 HOLD BUTTON 10 FLASH BUTTON 10 HEADSET BUTTON 10 DATA PORT 10 CONTRAST BUTTON 11 RELEASE BUTTON 11 VOICEMAIL BUTTON 11 DIRECTORY BUTTON 11 MESSAGE LIGHT 11 MESSAGE WAITING
4 11 KEY TONE 114 CALLER ID FEATURES 11 CALL WAITING DISPLAY 11 RECEIVING CALLS 11 REVIEWING CALLS 12 DELETING CALLS 12 CALLBACK 127-10-11 BUTTON 12 MESSAGE ERROR 12NO DATA SENT 12 PRIVATE CALLS
5 12 UNKNOWN CALLS 13 USING THE DIRECTORY 13 STORING ENTRIES 13 FINDING ITEMS 13 DIALING DIRECTORY NUMBERS 13 DELETING ITEMS 13 TELEPHONE SERVICE PROBLEMS 14 MAINTENANCE INFORMATION 14 TELEPHONE REPAIR 15 FCC Information 15 Limited Warranty 165 IMPORTANT SAFETY INSTRUCTIONSA lways follow basic safety precautions when using
6 Your telephone equipment to reduce the risk of fire, electrical shock, and Read and understand all instructions in the owner s INSTRUCTION Read all warnings and follow all instructions marked on the Unplug this product from the wall outlet before cleaning. Use a damp cloth for cleaning. Do not use liquid or aerosol Do not use the telephone near water. For example, do not use near a bathtub, wash bowl, kitchen sink, laundry tub, swimming pool, or in a wet Do not place this product on an unstable cart or stand. The product may fall causing serious damage to the Use only the type power source indicated on the label. If you are not sure of the type power supply to your home, consult your dealer or local power Do not place any objects on the telephone line cord. Do not locate the telephone where the line cord will be walked Do not block or cover ventilation slots and openings in the bottom of the telephone.
7 The openings should never be blocked by placing the telephone on a bed, sofa, rug, or other similar surfaces. The telephone should never be placed near or over a radiator or heat register. The telephone should never be placed in a built-in installation unless proper ventilation is Never spill liquid on the telephone or push objects of any kind through ventilation slots. Liquid or objects may touch dangerous voltage points or short out parts that could result in a risk of fire or electrical Do not disassemble this product. Opening or removing covers may expose you to dangerous voltages or other risks. Incorrect reassembly can cause electrical shock when the product is subsequently Do not overload outlets and extension cords. Some telephones require AC power from an outlet. Overloading the outlets can result in the risk of fire or electric Avoid using a telephone during a local thunderstorm.
8 There may be a remote risk of electrical shock from lightning. Fuse (F1) is rated at Time Do not use a telephone to report a gas leak in the vicinity of the Unplug the telephone from the wall outlet and refer servicing to qualified service personnel under the following conditions: When the line cord is frayed or plugs damaged. If liquid has been spilled into the telephone. If the telephone has been exposed to rain or water. If the telephone does not operate properly by following the operating instructions . (Adjust only those controls covered by the operating instructions . Improper adjustment of other controls may result in damage and will often require extensive work by a qualified technician to restore the product to normal operation.) If the telephone has been dropped or the housing damaged.
9 If the telephone exhibits distinct change in performance. CAUTION - Always disconnect all telephone lines from the wall outlet before servicing or disassembling this THESE INSTRUCTIONS6 Telephone Part Identification1 Menu Button16RJ-9 Headset Jack27-10-11 Button17 Redial Button3 Directory Button18 Headset Button4 Save Button19 Flash Button5 Message Lamp20 Mute Button6 Multi-Angle LCD21 Hold Button7 Delete Button22 Release Button8 Contrast Button23 Speaker Button9 Dial Button24 Pause Button10 Voice Mail Button25 Edit mm Headset Jack26 Volume Up/Down Button12 Review Up/Down Button27 Handset Jack13 Directory/Logo Strip28 Speaker14 Shift Button29 Handset Hook15 Memory Buttons30 Hookswitch7 INSTALLATIONDESK MOUNT1. Select the desired viewing angle and install the desk stand. The desk stand can be installed in two positions to give a choice of viewing Connect the power adapter.
10 The power adapter connects to the jack marked DC 9V on the bottom of the phone. Plug the large part of the adapter into the wall outlet. Use only a 9V DC. 200mA or 300mA, center positive Class 2 Connect the line cord. The line cord conncects to the jack marked LINE on the bottom of the Plug the coiled cord into the handset jack, and then plug the other end of the cord into the Place the handset on the MOUNT1. Remove the desk stand. The unit will then mount directly on a standard wall telephone jack. 2. Connect the power adapter and the line cord. See Steps 2 and 3 Rotate the handset hook into the wall mount Plug the coiled cord into the handset, and then plug the other end of the cord into the Place the handset on the MACHINE1. Connect the LINE jack of the answering machine to the wall telephone Connect the LINE jack of the model 2700 phone unit to the PHONE jack of the answering Set the answering machine to answer after 2 or more WAITING LAMPIf your phone is installed behind a Message Waiting enabled PBX, you will need to set the M/W switch in o