Transcription of PC Control Installation and Startup Guide - NORMAC
1 1 PC Control Installation andStartup Guide2 Table of ,8 About the User s of the the Set Up:Your system on the with with your System Update or Sensor Manual Rain Menu: Setting Water the with Table of ContentsSCHEDULE a unneeded & setting Setting start Setting day Day Weekday Odd/Even the zone Lighting zone an Intro schedule is controls Scheduling Advisor ..89 Manual Table of ContentsWorking with Schedules Naming Saving a Changing New Auto Load Deleting Copying over the internet EMAIL IT ..115 Seasonal function ..121 Set up: up: navigation overlap Software Hardware Table of ContentsHELP Menu continued Support Support ABOUT page.
2 135 Working with Controller COMM Adding a Adding convenience of Functions (handheld)..153 The remote s Functions (at the PC)..156 The remote s Awakening the Contacting the Setting the remote s Starting a Manual Table of ContentsThe convenience of theremote (continued) Multi-Manual Stopping Light bulb Sleep 172 PC mode ..172 Manually setting thecontrollers PIN andController System ConnectionsDesktop orlaptop computerwith softwareUSBcable,(included)DesktopstandC ombinationUSB moduleand handheldremote controlIrrigationcontrollerwith built-in2-way radioIn thegarageThe PC Control system is madeup of three main components;the software disk for thecustomer s computer, the remotecontrol device (with its desktopstand and USB cord) and the 12-station, indoor thehome8 System OverviewIrrigation and landscape lighting schedules are sent from thecomputer through the USB cable to the remote and then wirelesslytransmitted to the controller in the garage.
3 When the controller hasthe schedule, the computer can be used for other purposes orturned wireless communication is 2-way. The controller s status andacknowledgement of commands are transmitted back to theremote and to the computer (or to the remote alone when used inhandheld mode out in the yard or garden).9 The PC Control System sUser s ManualThe first sections of this manual are a Guide to theinstallation of the PC Control system with one 12-station controller and its initial later sections of the manual contain detailedinformation on specific reference topics like: Per zone controls What each menu page provides Using schedules (Opening, saving, changing, etc.) Installation and setup for multiple controllers Manually setting PINs and using the remote10 Quick Overview of theinstallation steps (details follow) sure the computer meets the the transformer to the controller andtemporarily mount the controller and plug it a battery in the remote and connect theremote to the the system s disk in the computer s CDROM drive and (at the user s computerlocation) start the communications communication is OK , install the System Requirements thecomputer must meetIf the computer does not meet these requirements,this system is not for your application Windows compatible PC with CD-ROM drive Windows 98SE (second edition), 2000, ME, NT, XP Home,XP Prof.
4 Available USB port ( or greater) 900 MHz CPU 64 MB RAM 20MB free hard disk space 1024x768 64K color display/monitor preferred (800x600minimum) Mouse & keyboard Internet connection and capability (high speed) Digital photo capability12 About the PIN NumberAddressesThe controller, remote and software for the PCControl all come with the Personal IdentificationNumber (PIN) of 0000 . This default PIN allows aspeedy communications check you have confirmed that all the devices are talking to each other and Installation iscomplete, you can then set the unique PIN foryour system. The PIN can be reset from thecomputer, however the remote s PIN and thecontroller s PIN can each be set the system will have more than one controller,see Working with Multiple Controllers for a PINset required, now, on controller #2 or is also a later chapter on SETTING Check the range:Preparing the the controller s transformer following these steps Do not plug in the transformer!
5 Remove the access cover from the controller by pushingin on the finger grips on both sides and sliding the coverforward and off the controller. Slip the transformer s 3-wire cord through the small holeon the left side of the bottom of the controller s case. Pull 6 inches of cable into the controller and tie a loose,half knot to prevent it from being pulled back out. With a screwdriver, connect the red wire to the lower lefthand terminal on the terminal strip, the black wire to thesecond from the left and the green wire to the third. Connect the 9-volt battery to the battery clip and replacethe access cover. Temporarily mount the controller on a short screw ornail in the proposed location and then plug it in toprepare for the communications Check the range:Preparing the remote With the remote face down, use a fingernail to open thecatch to the battery compartment cover and set the coveraside.
6 Bring out the battery clip and connect the 9-voltbattery. Insert the battery into the compartment and withoutcrimping them, carefully put the wires back also. Insert the cover s two tabs under the lower lip of thecompartment and snap the cover s latch back in place. For a close range check, press and release any button onthe remote to wake it up. Wait two seconds (All segmentsin the display will be illuminated) while the remote searchesfor the controller. The default PIN will allow communication. When the controller s status appears on the remote sdisplay, AUTO or OFF , with the signal indicator, the twodevices are talking .15 Checking the range fromcomputer to controllerIn the following steps you will check to see if thesystem s range will work for your application. At the user s usual computer location within the home, usethe supplied cord to connect the remote to a USB port on thecomputer.
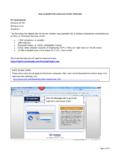
7 On the side of the remote, the plug for the USBcompartment is designed to be pulled outward by its short,upper tab to expose the mini-USB connector. After connecting the remote to the computer, place theremote in its stand on the same surface as the computer. If the computer is off, turn on the computer and let it boot open the CD-ROM drive, insert the PC Control system sCD and close the Your system on screen Click on MyComputer andthen click onthe disk driveicon. Double click onthe PC Controlfile to start it. A start upscreen willappearfollowed by theLicenseAgreement &Privacy the agreement carefully. You mustclick the AGREE button to Your system on screenWhen the SoftwareInstallation screenappears, click on CD-ROM from which toinstall the NEXTto next screen is forinstallation options. Inmost cases, all theselected options Your system on screenWait for a few moments whilethe program completes theinstallation and instructs youto click system overview is thelast screen before theprogram is launched.
8 Makesure the remote isconnected to your computerand the controller in thegarage is plugged shortcuticon appearson Your system on screenAllow the system20 seconds or soto AUTO ON tabwill appear toindicate thecontroller in thegarage is on. SynchronizeTime and then SynchronizeController sStation Use textboxes each case, for this setup sequence, left click on theUPDATE button to update the Update or GETN ormally, clicking Update sends the schedule orchanges in the schedule tothe controller in the update takes about 6 or 7seconds as shown on theprogress may be times whenyou want to Get theschedule in the controllerand put it into your maintenance contractorcan come by with his laptopcomputer, his remote andyour PIN number andreprogram your that case, when you receive the notice that the controller has a differentschedule than your computer, Get will retrieve it.
9 It will take a Your system on screenYou can read aboutthe various controlson the Graphic UserInterface (GUI) in thesoftware zone drawingsacross the top canbe replaced by digitalphotos of wateringzones in your zone you clickon will move underthe lens. The zonecan then be adjustedusing the fiveavailable controlsbelow the Communication checkfrom computer s locationLeft click on SETUP to open the SETUP click on the CHECK button to prepare for theautomatic Communication checkfrom computer s locationLeft click on the Start button for PC to controllercommunications. 24 Communications check fromcomputer s locationGreen radiowavesindicate , signallevels arehigh andthere is wave depictions in yellow are less than optimal, but OK. Redmeans no signal. The communications check is designed to remainon so someone can move the controller to alternate locations to findgreen or at least yellow signal indicators.
10 The communicationscheck will remain on until 30 seconds after you left click on Stop .25 Communications check fromcomputer s locationWhen you have clicked Stop and then clickon the BACK button to return to the mainscreen, you may see INSTALL MODE on thesystem s SYSTEM STATUS tab until the 30seconds times out or you click on the buttonwith the play not bother withthe controller tocontroller testunless yoursystem has morethan the Workingwith MultipleControllers the test indicates you have a good signal, install the controller inthe proven location. See the following Mounting the controllerThe Installation procedure for the PC Control s irrigation controller isvery similar to conventional controllers. Make sure the controlleris unplugged before you start. For a system with multiple controllers, the electrical code requiresthat no field wires, including valve common, are to be shared bythe controllers.