Transcription of Pella Installation Instructions BLOCK FRAME AND …
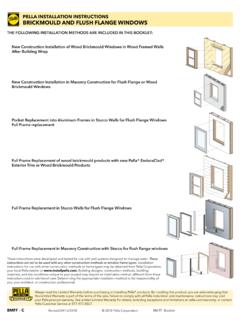
1 BFRPF 1 2018 Pella CorporationRevised 04/16/2018 THE FOLLOWING Installation METHODS ARE INCLUDED IN THIS BOOKLET:New Construction Installation in Masonry Construction for BLOCK FRAME Windows Always read the Limited Warranty before purchasing or installing Pella products. By installing this product, you are acknowledging that this Limited Warranty is part of the terms of the sale. Failure to comply with all Pella Installation and maintenance Instructions may void your Pella product warranty. See written Limited Warranty for details, including exceptions and limitations at , or contact Pella Customer Service at Instructions were developed and tested for use with wall systems designed to manage water. These Instructions are not to be used with any other construction methods or window FRAME types. Installation Instructions for use with other construction methods or FRAME types may be obtained from Pella Corporation, your local Pella retailer or Building designs, construction methods, building materials, and site conditions unique to your project may require an Installation method different from these Instructions and/or additional care.
2 Determining the appropriate Installation method is the responsibility of you, your architect, or construction Installation InstructionsBLOCK FRAME AND RENOVATION / PRECISION FIT WINDOWSP ocket Replacement from the Exterior for BLOCK FRAME Windows Pocket Replacement from the Interior for Renovation or Precision-Fit Windows Pocket Replacement into Wood Casement Frames for BLOCK FRAME Windows Full FRAME Replacement without Disturbing Brick or Siding for BLOCK FRAME Windows Full FRAME Replacement in Masonry Construction with Stucco for BLOCK FRAME Windows BLOCK FRAME BookletBFRPF 2 2018 Pella CorporationRevised 04/16/2018If the sashes are not removable or the glass is sealed to the FRAME :G. Remove the glazing bead using a putty knife or small pry For single pane windows with divided lights (grids): Use an angle grinder with a cut-off wheel to cut the end of the bars where they intersect with the sash or FRAME . This will allow the window glass to be removed more Heat the glazing seal using an electric heat While applying heat, press a de-glazing wheel between the glass and sash or FRAME .
3 Continue around the perimeter of the sash or panel. Apply light, constant pressure to separate the glass from the sash or FRAME . Dispose or recycle the glass : Wear appropriate personal protective equipment and keep the heat source away from flammable Pry the FRAME away from the brick or siding. Use a BLOCK of wood under the pry bar to protect interior or exterior finishes. Dispose or recycle the FRAME materials Cut through the FRAME using a reciprocating method of Full FRAME Removal involves removing the sash and entire FRAME of the existing window from the wall. The resulting opening is the original rough opening. The existing window nailing fins are usually nailed to the studs in FRAME construction with siding, brick veneer or other exterior material applied over the fin on the outside. The interior may have a drywall return from the wall to the window REQUIRED: Utility knife Phillips and Standard screwdrivers Pry bar Reciprocating saw Hammer Putty knife Deglazing wheel Heat gun Angle Grinder with cutting wheelREMEMBER TO USE APPROPRIATE PERSONAL PROTECTIVE ADHESIVE FILM OR DUCT TAPE TO THE GLASS TO PREVENT : Many windows in older homes are painted with lead-based paint.
4 Removal of old windows may disturb this paint. Proper precautions must be taken to minimize exposure to dust and debris. Consult state or local authorities and/or go to for more Score the paint or varnish between the interior trim and the wall or between the drywall return and the window FRAME to minimize damage. B. Remove the interior collapse aluminum frames follow steps C-M. To cut vinyl, clad wood, or aluminum frames out of the opening, see steps M and Score the sealant or paint between the exterior siding or brick and the window Remove the screen and vent sash from the old window. If it is not removable, see steps Remove the division bar by removing the screws at the ends or cutting it with a reciprocating Remove the other sash/panel. Remove any screws holding the fixed sash. Slide and lift out of the channel (sliding windows) or tilt and release from the balance assembly (hung windows).Cutting out vinyl, clad wood or aluminum frames:M.
5 Temporarily pry any head flashing up to avoid damaging or cutting Cut through the sealant line and nailing fin on all four sides using a reciprocating saw. Ensure the blade does not penetrate the interior where damage can occur to the FRAME REMOVAL WHEN PREPARING TO INSTALL A NEW BLOCK FRAME AND RENOVATION / PRECISION FIT WINDOWSFC onsult with local providers and authorities to recycle or properly dispose of old window components. BLOCK FRAME BookletBFRPF 3 2018 Pella CorporationRevised 04/16/2018 YOU WILL NEED TO SUPPLY:TOOLS REQUIRED: Moisture Resistant shims/spacers Fasteners (see BLOCK FRAME anchor Instructions and tables at the end of this booklet) Closed cell foam backer rod/sealant backer Pella SmartFlash foil backed butyl window and door flashing tape or equivalent Low expansion, low pressure polyurethane insulating window and door foam sealant DO NOT use high pressure or latex foams. Pella Window and Door Installation Sealant or equivalent high quality, multi-purpose sealant Tape measure Level Square Hammer Scissors or utility knife Small flat blade screwdriver Sealant Gun Screw Gun with a Phillips Driver bit 1/8" Allen wrenchSEALANTSEALANTTWO OR MORE PEOPLE WILL BE REQUIRED FOR THE WINDOW WINDOWS IN UPRIGHT POSITION, OUT OF DIRECT Remove plastic wrap and cardboard packaging from the window.
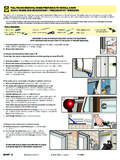
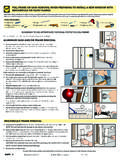
6 Do not cut checkrail bands (if present) or remove plastic or foam shipping spacers located between the window sash and FRAME . DO NOT open the window until it is securely Inspect the product for any damage such as cracks, dents or scratches. DO NOT install damaged Remove screens and hardware (if necessary). Label them and set aside in a protected with Half Screens: From the exterior, pull one side of the screen near the shipping clips until the clips disengage from the FRAME . Rotate the shipping clips toward the exterior of the screen until they snap free from the screens of some vinyl windows can be removed from the Installation , remove dirt and debris from all surfaces of the Read the entire instruction before PUSH DISCARD PUSH Shipping Clip Pull screen nearshipping clipPREPARING FOR BLOCK FRAME OR RENOVATION / PRECISION FIT WINDOW INSTALLATIONOTHER CONSTRUCTION MATERIALS MAY BE REQUIRED. READ AND UNDERSTAND THE Instructions AND INSPECT THE WALL CONDITIONS BEFORE YOU FOR INSTALLATIONT hese Instructions were developed and tested for use with wall systems designed to manage water.
7 These Instructions are not to be used with any other construction methods or window FRAME types. Installation Instructions for use with other construction methods or FRAME types may be obtained from Pella Corporation, your local Pella retailer or Building designs, construction methods, building materials, and site conditions unique to your project may require an Installation method different from these Instructions and/or additional care. Determining the appropriate Installation method is the responsibility of you, your architect, or construction read the Limited Warranty before purchasing or installing Pella products. By installing this product, you are acknowledging that this Limited Warranty is part of the terms of the sale. Failure to comply with all Pella Installation and maintenance Instructions may void your Pella product warranty. See written Limited Warranty for details, including exceptions and limitations at , or contact Pella Customer Service at FRAME BookletBFRPF 4 2018 Pella CorporationRevised 04/16/20181 PREPARE THE OPENING1 PREPARE THE OPENING (continued)2 PREPARE THE WINDOWREMEMBER TO USE APPROPRIATE PERSONAL PROTECTIVE Clean the opening.
8 Ensure it is dry and free from dirt, oil and Apply water resistant coating to the masonry. Extend the coating into the opening on all four sides. The water resistant coating may be a self-adhered sheet membrane (SASM) or a liquid applied flashing. Ensure continuity between the water resistant coating in the opening and the rest of the wall surface. SASM s must be overlapped in a water shed fashion. Apply all water resistant coatings according to the manufacturer s directions. E. Install and level sill shims. Place 1" wide x 1/4" to 3/8" thick shims 1/2" from each side. Keep shims back 1/2" from interior face of window. Place additional shims under each mullion and sliding window interlocker. For vinyl windows, add shims so maximum spacing is 18".F. Attach or set shims in adhesive sealant to prevent movement after they are level. Note: Improper placement of shims may result in bowing the bottom of the SCREW INSTALLATIONA. Drill pilot holes (if necessary) in the new window FRAME .
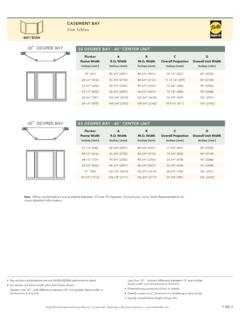
9 See the anchoring Instructions at the end of this : WHERE POSSIBLE, USE FRAME SCREWS (NOT CLIPS) AT THE SILL TO AVOID PENETRATING THE INTERIOR ExteriorB. Measure the width and height of the opening. The new window must be at least 1/2" to 3/4" smaller than this measurement. C. Confirm the opening is plumb, level and Measure and mark the opening where the interior of the new window will be placed. Consider the size of wall cavity (if applicable) and 3/4" overlap onto the brick veneer or finished wall materials for exterior perimeter CONSTRUCTION Installation IN MASONRY CONSTRUCTION FOR BLOCK FRAME WINDOWS for the Installation of new BLOCK FRAME windows into masonry openingsBlock FRAME BookletBFRPF 5 2018 Pella CorporationRevised 04/16/20182 PREPARE THE WINDOW (continued)3 SET AND FASTEN THE WINDOWCLIP INSTALLATIONC. Pre-bend clips if anchors will be installed into the interior wall Secure clips to the window FRAME : Pella Impervia and Pella 350 Series:E.
10 Slide clips into the FRAME grooves. See the anchor spacing Instructions at the end of this Secure the clips to the FRAME . Use a small piece of flashing tape to prevent the clips from sliding out of place ( Pella Impervia). Pella 350 Series - Drive two #8x1/2" pan head screws (provided) into the first row of pre-punched holes in the clip (All Pella 350 Series head and jambs except sliding windows. Do not install screws at the sill.)A. Insert the window in the opening. Check to make sure the distance from the interior of the new window to the interior of the wall is consistent all around the Place sealant under each clipC. Place shims and begin driving screws at each predrilled hole in the window FRAME or through each clip. Install masonry screws at least 2" from wall edge. Add additional shims at the ends of meeting rails and as necessary to ensure even reveal between the FRAME and to the anchoring Instructions at the end of this booklet.