Transcription of PREPARING FOR NAIL FIN WINDOW INSTALLATION
1 2018 pella CorporationRevised 10/26/2018NF 2 IMPORTANT SAFETY AND PRODUCT INFORMATION WINDOWCAUTION: Many windows in older homes are painted with lead-based paint. Removal of old windows may disturb this paint. Proper precautions must be taken to minimize exposure to dust and debris. Consult state or local authorities and/or go to for more information.!!WARNING: To ensure safety and security and help prevent property damage, including possible damage to your WINDOW or door, close and lock windows and doors any time they are not being used for venting on a nice day, and particularly during high winds or NOTICEB ecause all construction must anticipate some water infiltration, it is important that the wall system be designed and constructed to properly manage moisture.
2 pella Corporation is not responsible for claims or damages caused by anticipated and unanticipated water infiltration; deficiencies in building design, construction and maintenance; failure to install pella products in accordance with pella s INSTALLATION instructions; or the use of pella products in wall systems which do not allow for proper management of moisture within the wall systems. The determination of the suitability of all building components, including the use of pella products, as well as the design and INSTALLATION of flashing and sealing systems are the responsibility of the Buyer or User, the architect, contractor, installer, or other construction professional and are not the responsibility of products should not be used in barrier wall systems which do not allow for proper management of moisture within the wall systems, such as barrier Exterior Insulation and Finish Systems (EIFS)
3 (also known as synthetic stucco) or other non-water managed systems. Except in the states of California, New Mexico, Arizona, Nevada, Utah and Colorado, pella makes no warranty of any kind on and assumes no responsibility for pella windows and doors installed in barrier wall systems. In the states listed above, the INSTALLATION of pella Products in barrier wall or similar systems must be in accordance with pella s INSTALLATION instructions. Product modifications that are not approved by pella Corporation will void the and Maintenance Care and maintenance information is available by contacting your local pella retailer.
4 This information is also available at InstructionsGLASS: Remove any protective film and labels and clean the glass, using a soft, clean, grit-free cloth and mild soap or detergent. Be sure to remove all liquid by wiping dry or use a clean FINISHED PRODUCT: pella product that has been prefinished with stain or paint from the factory requires no additional finishing. Clean the surface with mild soap and ALUMINUM CLAD OR IMPERVIA FRAMES: The interior and exterior frame and sash are protected with a tough factory finish. Clean this surface with mild soap and water.
5 Stubborn stains and deposits may be removed with mineral spirits. DO NOT use abrasives. DO NOT scrape or use tools that might damage the BY pella /THERMASTAR BY pella , pella 350 SERIES AND pella 250 SERIES windows FRAMES: The vinyl frame may be cleaned using the same method as the glass. For stubborn dirt, a non-abrasive" cleaner such as Bon-Ami or Soft Scrub may be used. Do not use solvents such as mineral spirits, toluene, xylene, naphtha or muriatic acid as they can dull the finish, soften the vinyl and/or cause failure of the insulated unit seal.
6 Keep door tracks clear of dirt and debris. Keep weep holes open and clear of NOT use abrasives. DO NOT scrape or use tools that might damage the surface. Notice: DO NOT use inappropriate solvents or brickwash or Finish (Wood windows )Paint or finish immediately after products cannot be finished immediately, cover with clear plastic to protect from dirt, damage and moisture. Remove any construction residue before finishing. Sand all wood surfaces lightly with 180 grit or finer sandpaper. DO NOT use steel wool. BE CAREFUL NOT TO SCRATCH THE GLASS.
7 Remove sanding dust. pella products must be finished per the below instructions; failure to follow these instructions voids the Limited : To maintain proper product performance do not paint, finish or remove the weatherstripping, mohair dust pads, gaskets or vinyl parts. Air and water leakage will result if these parts are removed. After finishing, allow venting windows and doors to dry completely before closing them. If paint, stain or finish gets on the weatherstripping, wipe it off immediately with a damp Cleaning and Prep Instructions for Unfinished or Primed windows : Dry wipe dust from windows gently.
8 Examine WINDOW for possible smudges or fingerprints made from normal handling or construction. To remove smudges, lightly wipe surface with warm water. Scuff sand with light grade sand paper or abrasive pad (220 grit or higher). Rinse surface with warm water. Let WINDOW surfaces dry completely before applying the windows as soon as possible after INSTALLATION . On casement and awnings, it is optional to paint, stain or finish the vertical and horizontal sash edges. On single-hungs and double-hungs, do not paint, stain or finish the vertical sash edges, any finish on the vertical sash edges may cause the sash to stick; it is optional to paint, stain or finish the horizontal sash Corporation is not responsible for interior paint and stain finish imperfections for any product that is not factory-applied by pella Corporation.
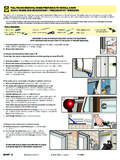
9 For additional information on finishing see the pella Owner s Manual or go to use of unapproved finishes, solvents or cleaning chemicals may cause adverse reactions with door materials. pella will not be responsible for problems caused by the use of unapproved materials. If in doubt, contact your local retailer or Finish of Existing Frame (Pocket Replacement)It is the responsibility of the homeowner, contractor or installer to ensure any exposed unfinished wood is covered or finished. Possible methods include, however are not limited to, covering with aluminum coil stock or Casement Hardware INSTALLATION go to: 2NC_NFAW 2018 pella CorporationRevised 10/26/2018NF 4 YOU WILL NEED TO SUPPLY:TOOLS REQUIRED.
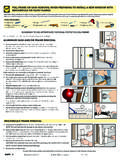
10 Moisture resistant shims/spacers Fasteners (see nail fin anchor instructions and tables at the end of this booklet) Closed cell foam backer rod/sealant backer pella SmartFlash foil backed butyl WINDOW and door flashing tape or equivalent Low expansion, low pressure polyurethane insulating WINDOW and door foam sealant DO NOT use high pressure or latex foams. pella WINDOW and Door INSTALLATION Sealant or equivalent high quality, multi-purpose sealant Tape measure Level Square Hammer Stapler Scissors or utility knife Small flat blade screwdriver Sealant Gun Screw Gun with a Phillips Driver bit 1/8" Allen wrenchSEALANTSEALANTINSTALLATION WILL REQUIRE (2) OR MORE PERSONS FOR SAFETY Confirm the opening is plumb and.