Transcription of Pico wireless English - Lutron Electronics Company Inc
1 Battery Holder ScrewLUTRONO verview pico wireless controls are for use with Lutron RF systems. The controls are programmed by the installer as shown in these instructions or the system Setup Guide. Important NotesCodes: Install in accordance with all local and national electrical codes. Environment: Ambient operating temperature: 32 F to 140 F (0 C to 60 C), 0 to 90% humidity, non-condensing. Indoor use only. Wallplates: Use only Lutron wallplates with this device. The mechanical design of the pico wireless control is NOT compatible with non- Lutron wallplates. Claro and Satin Colors wallplates are strongly recommended for best color match and clean aesthetic appearance. Do not paint controls, buttons, or wallplates. Wallplates are sold : To clean, wipe with a clean damp cloth.
2 DO NOT use any chemical cleaning solutions. Battery: The pico wireless control uses one (1) CR 2032 battery (included). Keep battery out of reach of children. DO NOT use rechargeable batteries. Using improper batteries could damage the pico wireless control. DO NOT dispose of the battery in normal household waste. Please recycle battery, take to a battery disposal facility, or contact your local waste disposal provider regarding local restrictions on the disposal or recycling of batteries. For California residents only: The batteries in these devices contain perchlorate material - special handling may apply. For more information visit: RF Device Placement: RF dimmers, switches, keypads, controls and shades/draperies must be located within 30 ft (9 m) of an RF signal repeater.
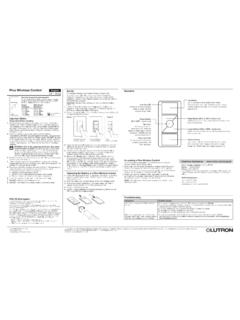
3 For systems without an RF signal repeater, all RF dimmers, switches, keypads, controls and shades/draperies must be located within 30 ft (9 m) of each other. Remote dimmers and switches hardwired to RF dimmers and switches are not required to be within a specific range. Mounting: For optimal performance, DO NOT mount the pico wireless control to a metal surface. Contents: Installation The pico wireless control can be used as a handheld remote, table top control or wall mount control. See the corresponding section below based on the type of installation desired. Handheld remote: Slide the Blank Backplate into the back of the pico wireless control: Slide the pico wireless control onto the Tabletop Pedestal (sold separately). Pedestal model numbers are: QSA-PED1 (holds 1 pico control) and QSA-PED2 (holds 2 pico controls).
4 Wall mount control: See the Wall Mount Template sheet included with the pico wireless control for various wall mount Setup To program a system which contains a Main Repeater refer to the system Setup Guide. Follow the instructions below to program a system which does NOT contain a Main Repeater. After all devices have been installed, the pico wireless control must be programmed to control a set of dimmers, switches and shades/draperies. Programming a system which does NOT contain a Main Repeater consists of two steps:1. Assigning dimmers, switches, keypads and shades/draperies to a pico wireless control 2. Saving the desired light levels and shade/drapery positionsAssigning devices to a pico wireless control1. Enter assign mode press and hold the top and bottom buttons of the pico wireless control until the LED begins to flash (approximately 6 seconds).
5 Note: The pico control will automatically exit assign mode after 10 Assign devices to the pico wireless control a. Dimmers/switches press and hold the tapswitch on the device until the load flashes 3 times (approximately 6 seconds). The LEDs on assigned dimmers and switches will continue to flash while the pico control is in assign mode. b. Shades/draperies press any button on the drive and the LED will Assign keypad columns press and hold the bottom button of the keypad column to be assigned until the LEDs begin to flash (approximately 6 seconds). 4. When all devices have been assigned, exit assign mode by holding the top and bottom buttons of the pico wireless control until the LED stops flashing (approximately 3 seconds).5. Confirm programming by individually pressing every button on the pico wireless control.
6 Assigned devices respond to the button press by going to the default level for that button. During normal operation, when a button is pressed, the LED next to the top button will flash for 1-2 seconds and turn off to conserve battery light levels and shade/drapery positionsYou can customize the levels or positions of the devices assigned to a pico wireless control by using the steps below. The pico control containing the button to be customized must have already been programmed according to Assigning devices to a pico wireless control, Press the button you wish to customize. The lights and shades/draperies will move to the default level(s) and/or position(s) for this button. Wait until the lights and shades/draperies stop dimming and Adjust each dimmer, switch and shade/drapery assigned to that column as follows: a.
7 Dimmers - use the tapswitch to toggle the lights on or off. Use the raise or lower button on the right side of the dimmer to make adjustments to the desired light levels. b. Switches - use the tapswitch to toggle the lights on or off. c. Shades/draperies - use the clockwise or counter-clockwise buttons on the shade/drapery to adjust the Making dimmers, switches and shades/draperies unaffected (optional) to make assigned devices not respond to a button press, you may make the devices unaffected . During normal operation when you press a button on a control, a device that is unaffected will ignore that button press. The light level or shade/drapery position will not change. To make devices unaffected , follow the corresponding step below based on the type of device to be made unaffected.
8 A. Dimmer if the dimmer is on, turn it off using the tapswitch. After the dimmer is completely off, hold the lower rocker until the three middle LEDs turn on (approximately 6 seconds), signifying that the next save will be ignored. ** b. Switch if the switch is on, turn it off using the tapswitch. Pull the FASS switch out. Press and hold the tapswitch. While still holding the tapswitch, push the FASS switch in. Continue holding the tapswitch until the LED flashes, signifying that the next save will be ignored. ** c. Shade/Drapery if the shade/drapery is open, close it using either the clockwise or counter-clockwise button. Release the button. After the shade/drapery is closed, press and hold the same button used to close the shade/drapery until the green LED blinks (approximately 10 seconds), signifying that the next save will be ignored.
9 **4. Press and hold the selected pico wireless control button until the LED flashes (approximately 6 seconds) to save the current levels or the unaffected status. The LED will blink rapidly for 1-2 seconds to confirm that the save was successful.** After a device becomes unaffected , you have 10 minutes to complete the save for all dimmers, switches and shades/draperies. Note: To change the unaffected status of a dimmer, switch or shade/drapery, follow the steps in Saving light levels and shade/drapery positions above.(1) pico wireless control(1) Blank backplate(1) Wall mount plate(4) Mounting screws(4) Screw anchors(1) Wall mount templateL-PED1 LUTRONQSR4P-3 RQSR8P-3 RQSRKP-3 RQSRMP-3 RBattery Replacement WARNING: Burn hazard. To avoid the risk of fire, explosion or burns, DO NOT recharge, disassemble, crush, puncture or incinerate the battery.
10 DO NOT heat the battery above 212 F (100 C).L-PED2 Lutron Elec tron ics Co., Inc. 7200 Suter Road Coopersburg, PA 18036-1299 Made and print ed in the 06/10 P/N 045-304 Rev. BTechnical Assistance: / Canada: Mexico: + InstructionsPlease Read Before Installing1. Remove the battery holder screw and slide the battery holder out of the back of the pico wireless Remove existing battery and replace with a new CR 2032 battery, positive (+) side down. Slide battery holder back into the pico wireless control until it snaps into place and insert the battery holder screw. Do not overtighten Holder ScrewOther Countries: + 24 hours a day, 7 days a Top Button Shades Or Draperies: Go to Open limit( 3R & 2R only)Grafik Eye QS WirelessIn Scene Control Mode: Activates Scene 1( 3R & 2R & 2)Grafik Eye QS wireless In Zone Control Mode: All assigned Zones brighten to 100%( 3R & 2R & 2)All other lighting devices:Brighten to 100%( 3R & 2R & 2)Tap Round Button: ( 3R only) Shades Or Draperies: Go to favorite presetGrafik Eye QS wireless In Scene Control Mode: Activates Scene 16 Grafik Eye QS wireless In Zone Control Mode: All assigned Zones go to the preset levelAll other lighting devices:Go to favorite presetTap Bottom Button:Shades Or Draperies.