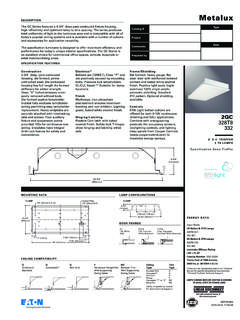
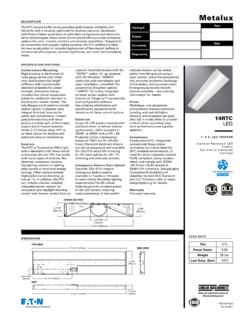
Transcription of Portfolio IB520015EN LDRT4B LDRT6B Commercial …
1 IMPORTANT: Read carefully before installing fixture. Retain for future of Electrical Shock! Disconnect power at fuse or circuit breaker before installing or of Fire! Do not install insulation within 76 mm (3 in) of any part of the luminaire or in a way that may entrap prevent wiring damage or abrasion, do not expose wiring to edges of sheet metal or other sharp and servicing to be performed only by qualified personnel, if not qualified, consult an not energize the LED Engine until the protective covering has been removed and the lower trim properly installed. Do not touch the yellow surface of the LED as it may damage the light #IB520015 ENInstallation instructions LDRT4B / LDRT6B /LDRT67B Commercial Recessed LED retrofit instructions d installation LDRT4B / LDRT6B /LDRT67B LED retrofit Commercial encastr Instrucciones de instalaci n de las luminarias LED adaptadoras, empotradas y de uso comercial LDRT4B / LDRT6B /LDRT67 Botee:NThis fixture should be supported by main runners or other structure that is capable of supporting fixture weight of 10 : When using electrical equipment, basic safety precautions should always be followed, including the following:1.
2 This unit is for recessed mounting only. Do not use in hazardous locations nor near gas or electric Do not use this equipment for other than the intended Install only in accordance with National Electrical Code and local regulatory agencies Install this kit only in luminaires that have the construction features and dimensions shown in the photographs and/or Installation of this retrofit assembly requires a person familiar with the construction and operation of the luminaire s electrical system and the hazard involved. If not qualified, do not attempt installation. Contact a qualified Do not alter, relocate, or remove wiring, lampholders, power supply, or any other electrical component unless specifically mentioned in these instructions or shown in the included photographs and/or Only those open holes indicated in the photographs and/or drawings may be made or altered as a result of kit installation.
3 Do not leave any other open holes in an enclosure of wiring or electrical instructions LDRT4B / LDRT6B /LDRT67B Commercial Recessed LED retrofit INSTALLATIONR etrofit Driver AssemblyFor Horizontal Compact Fluorescent Housingse:Connecting the module and trimAttach reflector to LED module using thumb this assembly in the ceiling1. Remove existing reflector/trim and lamp (Figure 1).2. Remove reflector mounting hardware from mounting bracket (Figure 2).3. Locate junction box, remove ballast/junction box cover and disconnect supply wires (120 or 277). Disconnect connections to insulation detector if any. Disconnect all wires from the socket to the ballast (wire colors may vary) (Figure 3).4. Remove one 7/8 diameter (1/2 trade size conduit) knockout from junction box, on top if Place retrofit driver assembly through ceiling/housing opening (Figure 4).
4 6. Lay retrofit driver assembly away from ceiling/housing opening with driver side up (Figure 5).7. Leave flexible conduits from retrofit driver assembly hanging down out of ceiling/housing Feed supply wires from retrofit driver assembly through knock-out that was removed in junction box and insert snap-in connector into junction box (Figure 6).9. Reconnect supply wires in junction box to leads from retrofit driver assembly: black wire to line, white wire to neutral, green wire to ground and any dimming leads as necessary (see Wiring Diagrams).10. Replace ballast/junction box cover to completely close junction Kit Contents: retrofit Ring Assembly retrofit Driver Assembly Portfolio LED Module (Sold Separately) Portfolio LED Reflector (Sold Separately)Tools Required (optional): Flathead screwdriver (from others) retrofit Ring AssemblyRetrofit AssemblyPortfolio LED Module (Sold Separately) Portfolio LED Reflector (Sold Separately) Installation instructions LDRT4B / LDRT6B /LDRT67B Commercial Recessed LED RetrofitIB520015EN 1 Figure 2 Figure 3 Figure 4 Figure 5 Figure 6 Adapter Ring (Optional)3 Installation instructions LDRT4B / LDRT6B /LDRT67B Commercial Recessed LED retrofit For Vertical Compact Fluorescent Housingse:1.
5 Remove existing reflector/trim and lamp (Figure 7).2. Adjust socket bracket to highest position (Figure 8).3. Locate junction box, remove ballast/junction box cover and disconnect supply wires (120 or 277). Disconnect connections to insulation detector if any. Disconnect all wires from the socket to the ballast (wire colors may vary) (Figure 9).4. Remove one 7/8 diameter (1/2 trade size conduit) knockout from junction box, on top if Place retrofit driver assembly through ceiling/housing opening (Figure 10).6. Lay retrofit driver assembly away from ceiling/housing opening with driver side up (Figure 11).7. Leave flexible conduits from retrofit driver assembly hanging down out of ceiling/housing Feed supply wires from retrofit driver assembly through knock-out that was removed in junction box and insert snap-in connector into junction box (Figure 12).
6 9. Reconnect supply wires in junction box to leads from retrofit driver assembly: black wire to line, white wire to neutral, green wire to ground and any dimming leads as necessary (see Wiring Diagrams).10. Replace ballast/junction box cover to completely close junction HID Housingse:1. Remove existing reflector/trim and lamp (Figure 13).2. Adjust socket bracket to highest position (Figure 14).3. Locate junction box, remove ballast/junction box cover and disconnect supply wires (120 or 277). Disconnect connections to insulation detector if any. Disconnect all wires from the socket to the ballast (wire colors may vary) (Figure 15).4. Remove one 7/8 diameter (1/2 trade size conduit) knockout from junction box, on top if Place retrofit driver assembly through ceiling/housing opening (Figure 16).
7 6. Lay retrofit driver assembly away from ceiling/housing opening with driver side up (Figure 17).7. Leave flexible conduits from retrofit driver assembly hanging down out of ceiling/housing Feed supply wires from retrofit driver assembly through knock-out that was removed in junction box and insert snap-in connector into junction box (Figure 18). Installation instructions LDRT4B / LDRT6B /LDRT67B Commercial Recessed LED RetrofitIB520015EN 7 Figure 8 Figure 9 Figure 10 Figure 11 Figure 12 Figure 13 Figure 14 Figure 15 Figure 16 Figure 17 Figure 1849. Reconnect supply wires in junction box to leads from retrofit driver assembly: black wire to line, white wire to neutral, green wire to ground and any dimming leads as necessary (see Wiring Diagrams).10. Replace ballast/junction box cover to completely close junction box.
8 Installation instructions LDRT4B / LDRT6B /LDRT67B Commercial Recessed LED RetrofitIB520015EN Incandescent Housingse:1. Remove existing reflector/trim and lamp (Figure 19).2. Adjust socket bracket to highest Locate junction box, remove cover and disconnect supply wires (120 or 277). Disconnect connections to insulation detector if any (Figure 20).4. Remove one 7/8 diameter (1/2 trade size conduit) knockout from junction box, on top if Place retrofit driver assembly through ceiling/housing opening (Figure 21).6. Lay retrofit driver assembly away from ceiling/housing opening with driver side up (Figure 22).7. Leave flexible conduits from retrofit driver assembly hanging down out of ceiling/housing Feed supply wires from retrofit driver assembly through knock-out that was removed in junction box and insert snap-in connector into junction box (Figure 23).
9 9. Reconnect supply wires in junction box to leads from retrofit driver assembly: black wire to line,white wire to neutral, green wire to ground (see Wiring Diagrams).10. Replace ballast/junction box cover to completely close junction Ring Assembly Installation1. Hold retrofit ring assembly springs parallel to ring opening and insert into ceiling/housing opening (Figure 25).2. Align torsion spring receivers with housing stilts (if present) and ensure that mounting springs do not contact any part of housing so that mounting feet rest flush on ceiling. retrofit ring may need to be rotated to avoid interference (Figure 26).3. The ring can be adapted to various ceiling thicknesses and plaster frame/housing heights by using the different slot locations for the mounting springs.
10 By default the rings are shipped with the springs in the top position for a 2 thick ceiling or housing. For ceiling thicknesses inch to inch use the lower slot and for thicknesses greater than but less than use the center slot (Figure 27).4. To prevent movement of retrofit ring assembly in housing/ceiling opening use a flat head screw driver to pry out 3 centering tabs (Figure 28).Installation instructions LDRT4B / LDRT6B /LDRT67B Commercial Recessed LED RetrofitCenter SlotScrew SlotsLower Slot (as shipped condition)Top SlotFigure 19 Figure 20 Figure 21 Figure 22 Figure 23 Figure 24 Figure 25 Figure 26 Figure 27 Figure 285 Installation instructions LDRT4B / LDRT6B /LDRT67B Commercial Recessed LED RetrofitIB520015EN instructions LDRT4B / LDRT6B /LDRT67B Commercial Recessed LED retrofit Reflector and LED Module1.