Transcription of PowerPoint 2019 Quick Reference - CustomGuide
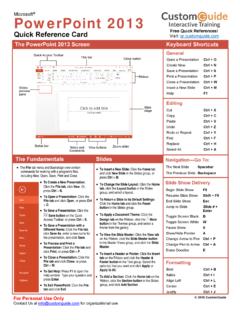
1 2021 CustomGuide , Inc. Click the topic links for free lessons! Contact Us: Microsoft PowerPoint Quick Reference Basic SkillsThe PowerPoint Program Screen The File tab opens Backstage view, which contains commands for working with your files like Open, Save, New, Print, Share, and Close. Create a New Presentation: Click the File tab, select New, and click Blank Presentation. Or, press Ctrl + a Presentation: Click the File tab and select Open, or press Ctrl + O. Select a location with a file youwant, then select a file and a Presentation: Click the Save button on the Quick Access Toolbar, or press Ctrl + S. Choose a location where you want to save the file. Give the file a name, then click Save. Preview and Print: Click the File tab, select Print, specify print settings, and click Print. Close a Presentation: Click the File tab and select Close, or press Ctrl + W. Close PowerPoint : Click the Close button in the upper-right corner. Undo: Click the Undo button on the Quick Access Toolbar.
2 Redo or Repeat: Click the Redo button on the Quick Access Toolbar. The button turns to Repeat once everything has been re-done. Change Presentation Views: Click the View tab and select a view, or click one of the View buttons at the bottom of the window. Normal View Outline View Slide Sorter View Reading View Get Help: Press F1 to open the Help pane. Type your topic or question and press Enter. Use Zoom: Click and drag the zoom slider to the left or right. General Open a presentation .. Ctrl + O Create a new presentation .. Ctrl + N Save a presentation .. Ctrl + S Print a Ctrl + P Insert a new slide .. Ctrl + M Toggle the Notes pane .. Ctrl + Shift + H Close a presentation .. Ctrl + W Exit PowerPoint .. Ctrl + Q Help .. F1 Editing Cut .. Ctrl + X Copy .. Ctrl + C Paste .. Ctrl + V Undo .. Ctrl + Z Redo .. Ctrl + Y Group .. Ctrl + G Find .. Ctrl + F Ctrl + H Select All .. Ctrl + A Formatting Bold .. Ctrl + B Italics .. Ctrl + I Underline .. Ctrl + U Align Left .. Ctrl + L Align Right.
3 Ctrl + R Ctrl + E Justify .. Ctrl + J Slide Show Delivery Begin slide show .. F5 Resume slide show .. Shift + F5 End slide show .. Esc Go to next slide .. Page Down Go to previous slide .. Page Up Go to first slide .. Home Go to last slide .. End Jump to slide .. [Slide #] + Enter Toggle screen black .. B Toggle screen white .. W Pause show .. S Change arrow to pen .. Ctrl + P Change pen to arrow .. Ctrl + A Keyboard Shortcuts Quick Access Toolbar Title Bar Close Button Ribbon File Tab Thumbnails Pane Active Slide Zoom Slider NotesPane Status Bar Getting Started View Buttons Free Cheat SheetsVisit 2021 CustomGuide , Inc. Click the topic links for free lessons! Contact Us: Work with Presentations Insert a New Slide: Click the Home tab and click the New Slide button in the Slides group, or press Ctrl + M. Change the Slide Layout: Click the Home tab, click the Layout button in the Slides group, and select a layout. Title Slide Title and Content Section Header Two Content Comparison Title Only Blank Content with Caption Picture with Caption Add Slides from Another Presentation: Click the New Slide list arrow on the Home tab and select Reuse Slides.
4 Click Browse and locate the file with slides you want to add. Click a slide in the Reuse Slides pane to add it to the current presentation. Duplicate Slides: Select the slide you want to duplicate. Click the New Slide list arrow on the Home tab and select Duplicate Selected Slides. Copy and Paste: Select the text you want to copy and click the Copy button on the Home tab. Then click where you want to paste the text and click the Paste button. Cut and Paste: Select the text you want to cut and click the Cut button on the Home tab. Then click where you want to paste the text and click the Paste button. Work with Presentations Add Slide Notes: Click the View tab on the ribbon and click the Notes button in the Show group to turn on the Notes pane. Enter a slide note to use during the presentation or for slide handouts. Add a Comment: Click the slide where you want to add a comment. Click the Review tab on the ribbon and click the New Comment button. Type your comment and click outside the Comments pane to save it.
5 Compare Two Presentations: Open the first presentation you want to compare. Click the Review tab on the ribbon and click the Compare button. Navigate to and select the second presentation you want to compare. Click the Merge button. Check Spelling and Grammar: Click the Review tab and click the Spelling button. Find Text: Click the Find button on the Home tab, enter the word you want to find in the Find what field, and click the Find Next button to locate the word in the presentation. Replace Text: Click the Replace button on the Home tab. Enter the word you want to find in the Find what field, then enter the text that will replace it in the Replace with field. Click Replace or Replace All. Click OK when finished. Edit Document Properties: Click the File tab and ensure Info is selected. The right column contains properties for the presentation such as file size, number of slides, hidden slides, and author, among others. Click in a field to edit it. Password Protect a Presentation: Click the File tab, click the Info tab, click the Protect Presentation button and select Encrypt with Password.
6 Enter a password to protect the presentation and click OK. Reenter the password and click OK. Organize a Presentation Add a Section: Select the slide where you want the section to start. Click the Section button on the Home tab and select Add Section from the menu. Rename Sections: Click any section heading in the Thumbnails pane to select it. Click the Section button on the Home tab and select Rename Section. Type a new name for the section and click Rename. Outline View: The Outline view allows you to focus on just the slide text without seeing any pictures or graphics. Click the View tab on the ribbon and click the Outline View button. Slide Sorter View: The Slide Sorter view is the easiest way to rearrange and organize slides after a presentation is created. Click the View tab on the ribbon and click the Slide Sorter button. Organize a Presentation Move a Slide: Click a slide in the Thumbnails pane and drag it to a new location. Hide or Unhide a Slide: Select a slide in the Thumbnails pane in Normal view.
7 Click the Slide Show tab on the ribbon and click the Hide Slide button in the Set Up group to toggle the slide visibility. Deliver a Slide Show Start a Slide Show: Click the Slide Show tab on the ribbon and click either the From Beginning or From Current Slide button. Or, click the Slide Show button on the status bar, or press F5. End a Slide Show: While presenting a slide show, click the Options button in the toolbar at the bottom left and select End Show. Or, press the Esc key. Advance to the Next Slide: Click the Next Slide button, press the Spacebar, click the left mouse button, or press the Page Down key. Go Back to the Previous Slide: Click the Previous Slide button, press Backspace key, or press the Page Up key. Use the laser Pointer: In Slide Show view, press and hold down the Ctrl key while clicking and holding the left mouse button. Use the Pen: In Slide Show view, press Ctrl + P and then draw on the screen. Press Ctrl + A to switch back to the arrow pointer. Press E to erase your annotations.
8 Hide a Presentation Slide: In Slide Show view, temporarily hide the current slide. Press the B key to make the screen black or the W key to make it all white. Press the Esc key to make the slide visible once again. Slide Zoom: In Slide Show view, click the Zoom button in the slide show toolbar. Click an area of the slide to zoom in. Right-click or press the Esc key to zoom out and view the entire slide. Start Presenter View: While presenting, click the Options button in the slide show toolbar and select Show Presenter View. End Presenter View: While in Presenter view, click the Options button in the slide show toolbar and select Hide Presenter View. Create a Custom Slide Show: Click the Slide Show tab on the ribbon. Click the Custom Slide Show button and select Custom Shows. Click the New button. Select the slides you want to add to the custom show and click the Add button. Click OK to save the custom show. Convert Presentations to Video: Click the File tab on the ribbon and select Export at the left.
9 Click Create a Video. Adjust the video settings and click Create Video. 2021 CustomGuide , Inc. Click the topic links for free lessons! Contact Us: Microsoft PowerPoint Quick Reference Intermediate Skills Animations Tab & Pane Transitions and Animations Apply a Slide Transition: Select the slide(s) where you want to add a transition. Click the Transitions tab on the ribbon and click the More button in the Transition to This Slide group. Select the transition you want to use. Modify a Transition: Click the Transitions tab on the ribbon and click the Effect Options button. Select an effect option in the menu. Apply an Animation: Select the text or object you want to animate and click the Animations tab on the ribbon. Click the Animation Styles button and select the animation you want to use. Click the Add Animation button to add additional animations to the same object. Modify an Animation: Click the Animations tab on the ribbon and click the Effect Options button. Select an option for the applied animation.
10 Copy Animations: Select an object with an animation applied. Click the Animations tab and click the Animation Painter button. Select the object you want the animation applied to. Display the Animation Pane: Click the Animations tab on the ribbon and click the Animation Pane button. View and edit the timeline for animations on the current slide. Formatting and Themes Change the Font: Select the text you want to change, click the Font list arrow on the Home tab, and select a new font. Change the Font Size: Select the text you want to change, click the Font Size list arrow on the Home tab, and select a new font size. Change the Font Color: Select the text you want to change, click the Font Color list arrow, and select a new color. Modify the Slide Background: Click the Design tab on the ribbon and click the Format Background button. Make the desired changes in the Format Background pane. Apply a Presentation Theme: Click the Design tab on the ribbon. Click the More button in the Themes group and select a theme.