Transcription of Pre-Delivery Guide
1 Pre-Delivery GuidePlease take the time to read this booklet carefully, as it will provide you with the information you will need to ensure the safe, secure, and timely installation of your new spa. The following sections are guidelines on how to prepare for delivery and set-up of your new spa. Specifically covered are site selection, delivery access, ground preparation, and electrical to carefully review the Owner s Manual that accompanies your spa, The Owner's Manual can be found in the Owner s Wellness reserves the right to change features, specifications, and design without notification and without incurring any PURCHASED: _____In most cities and counties, permits will be required for the installation of electrical circuits or the construction of exterior surfaces (decks and gazebos). In addition, some communities have adopted residential barrier codes which may require fencing and/or self-closing gates on the property to prevent unsupervised access to a pool (or spa) by children under 5 years of age.
2 Your spa is equipped with a locking cover that meets the ASTM F1346-91 Standard for Safety Covers and as a result, is usually exempt from most barrier requirements. As a general practice, your local Building Department will inform you of any applicable barrier requirements at the time a permit is obtained for the installation of an electrical circuit. For Customer Service, please call (888) 961-7727 Congratulations on your decision to purchase a Lifesmart to the growing family of Lifesmart spa owners!Site Selection and PreparationIMPORTANT: Site selection and preparation are your responsibility. Carefully read these instructions and consult your authorized dealer if you have any probably have a spot picked out for your new spa, whether it s indoors or outdoors, on a patio or on a deck. Just make sure you check the following: Always put your spa on a structurally sound, level within " per 10' (1 cm per 3 m) surface.
3 A filled spa can weigh hundreds of pounds. Make certain that the location you choose can support the weight of your filled spa. Locate your equipment compartment, which houses all of the electrical components, in a place where water will drain away from it. Allowing water into the equipment compartment can damage the electronics, or may result in tripping your house s circuit breaker. Leave yourself easy access to the circuit breakers in the subpanel (230 volt models), or to the GFCI on the end of the power cord (110 volt models). Never let water get into the subpanel (230 volt models), or into the GFCI (110 volt models), or into the electrical outlet that your spa is plugged into. Leave access to the equipment compartment for periodic spa care and AND PATIO INSTALLATIONNo matter where you install your new spa, it s important that you have a solid foundation to support it. Structural damage to the spa resulting from incorrect installation or placement on an inadequate foundation is not covered under the spa s limited warranty.
4 If you install the spa outdoors, a reinforced concrete pad at least four inches (10 cm) thick is suggested. The reinforcing rod or mesh in the pad should be attached to a bond wire. All spas may be installed onto a deck, provided that the load capacity of the deck is greater than the dead weight of the spa. DECK INSTALLATIONTo be certain your deck can support your spa, you must know the deck s maximum load capacity. Consult a qualified building contractor or structural engineer before you place the spa on an elevated deck or indoors. To find the weight of your spa, its contents and occupants, refer to the Spa Specification chart on the inside back cover of this Guide . The weight per square foot must not exceed the structure s rated capacity, or serious structural damage could INSTALLATIONBe aware of some special requirements if you place your spa indoors. Water will accumulate around the spa, so flooring materials must provide a good grip when wet.
5 Proper drainage is essential to prevent a build-up of water around the spa. When building a new room for the spa, it is recommended that a floor drain be installed. The humidity will naturally increase with the spa installed. Water may get into woodwork and produce dry rot, mildew, or other problems. Check for airborne moisture s effects on exposed wood, paper, etc. in the room. To minimize these effects, it is best to provide plenty of ventilation to the spa area. An architect can help to determine if more ventilation must be installed. x Page x xPre- delivery Guide Page 2 x Page x xx Page x xGROUND PREPARATIONYour spa has been engineered to perform on all kinds of common yard surfaces. While a concrete slab is best for long-term use*, other foundations are acceptable so long as a level base is prepared prior to delivery . Three foundation base pictures, shown at right, represent examples of alternatives to a concrete slab for spas installed without gazebos or other : A reinforced concrete pad at least four inches (10 cm) thick is NOTES:As a homeowner, it is your responsibility to provide a suitable, level foundation for your spa.
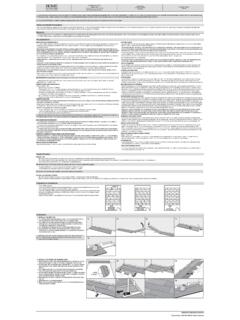
6 Keep in mind that most delivery crews are not equipped to level and prepare spa you are interested in having a concrete slab, brick surface, or wood deck installed, your dealer should be able to suggest a qualified, licensed : In order for the spa to operate properly and the internal plumbing to drain completely, you must ensure that the spa is leveled within " per 10' (1 cm per 3 m) after it has been installed. Do not shim you spa in any manner, as this could cause the cabinet to warp, thereby voiding the warranty. Page 3 Pre-Delivery GuideCONCRETE PADSBRICK SURFACESWOOD DECKINGFOUNDATIONS FOR SPASWITH ACCESSORIESx Page x xDELIVERYYour spa will be delivered at the end of your driveway. It is delivered on end, wrapped on a sturdy pallet for convenient placement. You will be responsible for any arrangements needed to have your spa placed in your desired location. When the freight company calls to set up a delivery appointment, you may inquire if they are able to assist.
7 There may be an additional fee that you need to work out with the freight company.(For example, cranes are not considered "normal delivery ".) It is recommended to consulting professionals who have experience moving large spa will be delivered in approximately 2 - 4 weeks from the date of order. If you are unable to accept delivery within this lead time, your spa order will be cancelled. Carriers are unable to hold and store your THE ROUTE OF YOUR SPA delivery :Carefully review the route that the spa will take through your property. Make sure there is sufficient clearance. Keep the overall dimensions in mind when your spa is wrapped on a pallet. You are able to remove the hot tub from the pallet and put a 4-wheel furniture dolly underneath it to move it. In this case you will need a 3 ft wide pathway that will accommodate an approximate 7' - 7 ' height clearance. Keep in mind that it will be almost 7' long, so check for clearances when turning : The empty spa can weigh as much as 1,000 lbs.
8 Choose the safest and most direct route possible. We recommend hiring professionals to avoid physical harm or Page x xHow is your width clearance?Protruding electric metersA/C unitsDo you have sufficientoverhead clearance?Check low roof eaves,overhanging branches,rain guttersIs the path clear?Move away branches, doghouses, firewood, there is a 90 turn, can weclear it? (The spa will not bend)No more than 6 consecutivestairs without a landingGas metersCheck all gatesHOUSEBACK YARDSTREETPre- delivery Guide Page 4 How is your width clearance?x Page x x Page 5 Pre-Delivery GuideLS100/DXDimensionsNOTE: All dimensions are approximate; measure your spa before making critical design or pathway ViewBottom ViewDOOR (116 cm)47 (119 cm) ( cm)26 (66 cm)ELECTRICALDRAIN32 ( cm)70 (178 cm)61 (155 cm)21 (53 cm) 4 (10 cm)18 (46 cm)x Page x xPre- delivery Guide Page 6 LS200 DimensionsNOTE: All dimensions are approximate; measure your spa before making critical design or pathway ViewBottom ViewDOOR SIDEC alavera40 (101 cm)49 (125 cm) ( cm)21 (53 cm)ELECTRICALDRAIN29 ( cm)66 (168 cm)77 ( cm)22 (56 cm)4 (10 cm)12 (31 cm)x Page x xLS300 PLUSD imensionsNOTE: All dimensions are approximate; measure your spa before making critical design or pathway decisions.
9 Page 7 Pre-Delivery GuideDOOR SIDEB ottom View Front ViewLS30060 (152 cm)66 (168 cm)1 ( cm)23 (58 cm)ELECTRICALDRAIN31 (79 cm)98 (249 cm)67 (170 cm)33 (84 cm) (9 cm)30 (76 cm)72 (183 cm)x Page x xx Page x xPre- delivery Guide Page 8 LS350DX/PLUS DimensionsNOTE: All dimensions are approximate; measure your spa before making critical design or pathway SIDEF ront ViewBottom View LS350 DX51 (130 cm)52 (132 cm) (4 cm)27 (69 cm)ELECTRICALDRAIN34 (86 cm)81 (206 cm)72 (183 cm)26 (66 cm) 4 (10 cm)25 ( cm)x Page x xx Page x x Page 9 Pre-Delivery GuideLS450 DXDimensionsNOTE: All dimensions are approximate; measure your spa before making critical design or pathway ViewBottom ViewDOOR SIDEV erona51 (130 cm)53 (135 cm) ( cm)24 (61 cm)ELECTRICALDRAIN34 ( cm)81 ( cm)81 ( cm)25 ( cm)3 (8 cm)21 (53 cm)LS500/550 DimensionsNOTE: All dimensions are approximate; measure your spa before making critical design or pathway Page x xPre- delivery Guide Page 10 Aryana27 (69 cm)55 (140 cm)58 (147 cm) ( cm)26 (66 cm)ELECTRICALDRAIN34 ( cm)77 ( cm)87 (221 cm) (62 cm)4 (10 cm)Front ViewDOOR SIDEB ottom Viewx Page x x Page 11 Pre-Delivery GuideLS600/700 DimensionsNOTE: All dimensions are approximate; measure your spa before making critical design or pathway ViewFront ViewNOTE: The LS700 has a secondary door not illustratedDOOR (54 cm)25 ( cm)52 (132 cm)54 (137 cm) ( cm)3 ( cm)24 (61 cm)ELECTRICALDRAIN34 ( cm)81 ( cm)81 ( cm)x Page x xPre- delivery Guide Page 12 SERENOD imensionsNOTE: All dimensions are approximate.
10 Measure your spa before making critical design or pathway ViewBottom ViewDOOR SIDET ransport38 ( cm)39 (99 cm)1 ( cm)27 ( cm)ELECTRICALDRAIN34 ( cm)75 ( cm)75 ( cm)8 (21 cm)4 (10 cm)7 (18 cm) (123 cm)x Page x xTIERRAD imensionsNOTE: All dimensions are approximate; measure your spa before making critical design or pathway Guide Page 14 Tierra14 (36 cm)20 (51 cm)51 (130 cm)56 (142 cm)1 ( cm)5 (13 cm)23 (58 cm)ELECTRICALDRAIN34 ( cm)77 (196 cm)87 (221 cm)Front ViewBottom ViewDOOR SIDEx Page x x Page 15 Pre-Delivery GuideCARINO DimensionsNOTE: All dimensions are approximate; measure your spa before making critical design or pathway (198 cm) ( cm)31 (79 cm)ELECTRICALDRAIN36 ( cm)89 (226 cm)89 (226 cm)21 (53 cm) 6 (15 cm) (14 cm)ELECTRICALF ront ViewBottom ViewDOOR SIDEx Page x xPre- delivery Guide Page 16 ESTRELLA NL/LDimensionsNOTE: All dimensions are approximate; measure your spa before making critical design or pathway (124 cm) ( cm)31 (79 cm)ELECTRICALDRAIN36 ( cm)84 (213 cm)84 (213 cm)21 (53 cm) 6 (15 cm) (14 cm)ELECTRICALF ront ViewBottom ViewDOOR SIDEx Page x xP L AYA DimensionsNOTE: All dimensions are approximate.