Transcription of Project 2010 Quick Reference - SharePoint Training
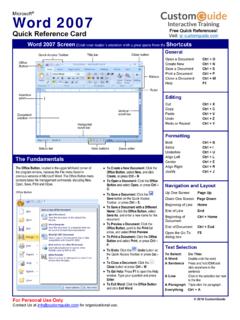
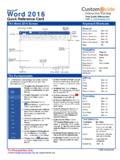
1 Microsoft . Project 2010 Free Quick References! Quick Reference Card Visit: Project 2010 Screen Common Views Quick Access Toolbar Minimize Ribbon To Display a View: Click the View tab on the Ribbon and select a view from the Task or File tab Resource Views groups. Or, click a view button in the status bar of the program window. Or, Ribbon click the Task tab or Resource tab on the Ribbon, click the button list arrow in the View Timeline group, and select a view. Gantt Chart: This is the default task view. Displays a task list with bar chart information. Vertical Calendar: Displays tasks and durations in a Scroll Bar monthly calendar. Network Diagram: Displays a sequence or logic diagram that shows the Project 's tasks and Pane Gantt dependencies.
2 Divider chart Resource Sheet: Displays a list of resources and their details in rows and columns. Resource Usage: Displays assigned tasks grouped under each resource. Horizontal Status Scroll Bar Resource Form: Displays resource information Bar in a form view. Gantt spreadsheet View Zoom buttons slider Resource Graph: Displays a graph of resources and their costs, etc. over time. The Fundamentals Task Usage: Displays a list of tasks showing To Create a New Project : Click the File tab on the To Save a Baseline Plan: Click the Project tab on assigned resources under each task. Ribbon and select New. the Ribbon and click the Set Baseline button in the Task Form: Displays task information in a form Properties group.
3 Select the Set baseline option, view. To Create a Project from a Template: Click save the plan for the entire Project or selected the File tab on the Ribbon and select New. Select a tasks, click OK. Task Sheet: Displays a list of tasks and their template under the Templates section, details in rows and columns. or click My Templates and select a template. To Save an Interim Plan: Click the Project tab on the Ribbon and click the Set Baseline button in the Team Planner: The default resource view. To Create a New Project from an Excel Properties group. Select the Set interim plan Choose from more advanced and specific views. Spreadsheet or SharePoint List: Click the File tab option, save the plan for the entire Project or Timeline: Displays a list of tasks with a baseline on the Ribbon and select New from Excel selected tasks, click OK.
4 Schedule and Gantt bars. workbook or New from SharePoint task list. To Calculate Project Changes: Click the Project Tracking Gantt: Displays a list of tasks with a To Save a Project File: Click the Save button on tab on the Ribbon and click the Calculate Project baseline schedule and Gantt bars. the Quick Access Toolbar, click File tab on the button in the Schedule group. More Views: Choose from a list of more Ribbon and select Save. Or, press Ctrl + S. To Open the Timescale Dialog Box: Click the advanced and specific views. To View Information about a Project : Click the View tab on the Ribbon, click the Timescale list Project tab on the Ribbon and click the Project arrow in the Zoom group, and select Timescale.
5 Or, Keyboard Shortcuts Information button in the Properties group. double-click inside the timescale header. Task or Resource Shift + F2. Set the Working Time Calendar: Click the Project To Adjust the Timescale: Click the View tab on Information tab on the Ribbon and click the Change Working the Ribbon and click the Timescale list arrow in the Time button in the Properties group. Select the Zoom group. Or, change the options in the Assign Resources Alt + F10. date(s) you want to change and select a new Timescale dialog box. Help F1. calendar, or enter the new working hours in the To Adjust the Zoom Level: Click and drag the View Context- Shift + F1.
6 From: and To: boxes. Zoom Slider to zoom in or out. Or, click the View Sensitive Help To Update the Project : Click the Project tab on tab on the Ribbon and click the Zoom button in the Go To Selected Task Ctrl + Shift the Ribbon and click the Update Project button in Zoom group. Choose a zoom option from the list. + F5. the Status group. To Jump to a Tasks: Select the task you wish to Link Selected Task Ctrl + F2. To Set the Status Date: Click the Project tab on view. Click the View tab on the Ribbon and click the Zoom Selected Tasks button in the Zoom group. Unlink Selected Ctrl + Shift the Ribbon and click the Status Date button in the Task + F2.
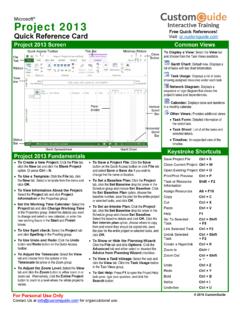
7 Status group. Select the status date to report To View the Entire Project : Click the View tab on progress of the Project . the Ribbon and click the Zoom Entire Project Zoom In Ctrl+ /. button in the Zoom group. Zoom Out Ctrl + *. For Personal Use Only 2016 CustomGuide Contact Us at for organizational use. Plan and Manage the Project Working with Resources and Costs There are six basic steps to follow when planning a Project : (1) Define a To Add a Resource: In a resource view, click the Resource tab on the Project (2) Plan Project activities (3) Plan for and gather resources (4) Plan Ribbon and click the Add Resources button in the Insert group.
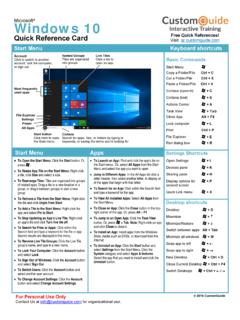
8 Select the Project costs (5) Plan for quality and risks (6) Plan security and type of resource you want to add and enter its information. communication. To Enter Resource Availability: Click the Information button in the Project management is the Project Triangle Properties group of the Resource tab. Enter the Available To and Available process of planning, organizing, From dates in the Resource Availability table, and enter the Maximum Units Time Know the Cost This includes and managing tasks and deadline for your the people and the available in the Units field. resources to accomplish an Project . equipment that do the work, and the To Assign a Resource: Select a task.
9 Click the Resources tab on the objective within constraints of materials they use. Ribbon and click the Assign Resources button in the Assignments group. time, resources, or cost. Select the resource(s) and click Assign. Adjusting one constraint of the Scope This includes the quality, functions, and To Enter Costs: In a resource view, enter cost amounts in the Std. Rate field, Project Triangle affects the features of your product or service, and the work the Ovt. Rate field, or the Cost/Use field. Then choose when you'd like to other two. required to deliver it. begin accruing the resource cost in the Accrue At field. To Enter Fixed Costs: Click the View tab on the Ribbon and click the Tables Working with Tasks button in the Data group.
10 Select Cost from the list. Select the task for which To Enter a Task: In a task view, type the task's name in the Task Name you want to enter a fixed cost and type the cost in the Fixed Cost field. column and press Enter. Or, click the Task tab and click the Insert Task button in the Insert group. A new task is inserted above the selected task. View Tools To Enter Blank Row: Click the Task tab, click the Insert Task button list Viewing the Timeline: By default a timeline of the entire Project appears arrow in the Insert group and select Blank Row. A blank row is inserted above the selected view. To turn this on or off, click the View tab on the above the selected task.