Transcription of Pulse Width Modulation (PWM) Cornerstone Electronics ...
1 Pulse Width Modulation (PWM). Cornerstone Electronics Technology and Robotics II. Administration: o Prayer PicBasic Pro Programs Used in This Lesson: o General PicBasic Pro Program Listing: o Lab 1 pwm1 as a .pdf file: o Lab 2 hpwm1 as a .pdf file: o Lab 2 hpwm2 as a .pdf file: o Lab 3 hpwm3 as a .pdf file: o Lab 4 pwm_hpwm1 as a .pdf file: Pulse Width Modulation (PWM): o Introduction: Electric motor speed is controlled by increasing and decreasing the effective voltage to the motor. More voltage and the motor rotates faster, less voltage and the motor slows down. The instinctive way to control motor speed is to connect a rheostat between the motor and the power supply to adjust the voltage, but this method has several shortcomings which will be discussed in this lesson.
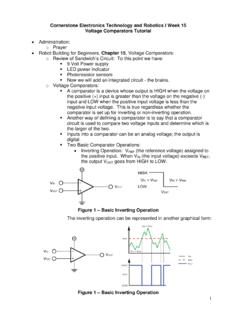
2 A better method of managing motor speed is to switch the power to the motor on and off very quickly. Rather than slowing a motor down by reducing the motor supply voltage from the full rated voltage, PWM produces digital pulses at the full motor rated voltage. Pulse Width Modulation , or PWM, is a technique for creating the series of on-off pulses. This on-off square wave pattern changes the portion of the time the signal is on versus the time that the signal is off (Figure 1). Figure 1: Sample Pulse - Width - Modulation (PWM) Signal Waveform 1. o Problems Using a Rheostat to Control a Motor: As noted above, to reduce the speed of a motor is seems natural to place a rheostat between the motor and the power supply, but this method has some inherent problems: One difficulty with this method is that the voltage drop across the resistor represents energy lost in the form of heat which is a waste of valuable energy, especially from a battery power source (Figure 2).
3 Figure 2: Motor Control Using a Rheostat (NOT Recommended). Motor torque is directly related to the voltage supplied to the motor. The rheostat reduces the voltage to the motor which proportionally reduces the torque the motor delivers. Another shortcoming is this when the motor is running and you set the rheostat for a very slow speed then restart the motor, the motor may not rotate. It takes more energy to start a motor than to keep it running. o Duty Cycle: Definition for our purposes: The percentage of time a motor is on. Formula definition of duty cycle: Duty Cycle = 100% x Pulse Width /Period Where: Duty Cycle in (%). Pulse Width = Time the signal is in the ON or high state (sec). Period = Time of one cycle (sec). Figure 3: PWM Signal Waveform Terms When the duty cycle is 0%, the load (motor) is fully off; when the duty cycle is 100%, the load is fully on.
4 2. Examples: Figure 4: Examples of Several Duty Cycles The lesson continues on the next page. 3. Example Duty Cycle Calculation: A PWM waveform is +12 volts for 40 us and 0 volts for 10 us (Figure 5). What is the duty cycle for the PWM signal? Period = Pulse Width + Time OFF. Period = 40 us + 10 us Period = 50 us Duty Cycle = 100% x Pulse Width / Period Duty Cycle = 100% x (40 us / 50 us). Duty Cycle = 80%. Figure 5: Duty Cycle Example Calculation What is the frequency of this waveform? Frequency = 1 / Period Frequency = 1 / 50 us Frequency = 1 / sec Frequency = 20,000 Hz or 20 kHz Theoretical Average Voltage: The actual voltage of a PWM signal depends upon the load. Formula: Theoretical Average Voltage = VoltageFull x Duty Cycle Example from Figure 5: Figure 6: Average Voltage of Duty Cycle Example Average Voltage = 12 Volts x 80%.
5 Average Voltage = Volts 4. o Details about PWM: Since the motor is at full voltage during the ON Pulse , the motor runs at full torque during the ON Pulse . A 25% duty cycle reduces the power applied to the motor close to 25%, yet the speed may not be reduced to 25% of the maximum speed. A PWM signal is at a fixed frequency. A very low PWM frequency will make the motor rotate in a sequence of 'jerks', a slightly higher frequency will cause the motor to make an audible humming sound. The frequency of a PWM motor signal should be 20 kHz or more to ensure that the motor whine is outside the normal human hearing range (20 20,000. Hz). If your motor driver circuitry uses MOSFETs, the PWM frequency should never exceed the switching speed of the MOSFET. Because of the weight of the motor armature and its inertia, the motor speed won't vary noticeable between each on and off Pulse , provided the pulses are short enough and close enough together.
6 Pulse - Width Modulation (PWM) is a way of controlling the power of an electric circuit that wastes very little electrical energy. The signal is fed through a transistor switch which has little resistance while in the ON. state. Power MOSFETs generally have a drain to source resistance in the ON-state (RDS(ON)) measured in the hundredths of an ohm (Figure 7). Since the resistance is so small, little energy is consumed by the transistor switch while in the ON-state. Figure 7: The Drain to Source Resistance in the ON-state is Measured in the Hundredths of an Ohm Check out how your motor controller copes with forward and reverse. Some controllers use the PWM for speed and another pin to set direction (forward or reverse). Other controllers achieve it all in the one PWM.
7 Signal duty cycles < 50% are reverse and > 50% are forward. 5. New PicBasic Pro Commands: o PWM. Format: PWM Pin,Duty,Cycle Outputs a Pulse Width modulated Pulse train on Pin. The Duty cycle for each PWM cycle ranges from 0 (0%) to 255 (100%). This PWM cycle is repeated Cycle times. Pin may be a constant, 0 - 15, or a variable that contains a number 0 15 ( B0) or a pin name ( ). The Cycle time of PWM is dependent upon the oscillator frequency. If a 4 MHz oscillator is used, each Cycle is about 5ms long. If a 20 MHz oscillator is used, each Cycle is about 1ms in length. Defining an OSC. value has no effect on PWM. The Cycle time always changes with the actual oscillator speed. If you want continuous PWM output and the PICmicro MCU has PWM. hardware, HPWM may be used instead of PWM.
8 Pin is made an output just prior to Pulse generation and reverts to an input after generation stops. The PWM output on a pin looks like so much garbage, not a beautiful series of square waves. A filter of some sort is necessary to turn the signal into something useful. An RC circuit can be used as a simple D/A converter: Example: PWM 7,127,100 Sends a 50% duty cycle PWM. signal out Pin RB7 for 100 cycles o Perform Pulse Width Modulation LAB 1 o HPWM: Format: HPWM Channel,Dutycycle,Frequency Outputs a PWM signal using the PICs PWM hardware which is available on some PICs including the PIC16F88. The default HPWM Channel 1 on the 16F88 is RB0. In the specification sheet, it is referred to as CCP1. RB3 is an alternative pin for CCP1, but the PIC must be reconfigured before this pin can be used.
9 See the green PicBasic Pro Compiler manual by microEngineering Labs, Inc. for details. The Dutycycle for each HPWM cycle ranges from 0 (0%) to 255 (100%), similar to Duty for the PWM command. Frequency sets the desired frequency of the PWM. The lowest frequency for the PIC16F88 at an oscillator setting of 4 MHz is 245 Hz and the highest is 32,767 Hz. The HPWM command runs in the background of your program, meaning it will continue to run while the program is executing other commands. o Complete Pulse Width Modulation LAB 2 Motor Calibration: o Since our robotic cars are equipped with differential drive, it is essential that both motors operate at the same rpm when navigating forward or backward. The dc motors must be calibrated to ensure both motors rotate at the same rpm.
10 O Perform Pulse Width Modulation LAB 3 PWM Calibration o Perform Motor Control Pulse Width Modulation LAB 4 Using PWM for Speed Control with the SN754410. 6. Cornerstone Electronics Technology and Robotics II. Pulse Width Modulation LAB 1 Purpose: The purpose of this lab is to acquaint the student the PicBasic Pro command PWM and how to make basic connections of a motor to a PIC. programmed with PWM. Apparatus and Materials: 1 Breadboard with +5 VDC and +12 VDC Power Supply 1 PIC16F88. 1 1K Resistors 1 Resistor 1 2N2222 NPN Transistor 1 1N5817 Schottky Diode 1 12 Volt DC Motor Procedure: o Wire the circuit below on your breadboard: o Open from your folder and download to the PIC. The program changes the motor speed to three levels. o Run the program and observe the motor speed changes o Now save as o Experiment by changing the values of Duty first, and then Cycle in the PWM command.