Transcription of QRZ Logbook
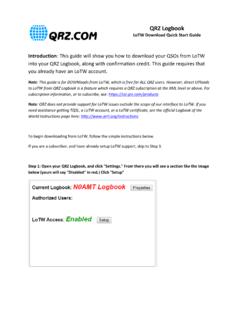
1 QRZ Logbook LoTW Certificate Import Quick Start Guide Introduction: This guide will show you how to retrieve the LoTW certificate which QRZ Logbook requires for direct uploads to ARRL s Logbook of the World (LoTW). This guide requires that you already have TQSL, and a valid certificate from LoTW. Note: Direct uploads to LoTW from QRZ Logbook is a feature which requires a QRZ subscription at the XML level or above. For subscription information, or to subscribe, see: Note: QRZ does not provide support for LoTW issues outside the scope of our interface to LoTW. If you need assistance getting TQSL, a LoTW account, or a LoTW certificate, see the official Logbook of the World Instructions page here: Step 1: Open TQSL, and select the Callsign Certificates tab to display all available certificates. QRZ Logbook LoTW Certificate Import Quick Start Guide Step 2: Right click on the certificate that matches the callsign of the QRZ Logbook that you wish to enable LoTW access for and select Save Certificate to QRZ Logbook LoTW Certificate Import Quick Start Guide Step 3: Browse to the location where you wish to store the certificate file, and save the file.
2 This location will be required later in the process. QRZ Logbook LoTW Certificate Import Quick Start Guide Step 4: If you wish, you may enter a password (recommended), then click OK. Note: You must remember this password! QRZ does not store this password, and CANNOT reset it for you. QRZ Logbook LoTW Certificate Import Quick Start Guide Step 5: From the QRZ Logbook LoTW Access Setup page, select Choose File. QRZ Logbook LoTW Certificate Import Quick Start Guide Step 5: Browse to the location of the saved file from Step 3. Select the file, and select Open. Step 6: Enter your LoTW username and password and click Save. Step 6a. You will be prompted for a certificate password. If you entered one in Step 4, enter it again here. If you did not enter a password in step 4, leave this blank. QRZ Logbook LoTW Certificate Import Quick Start Guide You can now send QSOs directly from QRZ Logbook to LoTW by selecting the checkbox of the QSO(s) you wish to send to LoTW, clicking Actions , then selecting Send the selected records to LoTW.
3 A password box will appear where you can enter the password from Step 4, or leave it blank if you did not enter a password in Step 4. Clicking Continue. QRZ Logbook LoTW Certificate Import Quick Start Guide You can also send ALL QSOs in your Logbook directly to LoTW by using the Export and send to LoTW button on the Settings page of the QRZ Logbook . (Highlighted in red below.) This will prompt you for a password. Again, this is the password you entered in Step 4. If you did not enter a password in Step 4, leave this blank.