Transcription of Quality Assurance / Quality Control (QA/QC) Reference Manual
1 Quality Assurance / Quality Control (QA/QC) Reference ManualTable of ContentsIntroductionSection A System Components Assure Prism multi Blood Glucose Meter Meter Display Screen Assure Prism multi Test Strips Assure Prism Control Solution Meter SpecificationsSection B Meter Operation and Set-Up Meter Set-Up Performing a Blood Glucose Test Performing a Control Solution Test Meter Memory Inserting or Replacing the Batteries Cleaning and Disinfecting the Meter Troubleshooting Assure Prism multi Test Strips Assure Prism Control Solution Section C In-Service Training In-Service Guide Competency Checklist
2 Self-Test Nurse In-Service Training Record Section D Quality Assurance / Quality Control Recording Forms Meter Tracking Quality Control Record Field Inspection ReportSection E Regulatory Review and Guidelines for QA/QC Protocols Competency Checklist Accuracy and Precision Studies Alternative Sites Testing EvaluationSection F Addendums Product Ordering WarrantyIntroductionThe Assure Prism multi Blood Glucose Monitoring System is intended for the quantitative measurement of glucose in fresh capillary whole blood samples drawn from the fingertips and alternative sites such as the forearm, palm, thigh, and site testing should be used only during steadystate blood glucose conditions. The system is intended for use outside the body (in vitro) and is intended for multiple-patient use in professional healthcare settings as an aid to monitor the effectiveness of diabetes Control .
3 The system is only used with the auto-disabling, single use lancing device. It is not intended for use on neonates and is not for the diagnosis or screening of comprehensive Manual has been designed to provide you with a thorough Reference source for the Assure Prism multi System including: Product operations Training and in-services Guidelines for policies and procedures Quality Assurance and Quality Control (QA/QC) programs Reviews of regulatory materialsAll of these materials have been designed to assist you in meeting the necessary requirements for various certification programs and trust that this Quality Assurance / Quality Control Manual will provide you with the needed support tools for your blood glucose monitoring program. If you have any questions after receiving the Manual , please call ARKRAY s Customer Service Department at Components SECTIONAORDERING DETAILSARKRAY Product Code# 530001 NDC# 08317-5300-01 Display Shows results, messagesTest Strip EjectorTest Strip PortInsert test strip hereButtonTurns the meter on/off and confirms menu selectionsBacklight ButtonTurns the backlight on/off ButtonSelects or changes informationButton Selects or changes informationASSURE PRISM MULTI BLOOD GLUCOSE METERSECTIONAMETER DISPLAY SCREENNote: It is recommended to check if the display screen on the meter matches the illustration above every time the meter turns on.
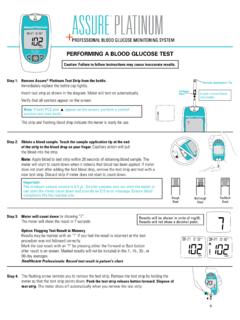
4 Do not use the meter if the display screen does not exactly match the illustration as the meter may show incorrect results. The unit of measurement for your Assure Prism multi Meter is preset and fixed in when test results stored in the memory are when the time alarm has been low when the temperature is during post-meal testing and when post- meal test results are only when the sound is set to when the Control solution test results are saved or results displaying meter is ready for TemperatureTimeSECTIONAORDERING DETAILS ARKRAY Product Code# NDC# Assure Prism multi Test Strips 50-count 530050 08317-5300-50 Assure Prism multi Test Strips 100-count 530100 08317-5301-00 ASSURE PRISM MULTI TEST STRIPSThe Assure Prism multi Blood Glucose Monitoring System measures blood glucose quickly and accurately.
5 It automatically absorbs the small blood sample applied to the narrow edge of the INSTRUCTIONS FOR USING TEST STRIPS All components that come into contact with blood samples should be considered biohazards capable of transmitting viral diseases between patients and healthcare professionals. Assure Prism multi Test Strips should be used only with fresh capillary whole blood samples. Do not reuse test strips. Do not use Assure Prism multi Test Strips beyond the expiration date. This may cause inaccurate results. Test strips in new, unopened vials and test strips in vials that have been opened can be used up until the expiration date printed on the test strip box and vial label if the test strips are used and stored according to its storage and handling methods.
6 Store test strips in a cool and dry place at a temperature of 34-86 F (1-30 C). Keep test strips away from direct sunlight or heat and do not freeze. Store test strips only in their original vial. Close the vial tightly after taking out a test strip and use the test strip immediately. Handle test strips only with clean and dry hands. Do not bend, cut, or alter test strips in any way. For detailed storage and usage information, refer to the Assure Prism multi Test Strip package insert. Keep the meter and testing supplies away from young children. The test strip vial contains drying agents that are harmful if inhaled or swallowed and may cause skin or eye barsGently push the test strip, with its contact bars facing up.
7 Into the test strip port of meterConfirmation window Check here to see whether sufficient blood sample has been appliedEdge to apply blood sampleApply blood sample here for testingInsertSECTIONAMETER SPECIFICATIONSFor additional information refer to the Assure Prism multi User PRISM Control SOLUTION Assure Prism Control SolutionORDERING DETAILS ARKRAY Product Code# NDC# Assure Prism Control Solutions 1 & 2 530006 08317-5300-06 Product SpecificationsTest stripsAssure Prism multi Test StripsMeasurement range20 600 mg/dL Sample sizeMinimum LTest time5 secondsSample typeFresh capillary whole bloodCalibrationPlasma equivalentAssay method ElectrochemicalBattery life1,000 testsPowerTwo lithium batteries (disposable, type CR2032)Memory500 test resultsSize93 X 56 X 21 mm( x x in.)
8 G( oz)(with batteries)Operating RangesTemperature50 F 104 F (10 C 40 C)Relative humidity10% 90%Hematocrit20% 60%Altitude10,000 ft. (3,048 meters)Unit of measurementmg/dLSECTIONBSECTIONBM eter Operation and Set-Up METER SET-UPYou should check and update the meter-settings such as time and date before using your meter or after changing the meter batteries. Press and hold the button for 3 seconds to enter the SET mode. Whenever you want to complete the settings and exit from the SET mode, press and hold the button for 3 seconds again. Press or to reach the accurate value. Press and hold to scroll the Date and TimeStep 1: Entering the SET ModePress and hold the button for 3 seconds. After all the segments flash across the screen, SET will be displayed on the screen.
9 Press the button again to progress to the next 2: Setting the YearPress or until the correct year appears. Press and hold button to scroll through the numbers quickly. After setting the year, press the button to confirm your selection and progress to the next 3: Setting the MonthA number indicating the month will be blinking on the left corner of the screen. Press or until the correct month appears. Press the button to confirm your selection and progress to the next 4: Setting the DatePress or until the screen displays the correct date. Press the button to confirm the date and progress to the next 5: Setting the Time FormatThe meter can be set in the AM/PM 12-hour or the 24-hour clock format. Press or to select a format.
10 The AM/PM is not displayed in the 24-hour format. After selecting the format, press the button to progress to the next 6: Setting the HourPress or until the correct hour appears. After the hour is set, press the button to progress to the next 7: Setting the MinutePress or until the correct minute appears. After setting the minute, press the button to progress to the next 8: Setting the Sound On/OFFOn pressing or , the screen will display On or OFF. Press the button to confirm the meter will beep in the following instances if set to On. When you press the button and/or button to turn on the meter or to set the alarm. When the test strip is inserted in the meter. When the blood or Control solution sample is absorbed into the test strip and the test starts.