Transcription of Quick Start - download.msi.com
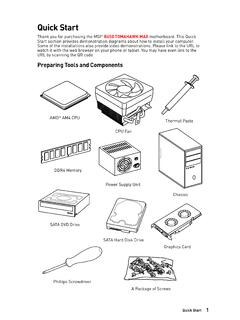
1 1 Quick StartQuick StartThank you for purchasing the MSI Z490-A PRO motherboard. This Quick Start section provides demonstration diagrams about how to install your computer. Some of the installations also provide video demonstrations. Please link to the URL to watch it with the web browser on your phone or tablet. You may have even link to the URL by scanning the QR Tools and ComponentsIntel LGA 1200 CPUCPU FanDDR4 MemoryGraphics CardSATA Hard Disk DriveSATA DVD DrivePhillips ScrewdriverChassisPower Supply UnitA Package of ScrewsThermal Paste2 Safety InformationSafety Information The components included in this package are prone to damage from electrostatic discharge (ESD).
2 Please adhere to the following instructions to ensure successful computer assembly. Ensure that all components are securely connected. Loose connections may cause the computer to not recognize a component or fail to Start . Hold the motherboard by the edges to avoid touching sensitive components. It is recommended to wear an electrostatic discharge (ESD) wrist strap when handling the motherboard to prevent electrostatic damage. If an ESD wrist strap is not available, discharge yourself of static electricity by touching another metal object before handling the motherboard.
3 Store the motherboard in an electrostatic shielding container or on an anti-static pad whenever the motherboard is not installed. Before turning on the computer, ensure that there are no loose screws or metal components on the motherboard or anywhere within the computer case. Do not boot the computer before installation is completed. This could cause permanent damage to the components as well as injury to the user. If you need help during any installation step, please consult a certified computer technician. Always turn off the power supply and unplug the power cord from the power outlet before installing or removing any computer component.
4 Keep this user guide for future reference. Keep this motherboard away from humidity. Make sure that your electrical outlet provides the same voltage as is indicated on the PSU, before connecting the PSU to the electrical outlet. Place the power cord such a way that people can not step on it. Do not place anything over the power cord. All cautions and warnings on the motherboard should be noted. If any of the following situations arises, get the motherboard checked by service personnel: Liquid has penetrated into the computer. The motherboard has been exposed to moisture.
5 The motherboard does not work well or you can not get it work according to user guide. The motherboard has been dropped and damaged. The motherboard has obvious sign of breakage. Do not leave this motherboard in an environment above 60 C (140 F), it may damage the InformationInstalling a Processor InformationInstalling DDR4 DIMMA2 DIMMA2 DIMMB2 DIMMA1 DIMMA2 DIMMB1 DIMMB25 Safety InformationHDD LEDRESET SWConnecting the Front Panel LEDHDD LED -HDD LED +POWER LED -POWER LED +POWER LED12109+++----+Power LEDHDD LEDR eset SwitchReservedPower SwitchJFP11 HDD LED +2 Power LED +3 HDD LED -4 Power LED -5 Reset Switch6 Power Switch7 Reset Switch8 Power Switch9 Reserved10No PinRESET SWPOWER SWPOWER LED+POWER LED-HDD LED6 Safety InformationInstalling the Motherboard3
6 Torque:3 kgf cm**3 kgf cm = N m = lbf in217 Safety InformationConnecting the Power ATX_PWR1 CPU_PWR1 CPU_PWR28 Safety InformationInstalling SATA Information1 Installing a Graphics InformationConnecting Peripheral Devices11 Safety InformationPower On431212 ContentsContentsQuick Start ..1 Preparing Tools and Information ..2 Installing a Processor ..3 Installing DDR4 memory ..4 Connecting the Front Panel Header ..5 Installing the Motherboard ..6 Connecting the Power connectors ..7 Installing SATA Drives ..8 Installing a Graphics Card.
7 9 Connecting Peripheral Devices ..10 Power On ..11 Specifications ..14 Package contents ..19 Block Diagram ..20 Rear I/O Panel ..21 LAN Port LED Status Table ..21 Audio Ports Configuration ..21 Realtek Audio Console ..22 Overview of Components ..24 CPU Socket ..26 DIMM Slots ..27 PCI_E1~5: PCIe Expansion Slots ..28M2_1~2: Slots (Key M) ..29 SATA1~6: SATA 6Gb/s connectors ..31 JFP1, JFP2: Front Panel connectors ..32 JCOM1: Serial Port Connector ..32 CPU_PWR1~2, ATX_PWR1: Power connectors ..33 JAUD1: Front Audio Connector ..34 JUSB5: USB Gen 1 Type-C Connector.
8 34 JUSB3~4: USB Gen 1 connectors ..35 JUSB1~2: USB connectors ..36 JTPM1: TPM Module Connector ..36 CPU_FAN1, PUMP_FAN1, SYS_FAN1~6: Fan connectors ..37 JCI1: Chassis Intrusion Connector ..38 JTBT1: Thunderbolt Add-on Card Connector ..39 JRTD3: Intel RTD3 Connector ..3913 ContentsJBAT1: Clear CMOS (Reset BIOS) Jumper ..40 JRGB1: RGB LED connector ..41 JRAINBOW1~2: Addressable RGB LED connectors ..42 Onboard LEDs ..43EZ Debug LED ..43 LED_SW1: EZ LED Control ..43 Installing OS, Drivers & Utilities ..44 Installing Windows 10 ..44 Installing Drivers.
9 44 Installing Utilities ..44 UEFI BIOS ..45 BIOS Setup ..46 Entering BIOS Setup ..46 Resetting BIOS ..47 Updating BIOS ..47EZ Mode ..49 Advanced Mode ..52 SETTINGS Menu ..53OC Menu ..59OC PROFILE Menu ..60 HARDWARE MONITOR Menu ..61 RAID Configuration ..63 Enabling Intel Rapid Storage Technology ..63 Creating RAID Volume ..64 Removing a RAID Volume ..65 Resetting Disks to Non-RAID ..66 Rebuilding RAID Array ..67 Installing RAID Driver ..68 Installing Intel Rapid Storage Technology Software ..68 Intel Optane Memory Configuration.
10 69 System Requirements ..69 Installing the Intel Optane memory ..69 Removing the Intel Optane ..7214 SpecificationsSpecificationsCPUS upports 10th Gen Intel Core and Pentium Gold / Celeron processors for LGA 1200 socket** Please go to for compatibility information.* Onboard graphics output are disabled when using the F SKU Z490 ChipsetMemory 4x DDR4 memory slots, support up to 128GB* Supports 1R 2133/2666/2933 MHz* 1 DPC 1R Max speed up to 4800+ MHz 1 DPC 2R Max speed up to 4266+ MHz 2 DPC 1R Max speed up to 4400+ MHz 2 DPC 2R Max speed up to 4000+ MHz Supports Dual-Channel mode Supports non-ECC, un-buffered memory Supports Intel Extreme Memory Profile (XMP)*Please refer for more information on compatible memoryExpansion Slot 1x PCIe x16 slot (from CPU)