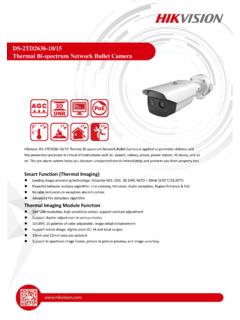
Transcription of Quick Start Guide - Hikvision
1 Quick Start Guide Plug n Play NVR DS-7604NI-E1/4P DS-7608NI-E2/8P Note: For more information refer to the complete User Manual located on the CD-ROM Please connect a monitor and a USB mouse (supplied) to the NVR for configuration purposes OVERVIEW 1. Overview 2. Main Menu Layout 3. Formatting the HDD 4. Setting up Time/Date 5. Setting up The Network 6. Adding IP Cameras (Non-PoE Models) 7. Setting up Recording 8. Configuring the Mobile APP 9. Playing Back Recorded Video 10.
2 Making a Backup Please note, that the Quick Start Guide is compiled for the latest firmware versions. Please upgrade the firmware of the NVR to the latest version before proceeding. Also note, that the CD may contain outdated manuals and software. For the latest firmware, manual and software downloads please visit: WHAT S IN THE BOX THE BOX CONTAINS: : 1. OVERVIEW NVR USB Mouse IR Remote (Batteries not included) Power Cord Hard Drive Mounting screws and brackets Hard Drive (Preinstalled) Hard Drive Cables Rack Mount Ear (not included in 4-ch model box) Quick Start Guide Manual/Software CD FRONT AND REAR VIEW DS-7604NI-E1/4P FRONT VIEW 1.
3 Power, Status and Tx/Rx indicators 2. USB Port REAR VIEW 1. Power Supply Port 2. Audio In 3. HDMI Monitor Output 4. Network Interface(RJ45) 5. Audio Out 6. VGA Output 7. USB Port 8. Grounding Screw 9. Power Switch 10. Built in POE Switch 11. Alarm In/Out 1 2 3 4 5 6 7 8 9 10 FRONT AND REAR VIEW DS-7608NI-E2/8P REAR VIEW 1. Power Supply Port 2. Audio In 3. HDMI Monitor Output 4. Network Interface(RJ45) 5. Audio Out 6. VGA Output 7. USB Port 8. Grounding Screw 9. Power Switch 10. Built in POE Switch 11. Alarm In/Out FRONT VIEW 1. Power, Status and Tx/Rx indicators 2. USB Port 2.
4 MAIN MENU LAYOUT MAIN MENU LAYOUT View recorded video and make Backup Setup recording type, motion detection, resolution and frame rate and more Setup Date/Time, network, screen settings, user accounts and more Model number, firmware version, camera status, HDD status and more Search for snapshots, make large backups Add cameras, Change brightness, Camera name, PTZ, Privacy mask Upgrade firmware, factory default, system logs, import/export settings Display the current logged in user Exit MENU to Live View DEFAULT USERNAME: admin DEFAULT PASSWORD: 12345 (Please note, that the username and password are case sensitive) Log Out and Lock the NVR IT IS STRONGLY RECOMMENDED TO CHANGE THE DEFAULT PASSWORD If the Hard Drive (HDD) is not formatted (initialized), the NVR will begin to beep.
5 The beeping will continue until the HDD is formatted. To format the HDD, go to: MENU > SYSTEM CONFIGURATION > HDD Select the HDDs that need to be formatted, and press INIT FORMATTING THE HARD DRIVE 3. FORMATTING THE HARD DRIVE Please Note: Units purchased with HDDs, already come with formatted HDDs Formatting the HDDs also erases the recorded video from the HDDs (this does not affect the settings). Free Space Total HDD Space List of HDDs To setup the Time and Date on a NVR, please go to: MENU > SYSTEM CONFIGURATION > GENERAL DATE AND TIME SETUP 4. SETING UP DATE/TIME NTP Settings Time Zone and Daylight Savings Time settings Date and Time settings Networking a NVR requires 3 steps: 1.
6 Assign an IP address, Default Gateway, Subnet Mask, and a DNS server (Please note: DNS, not DDNS) to the NVR 2. Forward the appropriate ports on the router (Port Forwarding). 3. Register DDNS (DDNS registration is required only if the public IP address is Dynamic). To assigning an IP ADDRESS, go to MENU > SYSTEM CONFIGURATION > NETWORK 5. SETTING UP THE NETWORK SETTING UP NETWORK ACCESS General IP CONFIGURATION Please note that the NVR s default IP Address is set to Enable DHCP With DHCP enabled, the router will assign an IP address to the NVR Select NIC Type Please Note: After enabling DHCP, The IP configuration becomes Greyed out REFRESH Step 1.
7 Enable DHCP (check the checkbox). Press APPLY and then press REFRESH Step 2. After pressing refresh, the IPv4 Address, IPv4 Subnet Mask and IPv4 Default Gateway will have new values. Step 3. Disable DHCP (uncheck the checkbox) Step 4. Change the value of PREFFERED DNS SERVER to ( ALTERNATE DNS SERVER can be left blank). After assigning the IP information, click on the MORE SETTINGS tab SETTING UP NETWORK ACCESS The MORE SETTINGS tab contains the ports that need to be forwarded for remote access The SERVER PORT is responsible for the MOBILE APP and CLIENT SOFTWARE log-in.
8 The HTTP PORT is responsible for WEB BROWSER log-in. The RTSP PORT is responsible for VIDEO/AUDIO STREAMING. The HTTP PORT and the SERVER PORT can be changed if desired, in order to avoid conflicts with the ISP or the existing network configuration. SETTING UP NETWORK ACCESS PORT FORWARDING After assigning the IP information to the NVR, connect a computer to the same router that the NVR is connected to (wired connection is recommended, to avoid complications). Log into the ROUTER, and proceed with PORT FORWARDING. For PORT FORWARDING assistance contact the Internet Service Provider (ISP), or the router manufacturer.
9 Also refer to for port forwarding step by step instructions. Please be aware, that Hikvision USA is not associated with , and not responsible for any activity between the user and Please refrain from downloading any software from the abovementioned website. Proceed to the ROUTERS section for step by step instructions. DDNS SETUP DDNS registration has been made more user friendly, and takes only a few seconds to complete. The legacy units require user registration on This step is no longer needed. Click on the DDNS tab In the DDNS tab: a. Enable DDNS b. Change the DDNS TYPE to HiDDNS (in some cases HkDDNS) c.
10 Make sure that the SERVER ADDRESS is set to d. Create a DEVICE DOMAIN NAME (the domain name CANNOT contain spaces, special characters and/or upper case letters, as well as it cannot begin with a number) SETTING UP NETWORK ACCESS After the changes have been made, presses APPLY . A SUCCESS message will pop up If the Domain Name does not meet the acceptable criteria, and/or is already registered, an error message will appear(The domain name cannot contain upper case characters, begin with a number, spaces, special ). SETTING UP NETWORK ACCESS Enable DDNS and create a DOMAIN NAME EZVIZ is used for a connection through a secure server.