Transcription of Read this manual before servicing the ... - Western Products
1 December 17, 2004No. 21936 SNOWPLOWSMECHANIC'S GUIDEMECHANIC'S GUIDEMECHANIC'S GUIDEMECHANIC'S GUIDEMECHANIC'S GUIDE SNO SNO SNO SNO SNOWPLWPLWPLWPLWPLOOOOOWSWSWSWSWSF eaturing theISARMATIC Hydraulic System CAUTIONRead this manual before servicing the 21936 December 17, 20043 PREFACETABLE OF CONTENTSThis guide has been prepared toassist the trained mechanic in theservice of Western also provides safety informationand recommendations. We urge allmechanics to read this manualcarefully before attempting to servicethe Western snowplow equipmentcovered by this of your Western snowplow equipment is bestperformed by your local WesternProducts outlet. They know yoursnowplow best and are interested inyour complete .. 3 ISARMATIC Hydraulic 6 Product Specifications .. 6 Required Tools .. 6 Hydraulic Hose 7 Hydraulic Unit Parts Diagram .. 8 Solenoid Cartridge Valve Identification and Location .. 9 Vehicle Harness and Vehicle Cable 10 Operating the Snowplow.
2 11 Theory of 13 Hydraulic and Electrical 14 Electrical Schematic .. 15 Hydraulic Schematic .. 17 Angle Right .. 18 Angle Left .. 20 Raise .. 22 Lower .. 24 Hold in Raise Position .. 26 Striking An Object While Plowing Right Cylinder Retracts .. 27 Striking an Object While Plowing Left Cylinder 28 Headlamps Plow Not Connected Vehicle Only .. 29 High Beam Headlamps With Plow Connected to Vehicle .. 31 Low Beam Headlamps With Plow Connected to Vehicle .. 33 Troubleshooting 35No. 21936 December 17, 20044 WARNINGV ehicle exhaust contains deadlycarbon monoxide (CO) this gas, even in lowconcentrations, could causedeath. Never operate a vehiclein an enclosed area withoutventing exhaust to the INFORMATIONNOTE: Identifies tips, helpful hintsand maintenance information theowner/operator should YOU BEGINVENTILATIONIf you work on the vehicle orsnowplow in a garage or otherenclosed area, be sure to ventexhaust gas directly to the outsidethrough a leakproof exhaust AND EXPLOSIONBe careful when using gasoline.
3 Donot use gasoline to clean parts. Storeonly in approved containers awayfrom sources of heat or the vehicle on a levelsurface, place shift lever in PARKor NEUTRAL and set the snowplow mounted onthe vehicle and lowered for mostservice procedures, unless SAFETYzWear only snug-fitting clothingwhile working on your vehicle not wear jewelry or a necktie,and secure long especially careful near movingparts such as fan blades, pulleysand safety goggles to protectyour eyes from battery acid,gasoline, dirt and touching hot surfaces suchas the engine, radiator, hosesand exhaust have a fire extinguisherhandy, rated BC for flammableliquids and electrical SAFETYzAlways inspect hydrauliccomponents and hoses beforeusing. Replace any damaged orworn parts you suspect a hose leak, DONOT use your hand to locate a piece of cardboard orwood. WARNINGL ower blade when vehicle isparked. Temperature changescould change hydraulicpressure, causing the blade todrop unexpectedly or damaginghydraulic components.
4 Failureto do this can result in seriouspersonal injury. CAUTIONI ndicates a situation that, if notavoided, could result in minorpersonal injury and/or damageto product or property. WARNINGH ydraulic fluid under pressurecould cause skin injectioninjury. If you are injured byhydraulic fluid, get medicaltreatment immediately. WARNINGI ndicates a potentiallyhazardous situation that, if notavoided, could result in death orserious personal injury. WARNINGDo not exceed GVWR or GAWR including blade and ballast. Therating label is found on thedriver-side vehicle doorcornerpost. WARNINGR emove blade assembly beforeplacing vehicle on hoist. WARNINGG asoline is highly flammableand gasoline vapor is smoke while working onvehicle. Keep all open flamesaway from gasoline tank andlines. Wipe up any spilledgasoline 21936 December 17, 20045 SAFETY INFORMATIONBATTERY SAFETYP lease become familiar with and makeowners knowledgeable of the Warning andInstruction labels on the back of the blade!
5 WARNINGCAUTIONLOWER BLADE WHEN VEHICLE IS BLADE ASSEMBLY before PLACING VEHICLEON NOT EXCEED GVWR OR GAWR INCLUDING BLADEAND OWNER'S manual before OPERATING ORSERVICING SPEED SHOULD NOT EXCEED 45 SPEED UNDER ADVERSE SPEED SHOULD NOT EXCEED 10 YOUR Western OUTLET FOR Label CAUTIONB atteries normally produceexplosive gases which cancause personal , do not allow flames,sparks or lit tobacco to comenear the battery. When chargingor working near a battery,always cover your face andprotect your eyes, and alsoprovide contain sulfuric acidwhich burns skin, eyes the battery beforeremoving or replacing anyelectrical LabelNo. 21936 December 17, 20046 PRODUCT SPECIFICATIONSREQUIRED TOOLSH ydraulic System Plow Type Crossover Relief Valve Pressure ( 100 PSI) No. of Turns Crossover Relief Valve Is Backed Off (CCW) From Fully Seated* Pump Relief Valve Pressure ( 100 PSI) Max.
6 Motor Amp Draw At Relief Pressure** Standard, PRO-PLOW , LSX 3500 1-1/2 2 1750 200 Heavyweight 3500 1-1/2 2 1900 210 Sport Utility 2500 2-1/4 2-3/4 1550 180 * Settings are approximate. ** Actual readings may vary due to vehicle battery voltage and oil temperature. zSolenoid Valve Coil Amp. Draw = Relay Coil Resistance =16 - 17 OhmszMotor Relay Amp. Draw = Relay CoilResistance = 106 OhmszHeadlamp Relay Amp Draw = SizezHarness 6 Amp. (SFE-6)Tools Required for servicing theelectrical and hydraulic systems:zLong/Slender Needle Nose PlierszFlat ScrewdriverzSocket and Combination Wrenches:3/8" thru 7/8", 1-1/16", 1-1/8"ISARMATIC SYSTEM SPECIFICATIONSH ydraulic SystemHydraulic FluidzWESTERN High PerformanceFluid to -40 F (-40 C) or otherfluid conforming to militaryspecification MIL-H-5606A, suchas Mobil Aero HFA or ShellAeroShell Fluid Transmission Fluid(ATF) Dexron III to -10 F(-23 C).
7 Hydraulic Fluid CapacityzUnit Reservoir = 1 3/4 QuartszSystem Total:w/ 6" Ram = 2 1/8 QuartsSport Utilityw/ 8" Ram = 2 1/4 QuartsLSXw/ 10" Ram = 2 3/8 QuartsStandard & PRO-PLOW w/ 16" Ram = 2 3/4 QuartsHeavyweightSolenoid Valve Spool Travel = " for three- and four-way valves(S2, S3)Electrical System approximatevalues:zSolenoid Valve Coil Resistance = Ohms at room temperaturezDeep Socket: 7/8"z1/4" Socket or Nut Driverz12 V Test LightzTorque Wrench (in-lb)zAllen Wrench Setz3000 PSI Pressure Gaugew/adapter fittingszFlashlightzPick SetzHammerzDigital Volt/Ohm MeterzPencil MagnetAvailable from your Western outlet:zUniMount Electrical Tester CAUTIONDo not mix different types ofhydraulic fluid. Some fluids arenot compatible and may causeperformance problems andproduct Fastener Torque (in-lb) Pump Mounting Cap 175 185 Motor Terminal 50 60 Motor Base Cap Screws .. 180 240 Motor End Cap Screws.
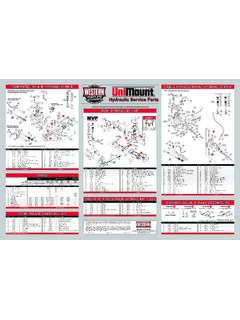
8 35 45 Valve Manifold Cap Screws .. 55 60 Solenoid Cartridge Valve .. 120 144 Coil Nut .. 48 60 Cartridge/Coil Cover Screws .. 15 20 Base Lug Cap 180 240 O-Ring Boss 50 70 No. 21936 December 17, 20047 ISARMATIC HYDRAULIC HOSE ROUTING AND FITTING ORIENTATION ! "# $%& ' ( "#! ) ( * $%& ' ( ! "# $No. 21936 December 17, 20048 ISARMATIC HYDRAULIC UNIT PARTS DIAGRAM+ + , - - , , , . + / . + + - - 01 2 ( - ) , - 3 4 5! -* . 3 4 5!6 -* . 3 -! . 7 . #* * , - )1 -* . 3 4 5! - 3 3 - - 7 3 + , .- &- - - &- - 3 + - "0$81 2 1- " %99 $ - 3 4 5!No. 21936 December 17, 20049 ISARMATIC HYDRAULIC UNIT VALVE IDENTIFICATION AND LOCATION . 7 -! 6 + 1 - 3 % " 3:;18:: $81 ! - 3 8 " 3:;10:$01 ! - 3 0 " 3:;1 :$ 1 ! - 3 1 - 3 1 - 3 - 3 < - &- - = 6 3 + , .3 + , .No. 21936 December 17, 200410 VEHICLE HARNESS AND VEHICLE CABLE LOCATION3 * - , . , .& 3 * - 4 !)
9 3 * - 4 ! # 3 * 3 * - ! " $# ! " $# + !, & ) &, . ># - - >) * !2 ( ! * * .& ! !? * * 1* 2 &/ ! 3 * # - , 3 * . * - ! ># 7 , ! # 1 - ", $3 * - ! * / No. 21936 December 17, 200411 SOLENOID CONTROLTurn the vehicle ignition switch to theON or the ACCESSORY control ON/OFF switch to theON position. The control indicatorlight (red) should light whenever thecontrol ON/OFF switch and theignition (key) are both turned ON. CAUTIONTo prevent accidental movementof the blade, always turn the ON/OFF switch to OFF whenever thesnowplow is not in use. Thecontrol indicator light will turnoff. WARNINGThe driver shall keep bystandersclear of the blade when it isbeing raised, lowered or not stand between thevehicle and the blade, or within8 feet of a moving blade. Amoving or falling blade couldcause personal the vehicle ignition switch on. Turn the control on. The control indicator light should be of OperationON/OFFS lide the control power switch ON to activate the hydraulic system.
10 Turn the control OFF to lockthe blade in place. This will prevent accidental movement of the the control lever right to angle the blade to the the control lever left to angle the blade to the the control lever up (forward) to raise the blade to the desired the control lever down (back) to lower the blade and activate the FLOAT Cancel FLOAT The FLOAT mode can be canceled by either momentarily placing the control in the RAISE position, turning the control off or turning the vehicle ignition off. Angling left or right will not THE SNOWPLOWNo. 21936 December 17, 200412 will glow red whenever the controlON/OFF switch and the vehicleignition switch are both Pressing the LOWER button seconds will engage theFLOAT mode. The controlindicator FLOAT light will glowgreen.* Cancel the FLOAT modeby momentarily pressing theRAISE Time OutsAll control functions, except forLOWER, automatically time out stop after a period of time.


![6.8 WESTERN [6.8 WESTERN] - SAAMI](/cache/preview/6/8/5/5/a/a/2/b/thumb-6855aa2b8539246dc3659b1a6f5ab7c3.jpg)