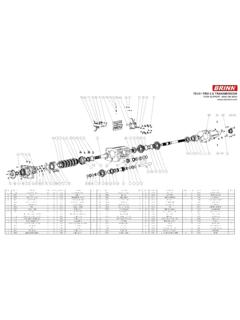
Transcription of Rebuild Instructions for 70001 and 70010 Transmission
1 Rebuild Instructions for 70001 and 70010 TransmissionBrinn, Incorporated1615 Tech DriveBay City, MI 48706 Telephone Revision: 7/24/072 NoticeRead all Instructions before proceeding. These Instructions should be used if you want to service the complete70001 or 70010 Transmission and Rebuild kit 70041 was purchased. Rebuild kit 70041 includes the NumberDescriptionQuantity70046 Clutch Assembly Wire171003 Oring471010 Retaining Ring171011 Seal, Front171012 Bushing, Input Shaft171016 Spring, Clutch Release171017 Steel Clutch Pressure Disc671018 Metallic Friction Disc671026 Thrust Bearing271035 Oring171040 Output Housing Bushing & Seal171046 Oring171063 Oring173009 Thrust Race, Intermediate Shaft1 Read 70001 and 70010 Clutch Rebuild Instructions if you only want to service the clutch assembly to replacethe clutch Revision: 7/24/073 Recommended Tools for Complete Transmission RebuildArbor pressDrill pressOring pickRetaining ring pliersAllen wrenchesTorque wrenchMagnaflux machineRunout gauge#18 and #31drill bitsLarge flat blade screwdriverSmall flat blade screwdriverPhilips head screwdriverSaf-T-Lok R80 Loctite 277 Silicone sealantLight greaseParts washerCombination wrenchesFeeler gaugesLast Revision: 7/24/074 Disassembly Procedure1.
2 Disconnect all plumbing connected to the Transmission and remove the Transmission from the Before disassembly, inspect the case and output housing for cracks. The areas where cracking is most likelyto occur are at the ribs of the case and around the output housing bolts. Inspect the input shaft forindications of damage. Damage to the output housing oil seal and bushing can indicate problems inside Drain all fluids from the Transmission by removing the fill and drain plugs (71041 & 71059).4. Remove the nuts (73022) and lock washers (73023) retaining the shift levers (73024 & 73021).5. Remove the shift Remove the side cover socket head cap screws (71001) and lock washers (71043).7. Remove the side cover (72001).8. Remove the six socket head cap screws (71009) passing through the front retainer (72004).9. Remove the front Spin the input shaft (74020) and look for broken or missing teeth on the Remove the input Remove the input shaft bushing (71012) and discard Remove the retaining ring (71010) from the input Remove the bearing (71008) from the input Use a small flat blade screwdriver to remove the oil seal (71011) from the front retainer.
3 Do not scratch ordamage the front retainer. Discard the oil Remove the synchronizer (74021).17. Remove the two bolts (71038) passing through the reverse idler shaft cover (73020).18. Tap on the end of the reverse idler shaft (73011) that is closest to the front of the Transmission to remove thereverse idler shaft Remove the reverse idler shaft from the rear of the Remove the reverse idler gear (74004).Last Revision: 7/24/07521. Position the Transmission case on its front Open the clutch bleeder (71027) and remove the bleeder Remove the three piston cap socket head cap screws (71034).24. Remove the piston cap (73013).25. Remove the three clutch actuator pins (71030).26. Remove the piston (73015) from the piston cap by first rotating the piston approximately turn whilekeeping the piston cap stationary. Then slide a socket head cap screw through the piston cap until contact ismade with the piston.
4 Then push on the end of the socket head cap screw to remove the piston. Do notscratch the inner diameter of the piston Remove the piston oring (71035) and discard Remove the two screws (71065) from the output housing (72003 or 72021) that retain the oil seal (71040).29. Remove the oil seal from the output housing and discard Remove the bushing set screw (71064).31. Remove the grease fitting (71037).32. Remove the four output housing bolts (71042) and three lock washers (71061).33. Use a flat blade screwdriver to pry the output housing from the Transmission case (72002 or 72020).34. Use retaining ring pliers to expand the retaining ring (71022) that is around the large bearing (71023) in theoutput housing. Do not remove the retaining ring from the output Tap on the yoke end of the output shaft (74010) while expanding the retaining ring (71022) to remove itfrom the output Remove the retaining ring (71024) that is around the output Remove all gears and bearings from the output Remove the bushing (71040) from the output housing and discard Use a large flat blade screwdriver to compress the clutch by placing the blade between the inner rear face ofthe Transmission case and the intermediate shaft (74008) and then using a prying Revision: 7/24/07640.
5 Place the clutch assembly wire (70046) over the clutch housing and driven gear input mesh. See Figures 2and Remove the intermediate shaft retainer (73014) by pushing on the counter shaft pin end that is closest to thefront of the Remove the counter shaft pin (73010) from the Transmission case and check for signs of wear and the counter shaft pin if there are grooves in the outer diameter of the Remove the clutch assembly through the hole normally occupied by the output Remove the oring (71046) from the front of the Transmission case and discard Remove the clutch assembly wire from the clutch Separate all bearings and thrust washers and look for signs of damage, such as missing needle rollers orcracks in the thrust Look for cracks on the large thrust washer (73009). Replace the thrust washer if there is damage. A newthrust washer is provided in the 70041 Rebuild Remove the forward clutch ring (73007) from the driven gear input mesh (74002).
6 49. Remove the large oring (71063) and discard Inspect the thrust washers (71032) in the clutch drum for cracks. Replace the thrust washers if there Separate the metallic friction discs (71018) from the steel clutch pressure discs (71017).52. Measure the thickness of the metallic friction discs and steel clutch pressure discs with calipers ormicrometers. Replace any disc that is thinner than .53. Measure the thickness of the rear clutch disc (71021). Replace the disc if it is thinner than .54. Measure the thickness of the forward clutch ring (73007). Replace the ring if it is thinner than .Remove all burrs and raised edges before Use a parts washer to clean all gears, shafts, bearings, case, output housing and anything else that has oiland/or dirt on it. The side cover does not need to be disassembled before cleaning. All dried silicone mustbe removed.
7 Replace any needle roller bearings if the rollers fall out of the cages during Revision: 7/24/07756. Use pressurized air to remove excess parts washer fluid. Do NOT allow any of the bearing components tospin while removing excess parts washer fluid. Damage and/or injury could Use a wire brush to remove any silicone not removed in the parts washer58. Visually inspect the synchronizer after cleaning. Visually check that the lugs on the synchronizer are backtapered. Replace the synchronizer if the lugs are not back tapered, have rounded corners, or if there areproblems keeping the Transmission in Reinspect the case and output housing after Use a Magnaflux machine to inspect the first gear driven, input and output shafts, synchronizer, and countershaft gears for cracks. Follow the Instructions provided with the Magnaflux. A Maganflux is necessary tofind cracks that are not visible to the naked Check for runout on the output shaft.
8 The output shaft must be mounted between centers. Runout should bechecked in front of the yoke splines and on both ground bearing surfaces. Subtract the largest runout valuefrom the smallest measured at each position to calculate the runout. or less is acceptable the output shaft if there is more than runout at any Procedure1. Apply Saf-T-Lok R80 to the outer diameter of the new output housing bushing (71040).2. Align one of the precut grooves in the inner diameter of the bushing with the grease fitting hole in the outputhousing (72003 or 72021).3. Use an arbor press to press the bushing into the output housing until the bushing and output housing Apply Saf-T-Lok R80 to the outer diameter of the new output housing oil seal (71011).5. Use an arbor press to press the oil seal into the output Align the grease fitting hole in the output housing with a #18 drill bit and drill through the Align the bushing set screw hole in the output housing with a #18 drill bit and drill through the Align an oil seal screw hole in the output housing with a #31 drill bit and drill into the oil seal.
9 Only drillthrough the outer steel ring of the oil seal. Repeat for the other Revision: 7/24/0789. Use compressed air to remove any chips and Thread two oil seal screws (71065) into the output Apply Loctite 277 to the threads of the bushing set screw (71064).12. Thread the bushing set screw into the output housing until the brass tip of the set screw is flush with theinner diameter of the bushing, Then turn the bushing set screw turn Thread the grease fitting (71037) into the output housing. Do not over tighten the grease fitting as severedamage to the output housing could Install the new intermediate shaft oring (71046) into the Transmission case (72002 or 72020).15. Thread the fill and drain plugs (71041 & 71059) into the Transmission case. Do not overtighten the plugs assevere damage to the Transmission case could result. The drain plug has a magnet on the end of it and it isthreaded into the hole that is closest to the bottom of the Transmission Install a new oring (71035) into the groove in the piston (73015).
10 The piston oring is Apply light grease to the piston Press the piston into the piston cap (73013). The cutouts in the piston must align with the holes in the Pack all of the bearings with Assemble the output shaft using Figure 1 as Slide the output shaft assembly into the output housing22. Expand the retaining ring (71022) already in the output housing23. Press the output shaft assembly into the output housing until the retaining ring (71022) engages with thegroove in the large roller bearing (71023).24. Assemble the clutch using Figure 2 or 3 as reference. There are two models of the 70001 and 70010transmissions. The newer models do NOT use a retaining ring to locate the first driver gear (74012). Theolder models use a retaining ring (71047) to locate the first driver gear (74012). Figure 2 should be used if aretaining ring is NOT used to locate the first driver gear (74012).