Transcription of Replacement Windows Measuring & Installation Guide
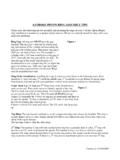
1 Proper Measuring of Typical Wood OpeningsReplacement Windows are ordered and manufactured (Exact Both) size, exact width and exact height. Windows aremanufactured to the nearest 1/16".Example:A window ordered 32" x 45-1/8" will bemanufactured 32" x 45-1/8".To Measure:1.) Width "A": Measure between the jambs at 3 pointstop, middle and bottom. Use the smallest ) Height "B": Measure from back side of the sill stool to the top of the window casing on the left, right and middle. Use thesmallest measurement. Cut back the dimensions to allow forsquaring and leveling the window frame in the opening and insertinsulation between the opening and mainframe.
2 Normal cutback is 3/8" in the width and 1/4" in the :Opening size 32" x 45-1/2"Order and maufacture size 31-5/8" x 45-1/4".Note: only aceepts exact measurements, and is notresponsible for determining window cutback RemovalMeasure the 3 width points from the plaster or drywall the 3 height points from the marble or formica sill tothe header dry wall the window to fit inside this opening, allowing for squaringand leveling. Keep in mind what material will be needed to finishthe window units on the interior and exterior, whether it is caulking,vinyl or wood trim on the interior and cauld, vinyl or wood and coilstock on the needed Installation materials should be noted so they are onhand at the time of MeasuringReplacement Windows Measuring & Installation GuideBuck FramingWhen a metal window is removed, the Replacement window can besized for a wood buck frame to line the four sides of the existingopening.
3 A 1" x 4" can be ripped down to the depth of the Replacement window (approximately 3-1/4"). To size the windowfor such an application, use this formula:1.) Drywall return size less 1-1/2" for the wood buck = the buckframe opening ) Deduct 3/8" on the width and 1/4" on the height for the :Drywall return size36-1/8" x 48"Wood buck-1-1/2" x -1-1/2"Woodbuck openning size34-5/8" x 46-1/2"Less 3/8" width & 1/4" height-3/8" x -1/4"Order manufactured size34-1/4" x 46-1/4"Bay or Bow WindowsBay and Bow Windows come with their own jamb sections, headerand seat.
4 This is called a wood buck. When Measuring , it is necessary to figure ahead to the Installation and plan on removingthe existing wood frame all the way down to the studs. This willProvide a secure surface to anchor the bay or bow the phantom lines in the diagram. They indicate thewindow components that should be removed to reach thestud. This is the rough Measuring , it is imperative that the unit be measured to fitsnugly inside the rough opening. The angle or degree of the bay(10 , 15 , 25, 30 , 45 ) and the proper wall thickness (from theinterior of the drywall or plaster to the outside of the siding) needsto be :1 bay unit 72" wide x 48" high6-1/2" wall thickness with (0971, 0974, 0971).
5 Make sure the existing header is sufficient and conforms toLocal and state building MeasuringReplacement Windows Measuring & Installation GuideProper MeasuringDouble-Hung/Standard Wood-Sill Pan, Square, Level and PlumbWith the existing sashes removed, construct a sill pan from coil stock (or purchase a preformed sill pan). The sill pan must be made to turn up the jambs at least as far as the interior leg of thepan. All sill pan joints must be sealed with an approved caulk prior to the new window Installation . The sill pan should cover allexisting wood.
6 Nail the sill pan so that the nails will be coveredwith the window once it is installed. Cover the nail heads withsealant prior to setting the window. Remember to always pitchcoil stock away from the window so water will run off, and not sitagainst the window the new window is being installed on a flat sill, insulate thewindow sill opening prior to setting the mainframe in place. Setthe new window into the opening. With a level on the mainframesill adjust the mainframe unit so the sill is level. Install a screw inthe lower corner of the mainframe jamb.
7 There are pre-drilledholes located behind the sash stops. Now plumb the mainframejambs and insert the Installation screws in the upper corners of thejambs. Snug the Installation screws. Do not over sure that the mainframe jambs and sashes make fullcontact with each other. A jamb adjustment screw is suppliedat mid-span of the jambs to help facilitate this. Add shimsaround the mainframe as needed to ensure that all sashweather-stripping makes full contact with the mainframe. Theweather-stripping should be compressed slightly.
8 Insulate thejamb and header of the window using fiberglass insulation oran approved non-expanding spray foam insulation. Do notoverfill the frame/rough opening gap as it may distort and tilt both sashes prior to replacing the trim to be surethat both sashes function properly and that all adjustments arecomplete. Reinstall the existing, or new interior trim, and caulkthe interior and exterior perimeters of the window unit with anapproved vinyl /wood compatible ExtenderFor Installation into openings with a sloped sill, a Sill Extender isprovided to accommodate the angle of slope.
9 Stuff fiberglassinsulation, or non-expanding spray foam insulation in the voidunder the sill. Measure the height needed for the sill extender tocover the void and use a utility knife to score the line on the backside, closest to the desired height. Apply a narrow bead of sealantinto the mainframe accessory groove and snap the sill angle intothe groove. Seal the Sill Extender to the sill pan, leaving two 1 voids at each end to allow any water collected in the sill pan Windows Measuring & Installation GuideInstallationOptional Header ExpanderA header expander may be ordered/supplied to ensure a tightfit in the height, yet allow downsizing of the window unitfor leveling purposes during Installation .
10 If possible, placefiberglass insulation between the header expander and will prevent cold transfer and assist in keeping theexpander extended. Do not use too much insulation,as this may cause a bow in the header and prevent proper may be applied to the opening header to create a sealbetween the opening and the a wide unit, a 3" pan head screw may be installed through theheader and mid-span to prevent sag. Frame extenders canalso be used on Windows with interior & exterioraccessory AHorizontal Sliding 2 & 3 Lite Windows , SupportAs with a Double-Hung, Horizontal Sliding Windows achievemaximum performance from Installation methods that dictatesquare frames, precise leveling and straight.


