Transcription of RoHS-Compliant Through-Hole VI Chip ... - Vicor Corporation
1 AN:017 Page 1 RoHS-Compliant Through-Hole VI chip Soldering RecommendationsAPPLICATION NOTE | AN:017 Ankur Patel Associate Product Line EngineerIntroductionRoHS compliant, Through-Hole full size VI Chips are intended for wave soldering assembly. The information contained in this document defines the processing conditions required for mounting a full size VI chip to the PCB using wave soldering or hand soldering. Failure to follow the recommendations provided can result in visual and functional failure of the module. In addition to soldering procedures, common soldering defects will be discussed and direction will be provided for detecting, handling and preventing these defects. For surface mount VI chip reflow soldering guidelines, please see: : Solder and related soldering equipment may be hot and/or emit noxious gases.
2 Industry standard health and safety procedures must be followed when soldering VI SolderingStorageThe full size Through-Hole VI chip is qualified to withstand an equivalent of MSL level 1 pre-condition using a three-zone wave soldering oven. A recommended oven temperature profile is available upon request. MSL 1 indicates that the product has an unlimited life in conditions of 30 C / 85% RH according to JEDEC-STD-020C for SMD & PlaceThe VI chip should be placed such that each lead rests in its appropriate hole without damage, distension, or bending. The appropriate hole spacing as recommended on the data sheet should be maintained to avoid improper seating of the VI chip leads within the PCB. 3D models of all VI Chips and recommended pad spacings are available on the web under their respective product. All persons and equipment in contact with VI Chips should have proper ESD protection to avoid damaging the units during the mounting process.
3 FluxingFluxes are available in no-clean and water washable varieties. Alpha EF 2202 is recommended for use in wave soldering Through-Hole VI Chips. Ultra-sonic spray is the recommended method for applying flux in wave soldering process. Flux should be applied to underside of the board (solder side). Precise control of flux quantities is required. Too little flux will cause poor joints, while too much flux may cause cosmetic or other problems. Through-Hole , Full VI chip packageContents PageIntroduction 1 Wave Soldering 1 Storage 1 Pick & Place 1 Fluxing 1 Preheating 2 Wave Soldering 2 Hand Soldering 4 Pin/Lead Protrusion 4 Board Cleaning 5 Solder Joint Inspection Procedure 6 Potential Defects 7 Removal 9 Disclaimer 10 Reference 10 AN:017 Page 2 PreheatingThe preheating procedure must be carefully selected to ensure that temperature and time cycles used do not degrade the board preheat lead free temperature profile.
4 Zone 1 Upper = 400 F (convection zone) closest to waveZone 1 Lower = 400 F (convection zone) closest to waveZone 2 Lower = 375 F (middle convection zone)Zone 3 Lower = 725 F (IR zone) farthest from waveWave SolderingNo-clean or water washable solder should be used for wave-soldering VI Chips. Other types of solder (including leaded solders) may be used if the module can be safely wave soldered without exceeding its maximum case temperature, as noted on the VI chip data sheet. As with any process, control of process variables will have a direct effect on the quality of the final product. The following guidelines are provided for wave soldering of full size Through-Hole VI ParameterTypicalRecommendedAmount of Flux Applied<1,200 g / in2using Spray methodUltra Sonic Spray MethodTop Side Preheat Temperature 400 FBottom Side Preheat Temperature Zone 1 = 400 FZone 2 = 375 FZone 3 = 725 FRecommended Preheat ProfileStraight ramp to desired top side temperature Maximum Ramp Rate of Topside Temperature (to avoid the component damage)2 C / seconds Maximum Conveyor (wave) Angle5 8 6 Conveyor (wave) feet / feet / minuteContact Time in Solder (Dwell Time) seconds3 to 4 secondsSolder Pot (wave) Temperature.
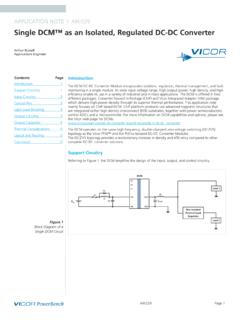
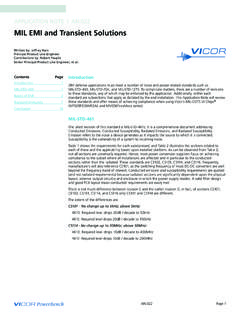
5 Lead Free Alloys( / , / , / / )490 510 F (255 265 C)510 F During wave soldering, while the tip of the lead on the bottom side of the board is exposed to molten solder and may reach 245 C, the temperature of VI chip body and Lead-Body interface should not exceed or even reach the melting point of SAC305 Solder (217 C). Figure 1 illustrates an example wave soldering profile and Figure 2 shows the locations on the VI chip corresponding to the temperature profiles. The TC1 and TC2 locations shown in Figure 2 must not exceed 217 C at any point during the soldering 1 General Guidelines for Machine Setting AN:017 Page 3 Figure 1 Example Wave Soldering Profile for a VI ChipFigure 2 Locations for Temperature Profiles Pictured in Figure 1 AN:017 Page 4 Hand SolderingBefore soldering, make sure that PCB is clean. The pins on the VI chip are optimized to provide a low resistance electrical connection.
6 The final mounting scheme for any VI chip should be designed to minimize any potential mechanical stress on the pins and solder joints. The maximum clamp pressure for the Through-Hole VI chip is 6lbs. If additional force is required, please contact Applications time required to create a good solder connection will vary depending on several parameters such as PCB thickness, copper-trace area, copper-trace thickness, soldering iron power, tip temperature, type of solder, tip size, etc. The following typical guidelines apply to hand soldering Through-Hole VI Chips. 1. Tip size: recommended tip diameter of 5mm 2. Tip temperature: 850 F3. Soldering time: 5 10 seconds4. Type of solder: No clean, Type of flux: NoneSoldering multiple pins of the same potential simultaneously is acceptable. Care should be taken not to short pins of different can be soldered directly to the VI chip leads.
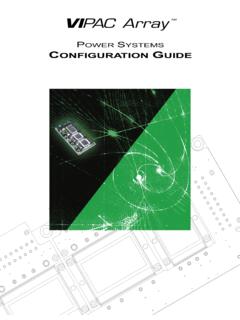
7 However, any wires soldered to the VI chip should have appropriate strain relief to insure that no stress is applied to the lead frame. The VI chip itself should be mechanically secured appropriately so that it will not move in the application and stress the solder connection. Caution should be taken not to cause solder bridging and shorts. Direct wire soldering to the VI chip leads is not recommended for production applications and should only be used in initial prototyping exercises when a PCB is not ProtrusionPin/Lead protrusion guidelines, defined in IPC-A-610D, are necessary to enable a good solder connection. Minimum criteria require the lead end to be discernible in the solder, while the maximum criteria require enough clearance to avoid danger of shorting between leads. Figures 3 6 and Table 2 show length (L) and the maximum and minimum 3 Length of Leads Considered Without Clinch (Left) and with Clinch (Right) AN:017 Page 5 Figure 4 Maximum (Left Image) and Minimum Criteria (Right Image)Figure 5 Example of Acceptable Protrusion of Soldered LeadLead ProtrusionClass 1*Class 2*Class 3*(L) MinEnd is visible in the solder joint (see Figure 5)(L) MaxNo danger of [ ] [ ]* Class 1: General electronic products as defined in IPC-A-610D Class 2: Dedicated service electronic products as defined in IPC-A-610D Class 3: High performance electronic products as defined in IPC-A-610 DBoard CleaningIf water-soluble solder is used, the board can be water washed using deionized water.
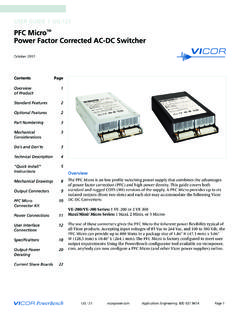
8 No-clean solders do not require cleaning but will leave residues on the board surface. If this is a concern, cleaning can be performed using isopropyl 2 Maximum and Minimum Recommended Lead Protrusion Lengths AN:017 Page 6 Figure 6 Good Joint-Board Bottom SideFigure 7 Good Joints-Board Bottom SideFigure 8 Good Joints-Board Top SideFigure 9 Good Joints on Board Top SideSolder Joint Inspection ProcedureA magnifying glass or optical microscope of 10x magnification should be used to look for solder shorts, and solder voiding. Electrical inspection should be conducted to verify any shorting that may not be visible. Figures 6 9 illustrate good solder joints with views from both the bottom and the top sides of the PCB. AN:017 Page 7 Potential Defects Some common defects of soldering Through-Hole VI Chips are described below, and illustrated in Figures 10 Solder voiding is caused by outgassing of substances from the solder.
9 To prevent this, a correct soldering profile should be selected and enough preheat should be Non-wetting is caused by improper chemical characteristics between the solder and the pad surface metallization. Surface plating should be compatible with the solder in order to eliminate non-wetting Fillet lifting is a defect in which solder joints lifts off from the pad. Fillet lifting has been associated with Pb contamination which leads to difference in solder solidification rate at the interface. The use of Bismuth and Lead with lead-free solders should be avoided in order to avoid fillet Shrink hole and hot-tearing defect is related to the appearance of tearing in the soldered joints. According to IPC 610 standard this defect is acceptable provided the shrink hole does not contact the lead, land or barrel Solder balling is related to the presence of solder balls after the soldering operation.
10 Adjusting the reflow profile and allowing enough time for soldering can avoid Insufficient solder is related to solder not filling the Through-Hole during the soldering process. Less than 75% solder fill is not acceptable according to IPC 610 rev Solder bridging is related to solder improperly connecting two or more adjacent pads and leads that come into contact to form a conductive path during the wave soldering process. Solder bridging between joints of same potential is acceptable but should not be 10 Solder VoidingFigure 11 Non-Wetting AN:017 Page 8 Figure 12 Fillet LiftingFigure 13 Shrink hole /Hot TearFigure 14 Insufficient SolderFigure 15 Solder Balling AN:017 Page 9 Figure 16 Solder BridgingRemoval Through-Hole VI chip components may be removed from a PCB using a vacuum method:1. Preheat assembly or component if Heat each individual joint one at a time in a rapid, controllable fashion to achieve complete solder Avoid thermal and mechanical damage to component, board, adjacent components and their joints.