Transcription of RP/IS-A-2000SS/SE&3000SS/SE Installation, Maintenance ...
1 RP/IS-A-2000SS/SE&3000 Division of Watts Water Technologies, , Maintenance , & Repair Series 2000SS/SE & 3000SS/SEDouble check Valve Assemblies & Double check Detector AssembliesSizes: 21 2" 6"SS (65 150mm)**6" 8"SE (150 200mm)**NOTICEFor Australia and New Zealand, line strainers should be installed between the upstream shutoff valve and the inlet of the backflow preventer. NOTICEThe flange gasket bolts for the gate valves should be retightened during installation as the bolts may have loosened due to storage and field testing procedure, refer to Ames installation sheets IS-A-ATG-1 found on other repair kits and service parts, refer to our Backflow Prevention Products Repair Kits & Service Parts price list PL-A-RP-BPD found on technical assistance, contact your local Ames representative.
2 ** Metric Dimensions are nominal pipe diameter. This product is produced with ASME/ANSI flanged end connections or DN flanged end !Read this Manual BEFORE using this to read and follow all safety and use information can result in death, serious personal injury, property damage, or damage to the this Manual for future are required to consult the local building and plumbing codes prior to installation. If the information in this manual is not consistent with local building or plumbing codes, the local codes should be followed. Inquire with governing authorities for additional local !
3 Need for Periodic Inspection/ Maintenance : This product must be tested periodically in compliance with local codes, but at least once per year or more as service conditions warrant. If installed on a fire suppression system, all mechanical checks, such as alarms and backflow preventers, should be flow tested and inspected in accordance with NFPA 13 and/or NFPA 25. All products must be retested once Maintenance has been performed. Corrosive water conditions, and/or unauthorized adjustments or repair could render the product ineffective for the service intended.
4 Regular checking and cleaning of the product s internal components helps assure maximum life and proper product !1. Before installing any Ames backflow assembly, flush the line thoroughly to remove all debris, chips and other foreign objects. Failure to do so may make the assembly The Ames 2000SS and 3000SS may be placed in any position as long as the flow indicator arrow in the assembly is pointed in the direction of water flow, and the local water authority has approved the installation configuration. ASSE (American Society of Sanitary Engineers) has approved these assemblies for either horizontal or vertical Allow sufficient clearance around the installed assembly to con-duct testing, servicing, and inspection.
5 Allow a minimum of 12 from the flood level to the bottom of the If double check or double check detector assembly is installed in a vault or pit, be sure proper drainage is available. If sufficient drain-age is not available a cross-connection may If installing on fire protection system, be sure to purge air from fire system. Fill system slowly with all inspectors test valves open. 2 Installation InstructionsVertical InstallationWARNING! Depressurize valve before Cam-Checks1. Shut down water system and lock out system if possible.
6 Slowly open all ball valves to relieve air and water pressure. Loosen bolts on groove coupler and remove groove coupler and cover plate from valve Remove #1 Cam- check assembly by using your hands to un-screw (turn counterclockwise) Cam- check and remove through top access port. Do not use Cam Arm as a handle to unscrew Cam- check . If Cam- check cannot be loosened by hand, insert a long screwdriver between valve body and Cam- check (see Figure 3). Slowly apply pressure against the Cam- check until loosened. Finish unscrewing by hand. Unscrew #2 Cam- check (turn counterclockwise) by placing a long screwdriver between lugs and applying pressure to loosen #2 Cam- check .
7 Finish unscrewing by To clean Cam- check , (except 21/2" 4" (65-100mm) DC check ) locate the Cam Arm opening stud on the outlet flange of the valve assembly. Slide the Cam Arm over the stud with the check threads facing downward (Figure 1). Tighten 1/4" nut on stud to secure cam bar. Slowly pull the assembly outward to open check raising the clapper so that the end of the Cam Arm rests between roller and clapper (Figure 2). Thoroughly clean the seat area and clapper sealing surfaces of both Cam-Checks. Rinse Cam-Checks and O-rings thoroughly.
8 Inspect seats, clapper sealing surfaces, Cam Arms, and O-rings for damage. If damaged, install a new Cam- check assembly and/or O-ring. WARNING!While the spring mechanism is removed for check servicing, never pull the screwdriver out or off the support notches on the arbors. Doing so may cause bodily injuries. Keep fingers out of seat and clapper area. 4. Gently close the Cam- check using the Cam Arm opening stud. Before reinstallation of Cam-Checks thoroughly clean O-ring groove and lubricate O-ring with FDA approved lubricant. Insert and thread #2 Cam- check first and then #1 Cam- check .
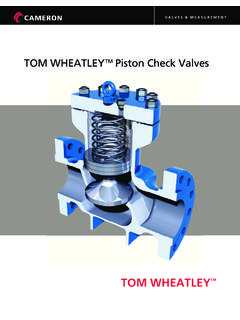
9 #2 Cam- check should be tightened by inserting a long screwdriver between lugs to tighten firmly (see Figure 1). Do not over tighten. Tighten #1 Cam- check firmly by hand only. Replace cover plate, clean groove coupler gas-ket and groove, replace groove coupler. Close ball InstructionsOutdoor InstallationIndoor Installation6" & 8" (150-200mm) 1st check DC 6" & 8" (150-200mm) 2nd check DCValve Outlet Flange Threaded Stud on FlangeCam Arm Open PinFigure 13 Maintenance Instructions ArmCam ArmRollerRollerHole 6" & 8" (150-200mm) OnlyClapperClapperO-ring Seal & GrooveSeatO-ring Seal & GrooveSpringCam ArmRollerHole 6" & 8" (150-200mm) OnlyClapperO-ring Seal & GrooveSeatO-ring Seal & GrooveLug#1 Cam- check 21/2" 6" (65-150mm)
10 #2 Cam- check DC & RPCleaning PositionFigure 25924138766 Figure 3 Figure 4 Item # Description 1. #1 Cam- check 2. #2 Cam- check 3. #1 Cam- check O-ring 4. #2 Cam- check O-ring 5. Cover Plate 6. Ball Valve 7. Groove Coupler 8. Groove Coupler Gasket 9. Ball Valve (Cover) For repair kits and parts, refer to our Backflow Pre-vention Products Repair Kits & Service Parts price list PL-A-RP-BPD found on check Valve No. 1 Step 1: Ensure shutoff #1 is open, shutoff #2 is 2: Connect high side hose to test cock #3, low side to test cock #2 and open both test cock #2 and test cock #3.